(For more resources on Drupal, see here.)
Setting up the e-commerce system
Ubercart has existed since Drupal 6 so those users who have used Ubercart with Drupal 6 will have some experience setting up and configuring this module for Drupal 7. In this section we'll install and set up the basic Ubercart configuration.
Goal
Set up the system that will allow visitors to purchase take-out from the website.
Additional modules needed
Ubercart, Token, Views, CTools, Entity, Token, Rules (http://drupal.org/project/ubercart).
Configuring Ubercart
In order to utilize an e-commerce solution within a website, you must either build a solution from scratch or use a ready-made solution. Because building a professional e-commerce solution from scratch would take an entire book and weeks or months to build, we are fortunate to have Ubercart, which is a professional quality e-commerce solution tailor-made for Drupal. To begin using Ubercart:
- Download and install the module from its project page. The current stable release for Drupal 7 is 7.x-3.0-rc3.
- To use Ubercart, you will also need to install some dependency modules in order to get the best functionality and performance from Ubercart. These dependencies are listed on the Ubercart Website: Token, Views, Rules, CTools, Entity API, Entity Token and Token. Go ahead and install and enable the dependency modules and Ubercart.
Once installed, we will begin by enabling the following Ubercart modules:
- All of the modules in the Ubercart—Core section including Cart, Order, Product, and Store.
- Then enable the following Core (Optional) modules: Catalog, File downloads, Payment, Product Attributes, Reports, Roles, and Taxes.
- Then in the Extra section enable the following: Product Kit and Stock.
- For our Payment method and module enable the Credit card, PayPal, and Test Gateway modules. We will not be shipping any items so we do not need to enable shipping modules at this point. There are a variety of other modules that can be optionally enabled. We will explore some of these in future topics.
If you are planning to use the PayPal Express Checkout payment method with Ubercart you should make sure you have enabled the CURL PHP extension for use in your PHP configuration. To do this you can ask your hosting company to enable the CURL extension in your php.ini file. Otherwise if you have access to the php.ini file you can open the file and uncomment the CURL extension to enable it. Then save your php.ini file and restart the Web server. When you check your PHP info via the Drupal status report you should see the following section showing you that the PHP CURL extension is enabled.
Now, you should see the following Ubercart modules that you have enabled on your main modules configuration page:
Ubercart installs a new menu item called Store next to the menu item called Dashboard in the Administer menu bar, which includes the options shown in the following screenshot:
The first thing you'll notice is a warning message telling you that one or more problems exist with your Drupal install. Click on the Status report link. On the Status report page you'll see a warning telling you to enable credit card encryption. In order to use Ubercart for payment processing for your online store transactions you first need to set up an encryption location for your credit card data.
To do this click on the credit card security settings link. That will load the Credit card settings screen. Under Basic Settings, for now let's enable the Test Gateway. Later we'll discuss integrating PayPal but for testing purposes we can use the Test Gateway configuration.
Unlock access to the largest independent learning library in Tech for FREE!
Get unlimited access to 7500+ expert-authored eBooks and video courses covering every tech area you can think of.
Renews at $15.99/month. Cancel anytime
Click on the Security Settings tab. Here we need to set up our card number encryption settings. We can first create a folder outside of our document root (outside of our Drupal directory) but on our web server to hold our encrypted data. We'll create a folder at the root level of our MAMP install called "keys". Go ahead and do this then type in /Applications/MAMP/keys in your Card number encryption key file path field. Also make sure the folder allows for write permissions.
Now click on the PayPal Website Payments Pro tab and disable the gateway for use. Click on the Test Gateway tab and leave this enabled for use. Click on Credit card settings and leave the defaults selected. Under Customer messages you can specify any custom messages you want to show the user if their credit card fails during the transaction process. Click Save configuration. When you save your configuration you should get the following success message:
Credit card encryption key file generated. Card data will now be encrypted. The configuration options have been saved.
Now, we have successfully set up our payment processing with the Test gateway enabled. We're ready to start using Ubercart.
To begin using Ubercart, we will need to:
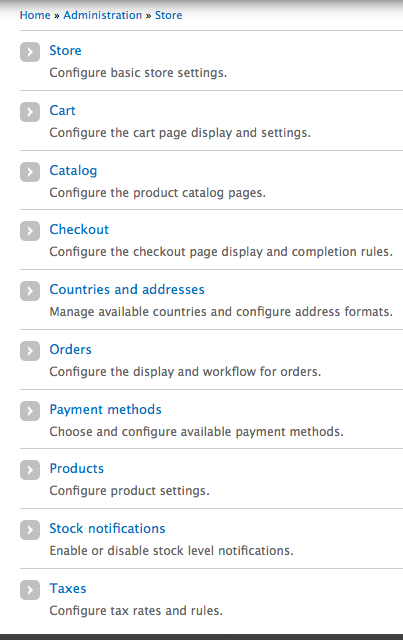
- Edit the Configuration settings, which are shown in the following screenshot:
- Clicking on the Store link allows you to configure several options that control how information on the site is displayed, as well as specify some basic contact information for the site
- To edit the settings for a section, click on the tab for that section. On the Store settings page, we simply need to update the Store name, Store owner, e-mail address, phone and fax numbers for the store. You can also enter store address information.
- If your store is not located in the United States, you will also need to modify the Currency Format settings. If you are shipping items you may need to tweak the Weight and Length formats. You can also specify a store help page where you'll provide help information. You can simply create a new page in Drupal and alias it, and then type the alias in here.
- Once you finish entering your Store settings click the Save configuration button
Configuring Ubercart user permissions
You should also create a role for store administration, by clicking on User management and then Roles. We will call our role Store Administrator. Click Add role to finish building the role. After the role has been added, click the edit permissions link for the role to define the permissions for the new role. Ubercart includes several sections of permissions including:
- Catalog
- Credit Card
- File Downloads
- Store
- Payment
- Product
- Product attributes
- Product kit
- Order
- Taxes
Since this is an administrative role you may just want to give this staff person all permissions for an admin level role on the site. Go ahead and check off the permissions you need to grant and then save your role's permissions.If your site has employees, you may also want to create a separate role (or several roles) that do not give full control over the store for your employees. For example, you may not want an employee to be able to create or delete products, but you would like them to be able to take new orders.
Ubercart provided blocks
The Ubercart module ships with a core block that you can enable to make it easier for visitors to your site to see what they have ordered and to check out. Go to your blocks administrative page and you can enable the Shopping cart block to show in one of your block regions. I'll put it in the Sidebar second region. These are the basic configuration options which need to be done after you enable the block. Click on the configure link and then you can title your block, select whether to display the shopping cart icon, make the cart block collapsible, add cart help text ,and more. I'll leave the defaults selected for now. You should see a block admin screen similar to the following:

 United States
 Great Britain
 India
India
 Germany
 France
 Canada
 Russia
 Spain
Spain
 Brazil
 Australia
 South Africa
 Thailand
 Ukraine
 Switzerland
 Slovakia
 Luxembourg
 Hungary
 Romania
 Denmark
 Ireland
 Estonia
 Belgium
 Italy
Italy
 Finland
 Cyprus
 Lithuania
 Latvia
 Malta
Malta
 Netherlands
 Portugal
 Slovenia
 Sweden
 Argentina
 Colombia
 Ecuador
 Indonesia
 Mexico
 New Zealand
 Norway
 South Korea
 Taiwan
 Turkey
 Czechia
 Austria
 Greece
 Isle of Man
 Bulgaria
 Japan
Japan
 Philippines
 Poland
 Singapore
 Egypt
Egypt
 Chile
Chile
 Malaysia