Evaluate your Cloud requirements and successfully migrate your .NET Enterprise Application to the Amazon Web Services Platform
Creating a S3 bucket with logging
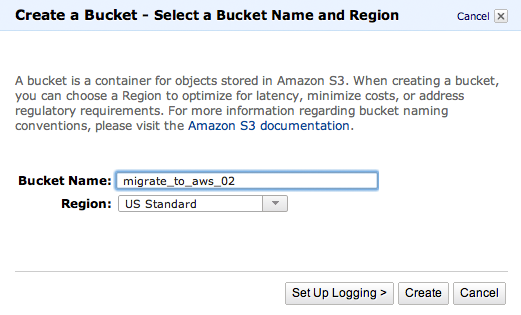
Logging provides detailed information on who accessed what data in your bucket and when. However, to turn on logging for a bucket, an existing bucket must have already been created to hold the logging information, as this is where AWS stores it. To create a bucket with logging, click on the Create Bucket button in the Buckets sidebar:

This time, however, click on the Set Up Logging button . You will be presented with a dialog that allows you to choose the location for the logging information, as well as the prefix for your logging data:

You will note that we have pointed the logging information back at the original bucket migrate_to_aws_01
Logging information will not appear immediately; however, a file will be created every few minutes depending on activity. The following screenshot shows an example of the files that are created:

Before jumping right into the command-line tools, it should be noted that the AWS Console includes a Java-based multi-file upload utility that allows a maximum size of 300 MB for each file
Using the S3 command-line tools
Unfortunately, Amazon does not provide official command-line tools for S3 similar to the tools they have provided for EC2. However, there is an excellent simple free utility provided at o http://s3.codeplex.com, called S3.exe, that requires no installation and runs without the requirement of third-party packages.
To install the program, just download it from the website and copy it to your C:AWS folder.
Setting up your credentials with S3.exe
Before we can run S3.exe, we first need to set up our credentials. To do that you will need to get your S3 Access Key and your S3 Secret Access Key from the credentials page of your AWS account. Browse to the following location in your browser, https://aws-portal.amazon.com/gp/aws/developer/account/ index.html?ie=UTF8&action=access-key and scroll down to the Access Credentials section:

The Access Key is displayed in this screen; however, to get your Secret Access Key you will need to click on the Show link under the Secret Access Key heading.
Run the following command to set up S3.exe:
C:AWS>s3 auth AKIAIIJXIP5XC6NW3KTQ
9UpktBlqDroY5C4Q7OnlF1pNXtK332TslYFsWy9R

To check that the tool has been installed correctly, run the s3 list command:
C:AWS>s3 list
You should get the following result:

Copying files to S3 using S3.exe
First, create a file called myfile.txt in the C:AWS directory.
To copy this file to an S3 bucket that you own, use the following command:
c:AWS>s3 put migrate_to_aws_02 myfile.txt

This command copies the file to the migrate_to_aws_02 bucket with the default permissions of full control for the owner.
You will need to refresh the AWS Console to see the file listed.
(Move the mouse over the image to enlarge it.)

Uploading larger files to AWS can be problematic, as any network connectivity issues during the upload will terminate the upload. To upload larger files, use the following syntax:
C:AWS>s3 put migrate_to_aws_02/mybigfile/ mybigfile.txt /big

This breaks the upload into small chunks, which can be reversed when getting the file back again.
If you run the same command again, you will note that no chunks are uploaded. This is because S3.exe does not upload a chunk again if the checksum matches.
Retrieving files from S3 using S3.exe
Retrieving files from S3 is the reverse of copying files up to S3.
To get a single file back use:
C:AWS>s3 get migrate_to_aws_02/myfile.txt
To get our big file back again use:
C:AWS>s3 get migrate_to_aws_02/mybigfile/mybigfile.txt /big

The S3.exe command automatically recombines our large file chunks back into a single file.
Importing and exporting large amounts of data in and out of S3
Because S3 lives in the cloud within Amazon's data centers, it may be costly and time consuming to transfer large amounts of data to and from Amazon's data center to your own data center. An example of a large file transfer may be a large database backup file that you may wish to migrate from your own data center to AWS.
Luckily for us, Amazon provides the AWS Import/Export Service for the US Standard and EU (Ireland) regions. However, this service is not supported for the other two regions at this time.
The AWS Import service allows you to place your data on a portable hard drive and physically mail your hard disk to Amazon for uploading/downloading of your data from within Amazon's data center.
Amazon provides the following recommendations for when to use this service.
- If your connection is 1.55Mbps and your data is 100GB or more
- If your connection is 10Mbps and your data is 600GB or more
- If your connection is 44.736Mbps and your data is 2TB or more
- If your connection is 100Mbps and your data is 5TB or more
Make sure if you choose either the US West (California) or Asia Pacific (Singapore) regions that you do not need access to the AWS Import/ Export service, as it is not available in these regions.
Setting up the Import/Export service
To begin using this service once again, you will need to sign up for this service separately from your other services. Click on the Sign Up for AWS Import/Export button located on the product page http://aws.amazon.com/importexport, confirm the pricing and click on the Complete Sign Up button .
Once again, you will need to wait for the service to become active:

Current costs are:
Cost Type
US East
Unlock access to the largest independent learning library in Tech for FREE!
Get unlimited access to 7500+ expert-authored eBooks and video courses covering every tech area you can think of.
Renews at $15.99/month. Cancel anytime
US West
EU
APAC
Device handling
$80.00
$80.00
$80.00
$99.00
Data loading time
$2.49 per data loading hour
$2.49 per data loading hour
$2.49 per data loading hour
$2.99 per data loading hour
Using the Import/Export service
To use the Import/Export service, first make sure that your external disk device conforms to Amazon's specifications.
Confirming your device specifications
The details are specified at http://aws.amazon.com/importexport/#supported_ devices, but essentially as long as it is a standard external USB 2.0 hard drive or a rack mountable device less than 8Us supporting eSATA then you will have no problems.
Remember to supply a US power plug adapter if you are not located in the United States.
Downloading and installing the command-line service tool
Once you have confirmed that your device meets Amazon's specifications, download the command-line tools for the Import/Export service. At this time, it is not possible to use this service from the AWS Console. The tools are located at http:// awsimportexport.s3.amazonaws.com/importexport-webservice-tool.zip.
Copy the .zip file to the C:AWS directory and unzip them, they will most likely end up in the following directory, C:AWSimportexport-webservice-tool.
Creating a job
- To create a job, change directory to the C:AWSimportexport-webservice- tool directory, open notepad, and paste the following text into a new file:
manifestVersion: 2.0
bucket: migrate_to_aws_01
accessKeyId: AKIAIIJXIP5XC6NW3KTQ
deviceId: 12345678
eraseDevice: no
returnAddress:
name: Rob Linton
street1: Level 1, Migrate St
city: Amazon City
stateOrProvince: Amazon
postalCode: 1000
phoneNumber: 12345678
country: Amazonia
customs:
dataDescription: Test Data
encryptedData: yes
encryptionClassification: 5D992
exportCertifierName: Rob Linton
requiresExportLicense: no
deviceValue: 250.00
deviceCountryOfOrigin: China
deviceType: externalStorageDevice
- Edit the text to reflect your own postal address, accessKeyId, bucket name, and save the file as MyManifest.txt. For more information on the customs configuration items refer to http://docs.amazonwebservices. com/AWSImportExport/latest/DG/index.html?ManifestFileRef_ international.html.
If you are located outside of the United States a customs section in the manifest is a requirement.
- In the same folder open the AWSCredentials.properties file in notepad, and copy and paste in both your AWS Access Key ID and your AWS Secret Access Key. The file should look like this:
# Fill in your AWS Access Key ID and Secret Access Key
# http://aws.amazon.com/security-credentials
accessKeyId:AKIAIIJXIP5XC6NW3KTQ
secretKey:9UpktBlqDroY5C4Q7OnlF1pNXtK332TslYFsWy9R
- Now that you have created the required files, run the following command in the same directory.
C:AWSimportexport-webservice-tool>java -jar
lib/AWSImportExportWebServiceTool-1.0.jar CreateJob Import
MyManifest.txt .
(Move the mouse over the image to enlarge it.)

Your job will be created along with a .SIGNATURE file in the same directory.
Copying the data to your disk device
Now you are ready to copy your data to your external disk device. However, before you start, it is mandatory to copy the .SIGNATURE file created in the previous step into the root directory of your disk device.
Sending your disk device
Once your data and the .SIGNATURE file have been copied to your disk device, print out the packing slip and fill out the details. The JOBID can be obtained in the output from your earlier create job request, in our example the JOBID is XHNHC. The DEVICE IDENTIFIER is the device serial number, which was entered into the manifest file, in our example it was 12345678.

The packing slip must be enclosed in the package used to send your disk device.
Each package can have only one storage device and one packing slip, multiple storage devices must be sent separately.
Address the package with the address output in the create job request:
AWS Import/Export
JOBID TTVRP
2646 Rainier Ave South Suite 1060
Seattle, WA 98144
Please note that this address may change depending on what region you are sending your data to. The correct address will always be returned from the Create Job command in the AWS Import/Export Tool.
Managing your Import/Export jobs
Once your job has been submitted, the only way to get the current status of your job or to modify your job is to run the AWS Import/Export command-line tool. Here is an example of how to list your jobs and how to cancel a job.
To get a list of your current jobs, you can run the following command:
C:AWSimportexport-webservice-tool>java -jar
lib/AWSImportExportWebServiceTool-1.0.jar ListJobs
To cancel a job, you can run the following command:
C:AWSimportexport-webservice-tool>java -jar
lib/AWSImportExportWebServiceTool-1.0.jar CancelJob XHNHC
(Move the mouse over the image to enlarge it.)

 United States
 Great Britain
 India
India
 Germany
 France
 Canada
 Russia
 Spain
Spain
 Brazil
 Australia
 South Africa
 Thailand
 Ukraine
 Switzerland
 Slovakia
 Luxembourg
 Hungary
 Romania
 Denmark
 Ireland
 Estonia
 Belgium
 Italy
Italy
 Finland
 Cyprus
 Lithuania
 Latvia
 Malta
Malta
 Netherlands
 Portugal
 Slovenia
 Sweden
 Argentina
 Colombia
 Ecuador
 Indonesia
 Mexico
 New Zealand
 Norway
 South Korea
 Taiwan
 Turkey
 Czechia
 Austria
 Greece
 Isle of Man
 Bulgaria
 Japan
Japan
 Philippines
 Poland
 Singapore
 Egypt
Egypt
 Chile
Chile
 Malaysia


