In this article by Gábor Farkas, the author of the book Mastering OpenLayers 3, you will learn about OpenLayers 3 which is the most robust open source web mapping library out there, highly capable of handling the client side of a WebGIS environment. Whether you know how to use OpenLayers 3 or you are new to it, this article will help you to create a simple map and either refresh some concepts or get introduced to them. As this is a mastering book, we will mainly discuss the library's structure and capabilities in greater depth. In this article we will create a simple map with the library, and revise the basic terms related to it.
In this article we will cover the following topics:
- Structure of OpenLayers 3
- Architectural considerations
- Creating a simple map
- Using the API documentation effectively
- Debugging the code
(For more resources related to this topic, see here.)
Before getting started
Take a look at the code provided with the book. You should see a js folder in which the required libraries are stored. For this article, ol.js, and ol.css in the ol3-3.11.0 folder will be sufficient. The code is also available on GitHub. You can download a copy from the following URL: https://github.com/GaborFarkas/mastering_openlayers3/releases.

You can download the latest release of OpenLayers 3 from its GitHub repository at https://github.com/openlayers/ol3/releases. For now, grabbing the distribution version (v3.11.0-dist.zip) should be enough.
Creating a working environment
There is a security restriction in front end development, called CORS (Cross Origin Resource Sharing). By default, this restriction prevents the application from grabbing content from a different domain. On top of that, some browsers disallow reaching content from the hard drive when a web page is opened from the file system. To prevent this behavior, please make sure you possess one of the following:
- A running web server (highly recommended)
- Firefox web browser with security.fileuri.strict_origin_policy set to false (you can reach flags in Firefox by opening about:config from the address bar)
- Google Chrome web browser started with the --disable-web-security parameter (make sure you have closed every other instance of Chrome before)
- Safari web browser with Disable Local File Restrictions (in the Develop menu, which can be enabled in the Advanced tab of Preferences)
You can easily create a web server if you have Python 2 with SimpleHTTPServer, or if you have Python 3 with http.server. For basic tutorials, you can consult the appropriate Python documentation pages.
Structure of OpenLayers 3
OpenLayers 3 is a well structured, modular, and complex library, where flexibility, and consistency take a higher priority than performance. However, this does not mean OpenLayers 3 is slow. On the contrary, the library highly outperforms its predecessor; therefore its comfortable and logical design does not really adversely affect its performance. The relationship of some of the most essential parts of the library can be described with a radial UML (Universal Modeling Language) diagram, such as the following :

Reading an UML scheme can seem difficult, and can be difficult if it is a proper one. However, this simplified scheme is quite easy to understand. With regard to the arrows, a single 1 represents a one-to-one relation, while the 0..n and 1 symbols denote a one-to-many relationship.
You will probably never get into direct contact with the two superclasses at the top of the OpenLayers 3 hierarchy: ol.Observable, and ol.Object. However, most of the classes you actively use are children of these classes. You can always count with their methods, when you design a web mapping or WebGIS application.
In the diagram we can see, that the parent of the most essential objects is the ol.Observable class. This superclass ensures all of its children have consistent listener methods. For example, every descendant of this superclass bears the on, once, and un functions, making registering event listeners to them as easy as possible.
The next superclass, ol.Object, extends its parent with methods capable of easy property management. Every inner property managed by its methods (get, set, and unset) are observable. There are also convenience methods for bulk setting and getting properties, called getProperties, and setProperties. Most of the other frequently used classes are direct, or indirect, descendants of this superclass.
Building the layout
Now, that we covered some of the most essential structural aspects of the library, let's consider the architecture of an application deployed in a production environment. Take another look at the code. There is a chapters folder, in which you can access the examples within the appropriate subfolder. If you open ch01, you can see three file types in it. As you have noticed, the different parts of the web page (HTML, CSS, and JavaScript) are separated. There is one main reason behind this: the code remains as clean as possible.
With a clean and rational design, you will always know where to look when you would like to make a modification. Moreover, if you're working for a company there is a good chance someone else will also work with your code. This kind of design will make sure your colleague can easily handle your code. On top of that, if you have to develop a wrapper API around OpenLayers 3, this is the only way your code can be integrated into future projects.
Creating the appeal
As the different parts of the application are separated, we will create a minimalistic HTML document. It will expand with time, as the application becomes more complicated and needs more container elements. For now, let's write a simple HTML document:
<!DOCTYPE html>
<html lang="en">
    <head>
        <title>chapter 1 - Creating a simple map</title>
        <link href="../../js/ol3-3.11.0/ol.css" rel="stylesheet">
        <link href="ch01.css" rel="stylesheet">
        <script type="text/javascript" src="../../js/ol3-
3.11.0/ol.js"></script>
        <script type="text/javascript"
src="ch01_simple_map.js"></script>
    </head>
    <body>
        <div id="map" class="map"></div>
    </body>
</html>
In this simple document, we defined the connection points between the external resources, and our web page. In the body, we created a simple div element with the required properties. We don't really need anything else; the magic will happen entirely in our code. Now we can go on with our CSS file and define one simple class, called map:
.map {
    width: 100%;
    height: 100%;
}
Save this simple rule to a file named ch01.css, in the same folder you just saved the HTML file.
If you are using a different file layout, don't forget to change the relative paths in the link, and script tags appropriately.
Writing the code
Now that we have a nice container for our map, let's concentrate on the code. In this book, most of the action will take place in the code; therefore this will be the most important part. First, we write the main function for our code.
function init() {
    document.removeEventListener('DOMContentLoaded', init);
}
document.addEventListener('DOMContentLoaded', init);
By using an event listener, we can make sure the code only runs when the structure of the web page has been initialized. This design enables us to use relative values for sizing, which is important for making adaptable applications. Also, we make sure the map variable is wrapped into a function (therefore we do not expose it) and seal a potential security breach. In the init function, we detach the event listener from the document, because it will not be needed once the DOM structure has been created.
The DOMContentLoaded event waits for the DOM structure to build up. It does not wait for images, frames, and dynamically added content; therefore the application will load faster. Only IE 8, and prior versions, do not support this event type, but if you have to fall back you can always use the window object's load event. To check a feature's support in major browsers, you can consult the following site: http://www.caniuse.com/.
Next, we extend the init function, by creating a vector layer and assigning it to a variable. Note that, in OpenLayers 3.5.0, creating vector layers has been simplified. Now, a vector layer has only a single source class, and the parser can be defined as a format in the source.
var vectorLayer = new ol.layer.Vector({
    source: new ol.source.Vector({
        format: new ol.format.GeoJSON({
            defaultDataProjection: 'EPSG:4326'
        }),
        url: '../../res/world_capitals.geojson',
        attributions: [
            new ol.Attribution({
                html: 'World Capitals © Natural Earth'
            })
        ]
    })
});
We are using a GeoJSON data source with a WGS84 projection. As the map will use a Web Mercator projection, we provide a defaultDataProjection value to the parser, so the data will be transformed automatically into the view's projection. We also give attribution to the creators of the vector dataset.
You can only give attribution with an array of ol.Attribution instances passed to the layer's source. Remember: giving attribution is not a matter of choice. Always give proper attribution to every piece of data used. This is the only way to avoid copyright infringement.
Finally, construct the map object, with some extra controls and one extra interaction.
Unlock access to the largest independent learning library in Tech for FREE!
Get unlimited access to 7500+ expert-authored eBooks and video courses covering every tech area you can think of.
Renews at €14.99/month. Cancel anytime
var map = new ol.Map({
    target: 'map',
    layers: [
        new ol.layer.Tile({
            source: new ol.source.OSM()
        }),
        vectorLayer
    ],
    controls: [
        //Define the default controls
        new ol.control.Zoom(),
        new ol.control.Rotate(),
        new ol.control.Attribution(),
        //Define some new controls
        new ol.control.ZoomSlider(),
        new ol.control.MousePosition(),
        new ol.control.ScaleLine(),
        new ol.control.OverviewMap()
    ],
    interactions: ol.interaction.defaults().extend([
        new ol.interaction.Select({
            layers: [vectorLayer]
        })
    ]),
    view: new ol.View({
        center: [0, 0],
        zoom: 2
    })
});
In this example, we provide two layers: a simple OpenStreetMap tile layer and the custom vector layer saved into a separate variable. For the controls, we define the default ones, then provide a zoom slider, a scale bar, a mouse position notifier, and an overview map. There are too many default interactions, therefore we extend the default set of interactions with ol.interaction.Select. This is the point where saving the vector layer into a variable becomes necessary. The view object is a simple view that defaults to projection EPSG:3857 (Web Mercator).
OpenLayers 3 also has a default set of controls that can be accessed similarly to the interactions, under ol.control.defaults(). Default controls and interactions are instances of ol.Collection, therefore both of them can be extended and modified like any other collection object. Note that the extend method requires an array of features.
Save the code to a file named ch01_simple_map.js in the same folder as your HTML file. If you open the HTML file, you should see the following map:

You have different, or no results? Do not worry, not even a bit! Open up your browser's developer console (F12 in modern ones, or CTRL + J if F12 does not work), and resolve the error(s) noted there. If there is no result, double-check the HTML and CSS files; if you have a different result, check the code or the CORS requirements based on the error message. If you use Internet Explorer, make sure you have version 9, or better.
Using the API documentation
The API documentation for OpenLayers 3.11.0, the version we are using, can be found at http://www.openlayers.org/en/v3.11.0/apidoc/. The API docs, like the library itself, are versioned, thus you can browse the appropriate documentation for your OpenLayers 3 version by changing v3.11.0 in the URL to the version you are currently using.
The development version of the API is also documented; you can always reach it at http://www.openlayers.org/en/master/apidoc/. Be careful when you use it, though. It contains all of the newly implemented methods, which probably won't work with the latest stable version.
Check the API documentation by typing one of the preceding links in your browser. You should see the home page with the most frequently used classes. There is also a handy search box, with all of the classes listed on the left side. We have talked about default interactions, and their lengthy nature before. On the home page you can see a link to the default interactions. If you click on it, you will be directed to the following page:
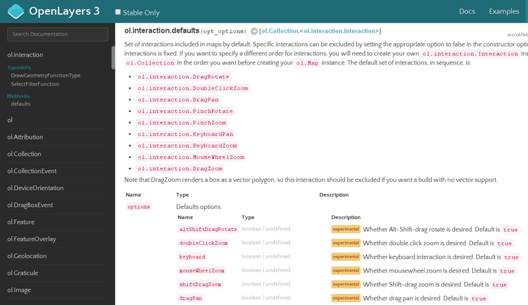
Now you can also see that nine interactions are added to the map by default. It would be quite verbose to add them one by one just to keep them when we define only one extra interaction, wouldn't it?
You can see some features marked as experimental while you browse the API documentation with the Stable Only checkbox unchecked. Do not consider those features to be unreliable. They are stable, but experimental, and therefore they can be modified or removed in future versions. If the developer team considers a feature is useful and does not need further optimization or refactoring, it will be marked as stable.
Understanding type definitions
For every constructor and function in the API, the input and expected output types are well documented. To see a good example, let's search for a function with inputs and outputs as well. If you search for ol.proj.fromLonLat, you will see the following function:

The function takes two arguments as input, one named coordinate and one named projection; projection is an optional one. coordinate is an ol.Coordinate type (an array with two numbers), while projection is an ol.proj.ProjectionLike type (a string representing the projection). The returned value, as we can see next to the white arrow, is also an ol.Coordinate type, with the transformed values.
A good developer always keeps track of future changes in the library. This is especially important with OpenLayers 3, as it lacks backward-compatibility, when a major change occurs. You can see all of the major changes in the library in the OpenLayers 3 GitHub repository: https://github.com/openlayers/ol3/blob/master/changelog/upgrade-notes.md.
Debugging the code
As you will have noticed, there was a third file in the OpenLayers 3 folder discussed at the beginning of the article (js/ol3-3.11.0). This file, named ol-debug.js, is the uncompressed source file, in which the library is concatenated with all of its dependencies. We will use this file for two purpose in this book. Now, we will use it for debugging. First, open up ch01_simple_map.js. Next, extend the init function with an obvious mistake:
var geometry = new ol.geom.Point([0, 0]);
vectorLayer.getSource().addFeature(geometry);
Don't worry if you can't spot the error immediately. That's what is debugging for. Save this extended JavaScript file with the name ch01_error.js. Next, replace the old script with the new one in the HTML file, like this:
<script type="text/javascript" src="ch01_error.js"></script>
If you open the updated HTML, and open your browser's developer console, you will see the following error message:

Now that we have an error, let's check it in the source file by clicking on the error link on the right side of the error message:

Quite meaningless, isn't it? The compiled library is created with Google's Closure Library, which obfuscates everything by default in order to compress the code. We have to tell it which precise part of the code should be exported. We will learn how to do that in the last article. For now, let's use the debug file. Change the ol.js in the HTML to ol-debug.js, load up the map, and check for the error again.

Finally, we can see, in a well-documented form, the part that caused the error. This is a validating method, which makes sure the added feature is compatible with the library. It requires an ol.Feature as an input, which is how we caught our error. We passed a simple geometry to the function, instead of wrapping it in an ol.Feature first.
Summary
In this article, you were introduced to the basics of OpenLayers 3 with a more advanced approach. We also discussed some architectural considerations, and some of the structural specialties of the library. Hopefully, along with the general revision, we acquired some insight in using the API documentation and debugging practices. Congratulations! You are now on your way to mastering OpenLayers 3.
Resources for Article:
Further resources on this subject:

 United States
 Great Britain
 India
India
 Germany
 France
 Canada
 Russia
 Spain
Spain
 Brazil
 Australia
 South Africa
 Thailand
 Ukraine
 Switzerland
 Slovakia
 Luxembourg
 Hungary
 Romania
 Denmark
 Ireland
 Estonia
 Belgium
 Italy
Italy
 Finland
 Cyprus
 Lithuania
 Latvia
 Malta
Malta
 Netherlands
 Portugal
 Slovenia
 Sweden
 Argentina
 Colombia
 Ecuador
 Indonesia
 Mexico
 New Zealand
 Norway
 South Korea
 Taiwan
 Turkey
 Czechia
 Austria
 Greece
 Isle of Man
 Bulgaria
 Japan
Japan
 Philippines
 Poland
 Singapore
 Egypt
Egypt
 Chile
Chile
 Malaysia