Setting up a static front page
By default, the main page of your WordPress site shows a running list of your latest posts. While this is perfectly acceptable for a personal blog, an e-commerce site typically takes a more static approach so as not to confuse any first-time visitors.
Fortunately, configuring a static front page is simple. We first, need to create a new page that will become the default front page. In your WordPress Dashboard, navigate to Pages and select Add New, as shown in the following screenshot:

Add any variety of information that you would like first-time visitors to see, such as a logo, a welcome message, a breakdown of product categories, or whatever you would like.
When you've finished, go ahead and publish your page. The page we created for our music shop is titled Welcome. Now let's set it as the default front page. Back in the WordPress Dashboard, browse to Settings and click on the Reading option, as shown in the following screenshot:

Underneath Reading Settings, select the option to display a static front page. Be sure to choose the title of the desired static page from the drop-down list. Note that we chose Welcome, the same page that we just added. The following screenshot shows the Reading Settings options:

Another good option for a static front page is to directly choose the Products Page from the drop-down list. The Products Page is automatically created when you activate the e-Commerce plugin for the first time, and is essentially the gateway to your e-commerce shop. If you want customers to first see your products when they visit your site, choose this option.
Using widgets
Also known as "sidebar accessories", widgets are one of the slickest and easiest ways to vary the content of your WordPress sidebars. With widgets, you can elegantly add text, images, gadgets, HTML, or any other design elements to one or more sidebars on your site. A growing number of plugins for WordPress also come with additional widget features, including the WP e-Commerce plugin.
To get started with widgets, navigate to Appearance in your Dashboard and click on Widgets, as shown in the following screenshot:

Feast your eyes on the number of Available Widgets. The following screenshot shows the different widgets available:
Unlock access to the largest independent learning library in Tech for FREE!
Get unlimited access to 7500+ expert-authored eBooks and video courses covering every tech area you can think of.
Renews at $15.99/month. Cancel anytime

Adding a widget to your desired sidebar is a simple, click-and-drag affair. You can add as many widgets as you like to the sidebar, and re-arranging them is as easy as dragging and dropping them.
Here are the three widgets that we added to our music shop: a Search box, a Text Widget, and the Shopping Cart. The Shopping Cart widget is shown in the following screenshot:

Creating text widgets
For an e-commerce site, a text widget is like a Swiss Army Knife since it's one simple tool that can serve a variety of purposes. Here are a few tasks that text widgets can accomplish:
- Create a "Featured Product" widget and rotate the contents every few days or weeks
- Add a custom image that links to a specific product category, such as "Albums" or "Singles"
- Create an HTML drop-down list with links to all product categories
- Add notices about sales or special discounts
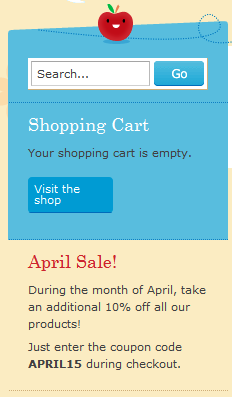
Here's an example: let's say we want to let our customers know about a special coupon code for our shop that is valid during the month of April. A text widget is the perfect way to let all visitors know about the sale.
Drag-and-drop an empty text widget and place it in the sidebar. It should expand automatically, and now we can type all of the necessary text and HTML.
In the following screenshot, we've added some text and a little HTML. The Title of the text widget is now April Sale! The <p> tags simply format the text into paragraphs, and the <strong> tag makes the coupon code show up in bold text. The usage of these tags is shown in the following screenshot:

Be sure to save all of the changes once you have created the text widget. If we now take a look at the front page of our music shop, we can see the widget layout and the sale information in the WordPress sidebar, as shown in the following screenshot:

 United States
 Great Britain
 India
India
 Germany
 France
 Canada
 Russia
 Spain
Spain
 Brazil
 Australia
 South Africa
 Thailand
 Ukraine
 Switzerland
 Slovakia
 Luxembourg
 Hungary
 Romania
 Denmark
 Ireland
 Estonia
 Belgium
 Italy
Italy
 Finland
 Cyprus
 Lithuania
 Latvia
 Malta
Malta
 Netherlands
 Portugal
 Slovenia
 Sweden
 Argentina
 Colombia
 Ecuador
 Indonesia
 Mexico
 New Zealand
 Norway
 South Korea
 Taiwan
 Turkey
 Czechia
 Austria
 Greece
 Isle of Man
 Bulgaria
 Japan
Japan
 Philippines
 Poland
 Singapore
 Egypt
Egypt
 Chile
Chile
 Malaysia


