In this article by Sebastian Raschka, the author of Python Machine Learning, we will take a look at the concept of multilayer artificial neural networks, which was inspired by hypotheses and models of how the human brain works to solve complex problem tasks.
(For more resources related to this topic, see here.)
Although artificial neural networks gained a lot of popularity in the recent years, early studies of neural networks goes back to the 1940s, when Warren McCulloch and Walter Pitt first described the concept of how neurons may work. However, the decades that followed saw the first implementation of the McCulloch-Pitt neuron model, Rosenblatt's perceptron in the 1950s. Many researchers and machine learning practitioners slowly began to lose interest in neural networks, since no one had a good solution for the training of a neural network with multiple layers. Eventually, interest in neural networks was rekindled in 1986 when D.E. Rumelhart, G.E. Hinton, and R.J. Williams were involved in the discovery and popularization of the backpropagation algorithm to train neural networks more efficiently (Rumelhart, David E.; Hinton, Geoffrey E.; Williams, Ronald J. (1986). Learning representations by back-propagating errors. Nature 323 (6088): 533–536).
During the last decade, many more major breakthroughs have been made, known as deep learning algorithms. These can be used to create so-called feature detectors from unlabeled data to pre-train deep neural networks—neural networks that are composed of many layers. Neural networks are a hot topic not only in academic research but also in big technology companies such as Facebook, Microsoft, and Google. They invest heavily in artificial neural networks and deep learning research. Today, complex neural networks powered by deep learning algorithms are considered state of the art when it comes to solving complex problems, such as image and voice recognition.
Introducing the multilayer neural network architecture
In this section, we will connect multiple single neurons to a multilayer feed-forward neural network; this type of network is also called multilayer perceptron (MLP). The following figure illustrates the concept of an MLP consisting of three layers: one input layer, one hidden layer, and one output layer. The units in the hidden layer are fully connected to the input layer, and the output layer is fully connected to the hidden layer, respectively.

As shown in the preceding diagram, we denote the ith activation unit in the jth layer as  , and the activation units
  and
and  are the bias units, which we set equal to 1. The activation of the units in the input layer is just its input plus the bias unit:

Each unit in layer j is connected to all units in layer j + 1 via a weight coefficient; for example, the connection between unit a in layer j and unit b in layer j + 1 would be written as  . Note that the superscript i in
  stands for the ith sample, not the ith layer; in the following paragraphs, we will often omit the superscript i for clarity.
Activating a neural network via forward propagation
In this section, we will describe the process of forward propagation to calculate the output of an MLP model. To understand how it fits into the context of learning an MLP model, let's summarize the MLP learning procedure in three simple steps:
- Starting at the input layer, we forward propagate the patterns of the training data through the network to generate an output.
- Based on the network's output, we calculate the error we want to minimize using a cost function, which we will describe later.
- We then backpropagate the error, find its derivative with respect to each weight in the network, and update the model.
Finally, after we have repeated steps 1-3 for many epochs and learned the weights of the MLP, we use forward propagation to calculate the network output, and apply a threshold function to obtain the predicted class labels in the one-hot representation, which we described in the previous section.
Now, let's walk through the individual steps of forward propagation to generate an output from the patterns in the training data. Since each unit in the hidden unit is connected to all units in the input layers, we first calculate the activation  as follows:


Here,  is the net input and
  is the activation function, which has to be differentiable so as to learn the weights that connect the neurons using a gradient-based approach. To be able to solve complex problems such as image classification, we need non-linear activation functions in our MLP model, for example, the sigmoid (logistic) activation function:
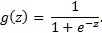
The sigmoid function is an "S"-shaped curve that maps the net input z onto a logistic distribution in the range 0 to 1, which passes the origin at z = 0.5 as shown in the following graph:

Intuitively, we can think of the neurons in the MLP as logistic regression units that return values in the continuous range between 0 and 1.
For purposes of code efficiency and readability, we will now write the activation in a more compact form using the concepts of basic linear algebra, which will allow us to vectorize our code implantation via NumPy rather than writing multiple nested and expensive Python for-loops:


Here,  is our [m +1] x 1 dimensional feature vector for a sample
  plus bias unit, and
  is [m + 1] x h dimensional weight matrix where h is the number of hidden units in our neural network. After matrix-vector multiplication, we obtain the [m + 1] x 1 dimensional net input vector
  . Furthermore, we can generalize this computation to all n samples in the training set:

 is now an n x [m + 1] matrix, and the matrix-matrix multiplication will result in an h x n dimensional net input matrix
  . Finally, we apply the activation function g to each value in the net input matrix to get the h x n activation matrix
  for the next layer (here, the output layer):

Similarly, we can rewrite the activation of the output layer in the vectorized form:

Unlock access to the largest independent learning library in Tech for FREE!
Get unlimited access to 7500+ expert-authored eBooks and video courses covering every tech area you can think of.
Renews at ₹800/month. Cancel anytime
Here, we multiply the t x n matrix  (t is the number of output class labels) by the h x n dimensional matrix
  to obtain the t x n dimensional matrix
  (the columns in this matrix represent the outputs for each sample).
Lastly, we apply the sigmoid activation function to obtain the continuous-valued output of our network:

Classifying handwritten digits
In this section, we will train our first multilayer neural network to classify handwritten digits from the popular MNIST dataset (Mixed National Institute of Standards and Technology database), which has been constructed by Yann LeCun and others (Y. LeCun, L. Bottou, Y. Bengio, and P. Haffner. Gradient-based learning applied to document recognition. Proceedings of the IEEE, 86(11):2278-2324, November 1998) and serves as a popular benchmark dataset for machine learning algorithms.
Obtaining the MNIST dataset
The MNIST dataset is publicly available at http://yann.lecun.com/exdb/mnist/ and consists of these four parts:
- Training set images: train-images-idx3-ubyte.gz (9.9 MB, 47 MB unzipped, 60,000 samples)
- Training set labels: train-labels-idx1-ubyte.gz (29 KB, 60 KB unzipped, 60,000 labels)
- Test set images: t10k-images-idx3-ubyte.gz (1.6 MB, 7.8 MB, 10,000 samples)
- Test set labels: t10k-labels-idx1-ubyte.gz (5 KB, 10 KB unzipped, 10,000 labels)
In this section, we will only be working with a subset of MNIST. Thus, we only need to download the training set images and training set labels. After downloading the files, I recommend that you unzip the files using the Unix/Linux GZip tool from the terminal for efficiency, for example, using the following command in your local MNIST download directory or, alternatively, your favorite unarchiver tool if you are working with a Microsoft Windows machine:
gzip *ubyte.gz -d
The images are stored in byte form, and using the following function, we will read them into NumPy arrays, which we will use to train our MLP:
>>> import os
>>> import struct
>>> import numpy as np
>>> def load_mnist(path):
...   labels_path = os.path.join(path, 'train-labels-idx1-ubyte')
...   images_path = os.path.join(path, 'train-images-idx3-ubyte')
...   with open(labels_path, 'rb') as lbpath:
...       magic, n = struct.unpack('>II', lbpath.read(8))
...       labels = np.fromfile(lbpath, dtype=np.uint8)
...   with open(images_path, 'rb') as imgpath:
...       magic, num, rows, cols = struct.unpack(
...                                ">IIII", imgpath.read(16))
...       images = np.fromfile(imgpath,
...                 dtype=np.uint8).reshape(len(labels), 784)
...   return images, labels
The load_mnist function returns an n x m dimensional NumPy array (images), where n is the number of samples (60,000), and m is the number of features. The images in the MNIST dataset consist of 28 x 28 pixels, and each pixel is represented by a grayscale intensity value. Here, we unroll the 28 x 28 pixels into 1D row vectors, which represent the rows in our images array (784 per row or image). The load_mnist function returns a second array, labels, which contains the 60,000 class labels (integers 0-9) of the handwritten digits.
The way we read in the image might seem a little strange at first:
magic, n = struct.unpack('>II', lbpath.read(8))
labels = np.fromfile(lbpath, dtype=np.int8)
To understand how these two lines of code work, let's take a look at the dataset description from the MNIST website:
[offset] [type]         [value]         [description]
0000     32 bit integer 0x00000801(2049) magic number (MSB first)
0004     32 bit integer 60000           number of items
0008     unsigned byte   ??               label
0009     unsigned byte   ??               label
........
xxxx     unsigned byte   ??               label
Using the two lines of the preceding code, we first read in the "magic number," which is a description of the file protocol as well as the "number of items" (n) from the file buffer, before we read the following bytes into a NumPy array using the fromfile method. The fmt parameter value >II that we passed as an argument to struct.unpack can be composed of two parts:
- >: Big-endian (defines the order in which a sequence of bytes is stored)
- I: Unsigned integer
After executing the following code, we should have a label vector of 60,000 instances, that is, a 60,000 × 784 dimensional image matrix:
>>> X, y = load_mnist('mnist')
>>> print('Rows: %d, columns: %d' % (X.shape[0], X.shape[1]))
Rows: 60000, columns: 784
To get a idea of what those images in MNIST look like, let's define a function that reshapes a 784-pixel sample from our feature matrix into the original 28 × 28 image that we can plot via matplotlib's imshow function:
>>> import matplotlib.pyplot as plt
>>> def plot_digit(X, y, idx):
...     img = X[idx].reshape(28,28)
...     plt.imshow(img, cmap='Greys', interpolation='nearest')
...     plt.title('true label: %d' % y[idx])
...     plt.show()
Now let's use the plot_digit function to display an arbitrary digit (here, the fifth digit) from the dataset:
>>> plot_digit(X, y, 4)

Implementing a multilayer perceptron
In this section, we will implement the code of an MLP with one input, one hidden, and one output layer to classify the images in the MNIST dataset. I tried to keep the code as simple as possible. However, it may seem a little complicated at first. If you are not running the code from the IPython notebook, I recommend that you copy it to a Python script file in your current working directory, for example, neuralnet.py, which you can then import into your current Python session via this:
from neuralnet import NeuralNetMLP
Now, let's initialize a new 784-50-10 MLP, a neural network with 784 input units (n_features), 50 hidden units (n_hidden), and 10 output units (n_output):
>>> nn = NeuralNetMLP(n_output=10,
...                n_features=X.shape[1],
...                   n_hidden=50,
...                   l2=0.1,
...                   l1=0.0,
...                   epochs=800,
...                   eta=0.001,
...                   alpha=0.001,
...                   decrease_const=0.00001,
...                   shuffle=True,
...                   minibatches=50,
...                   random_state=1)
- l2: The
 parameter for L2 regularization. This is used to decrease the degree of overfitting; equivalently, l1 is the for L1 regularization.
- epochs: The number of passes over the training set.
- eta: The learning rate
 .
.
- alpha: A parameter for momentum learning used to add a factor of the previous gradient to the weight update for faster learning:
 (where t is the current time step or epoch).
- decrease_const: The decrease constant d for an adaptive learning rate
 that decreases over time for better convergence
  .
.
- shuffle: Shuffle the training set prior to every epoch to prevent the algorithm from getting stuck in circles.
- minibatches: Splitting of the training data into k mini-batches in each epoch. The gradient is computed for each mini-batch separately instead of the entire training data for faster learning.
Next, we train the MLP using 10,000 samples from the already shuffled MNIST dataset. Note that we only use 10,000 samples to keep the time for training reasonable (up to 5 minutes on standard desktop computer hardware). However, you are encouraged to use more training data for model fitting to increase the predictive accuracy:
>>> nn.fit(X[:10000], y[:10000], print_progress=True)
Epoch: 800/800
Similar to our earlier Adaline implementation, we save the cost for each epoch in a cost_ list, which we can now visualize, making sure that the optimization algorithm has reached convergence. Here, we plot only every 50th step to account for the 50 mini-batches (50 minibatches × 800 epochs):
>>> import matplotlib.pyplot as plt
>>> plt.plot(range(len(nn.cost_)//50), nn.cost_[::50], color='red')
>>> plt.ylim([0, 2000])
>>> plt.ylabel('Cost')
>>> plt.xlabel('Epochs')
>>> plt.show()

As we can see, the optimization algorithm converged after approximately 700 epochs. Now let's evaluate the performance of the model by calculating the prediction accuracy:
>>> y_pred = nn.predict(X[:10000])
>>> acc = np.sum(y[:10000] == y_pred, axis=0) / 10000
>>> print('Training accuracy: %.2f%%' % (acc * 100))
Training accuracy: 97.60%
As you can see, the model gets most of the training data right. But how does it generalize to data that it hasn't seen before during training? Let's calculate the test accuracy on 5,000 images that were not included in the training set:
>>> y_pred = nn.predict(X[10000:15000])
>>> acc = np.sum(y[10000:15000] == y_pred, axis=0) / 5000
>>> print('Test accuracy: %.2f%%' % (acc * 100))
Test accuracy: 92.40%
Summary
Based on the discrepancy between the training and test accuracy, we can conclude that the model slightly overfits the training data. To decrease the degree of overfitting, we can change the number of hidden units or the values of the regularization parameters, or fit the model on more training data.
Resources for Article:
Further resources on this subject:

 United States
 Great Britain
 India
India
 Germany
 France
 Canada
 Russia
 Spain
Spain
 Brazil
 Australia
 South Africa
 Thailand
 Ukraine
 Switzerland
 Slovakia
 Luxembourg
 Hungary
 Romania
 Denmark
 Ireland
 Estonia
 Belgium
 Italy
Italy
 Finland
 Cyprus
 Lithuania
 Latvia
 Malta
Malta
 Netherlands
 Portugal
 Slovenia
 Sweden
 Argentina
 Colombia
 Ecuador
 Indonesia
 Mexico
 New Zealand
 Norway
 South Korea
 Taiwan
 Turkey
 Czechia
 Austria
 Greece
 Isle of Man
 Bulgaria
 Japan
Japan
 Philippines
 Poland
 Singapore
 Egypt
Egypt
 Chile
Chile
 Malaysia


