In this article by Jonathan McAllister, author of the book Mastering Jenkins, we will discover all things continuous namely Continuous Delivery, and Continuous Deployment practices. Continuous Delivery represents a logical extension to the continuous integration practices. It expands the automation defined in continuous integration beyond simply building a software project and executing unit tests. Continuous Delivery adds automated deployments and acceptance test verification automation to the solution. To better describe this process, let's take a look at some basic characteristics of Continuous Delivery:
- The development resources commit changes to the mainline of the source control solution multiple times per day, and the automation system initiates a complete build, deploy, and test validation of the software project
- Automated tests execute against every change deployed, and help ensure that the software remains in an always-releasable state
- Every committed change is treated as potentially releasable, and extra care is taken to ensure that incomplete development work is hidden and does not impact readiness of the software
- Feedback loops are developed to facilitate notifications of failures. This includes build results, test execution reports, delivery status, and user acceptance verification
- Iterations are short, and feedback is rapid, allowing the business interests to weigh in on software development efforts and propose alterations along the way
- Business interests, instead of engineering, will decide when to physically release the software project, and as such, the software automation should facilitate this goal
(For more resources related to this topic, see here.)
As described previously, Continuous Delivery (CD) represents the expansion of Continuous Integration Practices. At the time of writing of this book, Continuous Delivery approaches have been successfully implemented at scale in organizations like Amazon, Wells Fargo, and others. The value of CD derives from the ability to tie software releases to business interests, collect feedback rapidly, and course correct efficiently. The following diagram illustrates the basic automation flow for Continuous Delivery:

Figure 8-10: Continuous Delivery workflow
As we can see in the preceding diagram, this practice allows businesses to rapidly develop, strategically market, and release software based on pivoting market demands instead of engineering time frames.
When implementing a continuous delivery solution, there are a few key points that we should keep in mind:
- Keep the build fast
- Illuminate the failures, and recover immediately
- Make deployments push-button, for any version to any environment
- Automate the testing and validation operations with defined buckets for each logical test group (unit, smoke, functional and regression)
- Use feature toggles to avoid branching
- Get feedback early and often (automation feedback, test feedback, build feedback, UAT feedback)
Principles of Continuous Delivery
Continuous Delivery was founded on the premise of standardized and defined release processes, automation-based build pipelines, and logical quality gates with rapid feedback loops. In a continuous delivery paradigm, builds flow from development to QA and beyond like water in a pipe. Builds can be promoted from one logical group to another, and the risk of the proposed change is exposed incrementally to a wider audience. The practical application of the Continuous Delivery principles lies in frequent commits to the mainline, which, in turn, execute the build pipeline automation suite, pass through automated quality gates for verification, and are individually signed off by business interests (in a best case scenario). The idea of incrementally exposing the risk can be better illustrated through a circle of trust diagram, as follows:
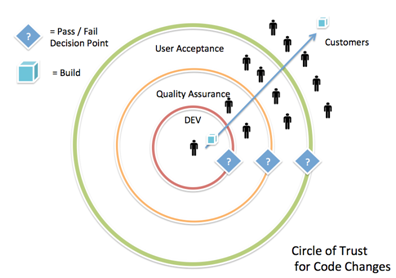
Figure 8-11: Circle of Trust for code changes
As illustrated in the preceding trust diagram, the number of people exposed to a build expands incrementally as the build passes from one logical development and business group to another. This model places emphasis on verification and attempts to remove waste (time) by exposing the build output only to groups that have a vested interest in the build at that phase.
Continuous Delivery in Jenkins
Applying the Continuous Delivery principles in Jenkins can be accomplished in a number of ways. That said, there are some definite tips and tricks which can be leveraged to make the implementation a bit less painful. In this section, we will discuss and illustrate some of the more advanced Continuous Delivery tactics and learn how to apply them in Jenkins. Your specific implementation of Continuous Delivery will most definitely be unique to your organization; so, take what is useful, research anything that is missing, and disregard what is useless. Let's get started.
Rapid feedback loops
Rapid feedback loops are the baseline implementation requirement for Continuous Delivery. Applying this with Jenkins can be accomplished in a pretty slick manner using a combination of the Email-Ext plugin and some HTML template magic. In large-scale Jenkins implementations, it is not wise to manage many e-mail templates, and creating a single transformable one will help save time and effort. Let's take a look how to do this in Jenkins.
The Email-Ext plugin provides Jenkins with the capabilities of completely customizable e-mail notifications. It allows the Jenkins system to customize just about every aspect of notifications and can be leveraged as an easy-to-implement, template-based e-mail solution. To begin with, we will need to install the plugin into our Jenkins system. The details for this plugin can be found at the following web address:
https://wiki.jenkins-ci.org/display/JENKINS/Email-ext+plugin
Once the plug-in has been installed into our Jenkins system, we will need to configure the basic connection details and optional settings. To begin, navigate to the Jenkins administration area and locate the Extended Email Notification section.
Jenkins->Manage Jenkins->Configure System
On this page, we will need to specify, at a minimum, the following details:
- SMTP Server
- SMTP Authentication details (User Name + Password)
- Reply-to List ([email protected])
- System Admin Email Address (located further up on the page)
The completed form may look something like the following screenshot:

Figure 8-12: Completed form
Once the basic SMTP configuration details have been specified, we can then add the Editable Email Notification post build step to our jobs, and configure the e-mail contents appropriately. The following screenshot illustrates the basic configuration options required for the build step to operate:

Figure 8-13: Basic configuration options
As we can see from the preceding screenshot, environment variables are piped into the plugin via the job's automation to define the e-mail contents, recipient list, and other related details. This solution makes for a highly effective feedback loop implementation.
Quality gates and approvals
Two of the key aspects of Continuous Delivery include the adoption of quality gates and stakeholder approvals. This requires individuals to signoff on a given change or release as it flows through the pipeline. Back in the day, this used to be managed through a Release Signoff sheet, which would often times be maintained manually on paper. In the modern digital age, this is managed through the Promoted builds plugin in Jenkins, whereby we can add LDAP or Active Directory integration to ensure that only authentic users have the access rights required to promote builds. However, there is room to expand this concept and learn some additional tips and tricks, which will ensure that we have a solid and secure implementation.
Integrating Jenkins with Lightweight Directory Access Protocol (LDAP) is generally a straightforward exercise. This solution allows a corporate authentication system to be tied directly into Jenkins. This means that once the security integration is configured in Jenkins, we will be able to login to the Jenkins system (UI) by using our corporate account credentials. To connect Jenkins to a corporate authentication engine, we will first need to configure Jenkins to talk to the corporate security servers. This is configured in the Global Security administration area of the Jenkins user interface as shown in the following screenshot:

Figure 8-14: Global Security configuration options
The global security area of Jenkins allows us to specify the type of authentication that Jenkins will use for users who wish to access the Jenkins system. By default, Jenkins provides a built-in internal database for managing users; we will have to alter this to support LDAP. To configure this system to utilize LDAP, click the LDAP radio button, and enter your LDAP server details as illustrated in the following screenshot:

Figure 8-15: LDAP server details
Fill out the form with your company's LDAP specifics, and click save. If you happen to get stuck on this configuration, the Jenkins community has graciously provided an additional in-depth documentation. This documentation can be found at the following URL:
Unlock access to the largest independent learning library in Tech for FREE!
Get unlimited access to 7500+ expert-authored eBooks and video courses covering every tech area you can think of.
Renews at ₹800/month. Cancel anytime
https://wiki.jenkins-ci.org/display/JENKINS/LDAP+Plugin
For users who wish to leverage Active Directory, there is a Jenkins plugin which can facilitate this type of integrated security solution. For more details on this plugin, please consult the plugin page at the following URL:
https://wiki.jenkins-ci.org/display/JENKINS/Active+Directory+plugin
Once the authentication solution has successfully been configured, we can utilize it to set approvers in the promoted builds plugin. To configure a promotion approver, we will need to edit the desired Jenkins project, and specify the users who should have the promote permissions. The following screenshot shows an example of this configuration:

Figure 8-16: Configuration example
As we can see, the promoted builds plugin provides an excellent signoff sheet solution. It is complete with access security controls, promotion criteria, and a robust build step implementation solution.
Build pipeline(s) workflow and visualization
When build pipelines are created initially, the most common practice is to simply daisy chain the jobs together. This is a perfectly reasonable initial-implementation approach, but in the long term, this may get confusing and it may become difficult to track the workflow of daisy-chained jobs. To assist with this issue, Jenkins offers a plugin to help visualize the build pipelines, and is appropriately named the Build Pipelines plugin. The details surrounding this plugin can be found at the following web URL:
https://wiki.jenkins-ci.org/display/JENKINS/Build+Pipeline+Plugin
This plugin provides an additional view option, which is populated by specifying an entry point to the pipeline, detecting upstream and downstream jobs, and creating a visual representation of the pipeline. Upon the initial installation of the plugin, we can see an additional option available to us when we create a new dashboard view. This is illustrated in the following screenshot:

Figure 8-17: Dashboard view
Upon creating a pipeline view using the build pipeline plugin, Jenkins will present us with a number of configuration options. The most important configuration options are the name of the view and the initial job dropdown selection option, as seen in the following screenshot:

Figure 8-18: Pipeline view configuration options
Once the basic configuration has been defined, click the OK button to save the view. This will trigger the plugin to perform an initial scan of the linked jobs and generate the pipeline view. An example of a completely developed pipeline is illustrated in the following image:

Figure 8-19: Completely developed pipeline
This completes the basic configuration of a build pipeline view, which gives us a good visual representation of our build pipelines. There are a number of features and customizations that we could apply to the pipeline view, but we will let you explore those and tweak the solution to your own specific needs.
Continuous Deployment
Just as Continuous Delivery represents a logical extension of Continuous Integration, Continuous Deployment represents a logical expansion upon the Continuous Delivery practices. Continuous Deployment is very similar to Continuous Delivery in a lot of ways, but it has one key fundamental variance: there are no approval gates. Without approval gates, code commits to the mainline have the potential to end up in the production environment in short order. This type of an automation solution requires a high-level of discipline, strict standards, and reliable automation. It is a practice that has proven valuable for the likes of Etsy, Flickr, and many others. This is because Continuous Deployment dramatically increases the deployment velocity. The following diagram describes both, Continuous Delivery and Continuous Deployment, to better showcase the fundamental difference between, them:

Figure 8-20: Differentiation between Continuous Delivery and Continuous Deployment
It is important to understand that Continuous Deployment is not for everyone, and is a solution that may not be feasible for some organizations, or product types. For example, in embedded software or Desktop application software, Continuous Deployment may not be a wise solution without properly architected background upgrade mechanisms, as it will most likely alienate the users due to the frequency of the upgrades. On the other hand, it's something that could be applied, fairly easily, to a simple API web service or a SaaS-based web application.
If the business unit indeed desires to migrate towards a continuous deployment solution, tight controls on quality will be required to facilitate stability and avoid outages. These controls may include any of the following:
- The required unit testing with code coverage metrics
- The required a/b testing or experiment-driven development
- Paired programming
- Automated rollbacks
- Code reviews and static code analysis implementations
- Behavior-driven development (BDD)
- Test-driven development (TDD)
- Automated smoke tests in production
Additionally, it is important to note that since a Continuous Deployment solution is a significant leap forward, in general, the implementation of the Continuous Delivery practices would most likely be a pre-requisite. This solution would need to be proven stable and trusted prior to the removal of the approval gates. Once removed though, the deployment velocity should significantly increase as a result.
The quantifiable value of continuous deployment is well advertised by companies such as Amazon who realized a 78 percent reduction in production outages, and a 60% reduction in downtime minutes due to catastrophic defects. That said, implementing continuous deployment will require a buy-in from the stakeholders and business interests alike.
Continuous Deployment in Jenkins
Applying the Continuous Deployment practices in Jenkins is actually a simple exercise once Continuous Integration and Continuous Delivery have been completed. It's simply a matter of removing the approve criteria and allowing builds to flow freely through the environments, and eventually to production. The following screenshot shows how to implement this using the Promoted builds plugin:

Figure 8-21: Promoted builds plugin implementation
Once removed, the build automation solutions will continuously deploy for every commit to the mainline (given that all the automated tests have been passed).
Summary
With this article of Mastering Jenkins, you should now have a solid understanding of how to advocate for and develop Continuous Delivery, and Continuous Deployment practices at an organization.
Resources for Article:
Further resources on this subject:

 United States
 Great Britain
 India
India
 Germany
 France
 Canada
 Spain
Spain
 Brazil
 Australia
 South Africa
 Thailand
 Switzerland
 Slovakia
 Luxembourg
 Hungary
 Romania
 Denmark
 Ireland
 Estonia
 Belgium
 Italy
Italy
 Finland
 Cyprus
 Lithuania
 Latvia
 Malta
Malta
 Netherlands
 Portugal
 Slovenia
 Sweden
 Argentina
 Colombia
 Ecuador
 Indonesia
 Mexico
 New Zealand
 Norway
 South Korea
 Taiwan
 Turkey
 Czechia
 Austria
 Greece
 Isle of Man
 Bulgaria
 Japan
Japan
 Philippines
 Poland
 Singapore
 Egypt
Egypt
 Chile
Chile
 Malaysia


