Set your classes up with no effort on your part
Why would you need to "set your classes up"? Surely if the course is enroll able, your students can just enter and take part in all the activities? They can indeed, but unless you put a password (enrolment key) on the course then any students on your Moodle could enroll and take a look around. That might be fine if you have an "open door" policy to your course – but in the real world, I wouldn't expect extra students to come in and join my Advanced Level French class, and so the same might apply in Moodle. Likewise, although my colleague and I share teaching resources and experiences, we don't actually mark each other's students' work – we have separate grade books. The same should apply to Moodle. If more than one class is sharing a Moodle course, it’s important that the classes are on different pages of the grade book rather than everyone all listed together.
So how do we do this without having manually to add every single student? If your Moodle admin hasn't done this for you already, then log in to your course and click on Groups in the course administration block:

- Now click on the button Create group as in the next screenshot:

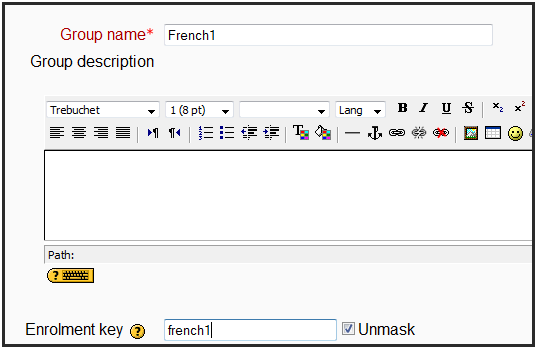
- Write the name of your class in the Group Name box, as it might say in their timetable for example. If you wish to put a description of this class you may do so, but it isn’t necessary.
- Scroll down to the Enrolment key box and enter a password for this class only. (Hint: it might be easier for them to recall if you make it the name of their class) If you click Unmask you will be able to see what you are typing:

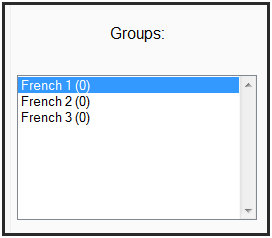
- Click the Save changes button, and you will be returned to the Groups page where you will see your class with (0) next to its name. That's telling you there are no students in there yet!
- Repeat the process with all the other classes sharing your Moodle course. Your Groups page might end up like this:

Unlock access to the largest independent learning library in Tech for FREE!
Get unlimited access to 7500+ expert-authored eBooks and video courses covering every tech area you can think of.
Renews at €14.99/month. Cancel anytime
- And finally… click to go back to your main course page and then, in the course administration block, click on Settings.

- In the page that comes up next, set Group mode to Visible or Separate and in Availability set another password (enrollment key).

This enrollment key never gets used! It is simply there to keep unwanted students out! It doesn’t matter what you set it to or even whether you yourself remember it or not.
 United States
 Great Britain
 India
India
 Germany
 France
 Canada
 Russia
 Spain
Spain
 Brazil
 Australia
 South Africa
 Thailand
 Ukraine
 Switzerland
 Slovakia
 Luxembourg
 Hungary
 Romania
 Denmark
 Ireland
 Estonia
 Belgium
 Italy
Italy
 Finland
 Cyprus
 Lithuania
 Latvia
 Malta
Malta
 Netherlands
 Portugal
 Slovenia
 Sweden
 Argentina
 Colombia
 Ecuador
 Indonesia
 Mexico
 New Zealand
 Norway
 South Korea
 Taiwan
 Turkey
 Czechia
 Austria
 Greece
 Isle of Man
 Bulgaria
 Japan
Japan
 Philippines
 Poland
 Singapore
 Egypt
Egypt
 Chile
Chile
 Malaysia


