In this virtual classroom, we are going to enrich the use of vocabulary, because in the creation of these techniques we have to use keywords, which have to be used in a piece of writing.
Mind maps are going to be designed according to the facilities that the different software provides us to exploit them.
Pictures in mind maps—using Buzan's iMindMap V4
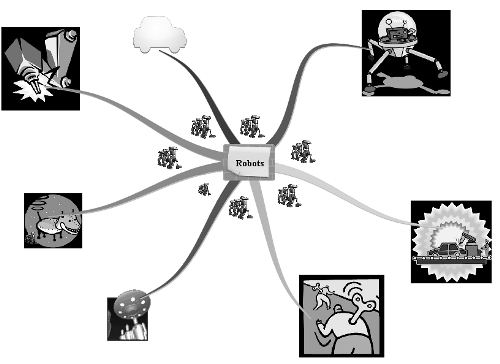
In this task, we are going to use the software of the inventor of mind maps: Buzan's iMindMap V4. We are going to work on the topic of robots and afterwards students are going to write an article about them. We are going to provide students with images of different robots, taking into account that a robot is not a silver rectangular human look-alike. They may have several shapes and can be used for different purposes.
Read the next screenshot, which is taken from Buzan's iMindMap V4 software, about inserting images in a mind map:

Getting ready
Let's create a mind map related to robots with pictures. After creating the mind map, students are going to look at it and they are going to write an article about the topic. In this case, the mind map will be designed with images only so as to "trigger associations within the brain" of our students. You can download a free trial of this software from the following webpage: http://www.thinkbuzan.com/uk/.
How to do it...
After downloading the free trial (you may also buy the software), create a new file. Then follow these steps to create a mind map with images using the previously mentioned software:
- Choose a central image in order to write the name of the topic in the middle, as shown in the next screenshot:

- In Enter some text for your central idea,, enter Robots as shown in the previous screenshot and click on Create.
- Click on Draw and select Organic, and draw the lines of the mind map, as shown in the following screenshot:

- To add images to the mind map, click on Insert and select Floating image, as shown in the next screenshot:

- Click on View and select Image Library and search for images, as shown in the next screenshot:

- Another option is to look for an image in Microsoft Word and copy and paste the images in the mind map.
- Save the file.
How it works...
We are going to select the Weekly outline section where we want to insert the activity. Then we are going to create a link to a file. Later, we will ask students to upload a single file in order to carry out the writing activity. Follow these steps:
- Click on Add a resource and select Link to a file or website.
- Complete the Name block.
- Complete the Summary block.
- Click on Choose or upload a file.
- Click on Upload a file.
- Click on Browse and search for the file, then click on Open.
- Click on Upload this file and then select Choose.
- In the Target block, select New window.
- Click on Save and return to course. The mind map appears as shown in the following screenshot:

There's more...
We saw how to create a mind map related to robots previously; now we will see how to upload this mind map as an image in your course.
Uploading the mind map as .png file
If your students do not have this software and they cannot open this file, you may upload this mind map in the Moodle course as an image. These are the steps that you have to follow:
Unlock access to the largest independent learning library in Tech for FREE!
Get unlimited access to 7500+ expert-authored eBooks and video courses covering every tech area you can think of.
Renews at €14.99/month. Cancel anytime
- Open the file and fit the mind map in the screen. Press the Prt Scr key.
- Paste (Ctrl + V) the image in Paint or Inkscape (or any similar software).
- Select the section of the mind map only, as shown in the next screenshot:
- Save the image as .png so that you can upload the image of the mind map in the Moodle course.
Drawing pictures using pen sketch
It is also possible to use a digital pen, also known as pen sketch, to draw elements for the mind map. For example, as we are dealing with robots in this mind map, you can draw a robot's face and add it to the mind map, as shown in the next screenshot:

Creating a writing activity
You may add the mind map as a recourse in the Moodle course or you may insert an image in it. In both cases, students can write an article about robots. If you upload the mind map in the Moodle course, you can do it in the Description block of Upload a single file and you do not have to split the activity in two.
Adding data to pictures—creating a mind map using MindMeister
In this recipe, we are going to work with MindMeister software, which is free and open source.We are going to create a mind map, inserting links to websites, which contain information as well as pictures. Why? Because if we include more information in the mind map, we are going to lead our students on how to write. Apart from that, they are going to read more before writing and we are also exercising reading comprehension in a way. However, they may also summarize information if we create a link to a website. So let's get ready!
Getting ready
We are going to enter http://www.mindmeister.com/ and then Sign up for free. There is one version which is free to use, or you may choose the other two that are commercial. After signing up, we are going to develop a mind map for our students to work with.
There is a video which is a tutorial explaining in a very simple and easy way on how to design a mind map using this software. So it is worth watching.
How to do it...
We are going to enter the previously mentioned website and we are going to start working on this new mind map. In this case, I have chosen the topic "Special days around the world". Follow these steps:
- Click on My New Mind Map and write the name of the topic in the block in the middle.
- Click on Connect and draw arrows, adding as many New node blocks as you wish.
- Add a website giving information for each special occasion. Click on the Node, then click on Extras–Links | Links and complete the URL block, as shown in the next screenshot:

- Then click on the checkmark icon. Repeat the same process for each occasion.
- You can add icons or images to the nodes of the mind map.
- Click on Share Map at the bottom of the page, as shown in the next screenshot:

- Click on Publish and change the button to ON, as shown in the next screenshot:

- Select Allow edit for everybody (WikiMap), as shown in the previous screenshot.
- You can also embed the mind map. When you click on Embed map, the next screenshot will appear:

- Copy the Embed code and click on Close.
- Click on OK.
How it works...
After creating the mind map about special occasions around the world, we will either embed it or create a link to a website for our students to work on a writing activity. Here the proposal is to work through a Wiki because in Map Properties we have clicked on Allow edit for everybody (WikiMap) so that students can modify the mind map with their ideas. Select the Weekly outline section where you want to insert the activity and these are the steps you have to follow:
- Click on Add an activity and select Wiki.
- Complete the Name block.
- Complete the Summary block. You may either embed the mind map or create a link to a website, as shown in the next screenshot:
- Click on Save and return to course.
 United States
 Great Britain
 India
India
 Germany
 France
 Canada
 Russia
 Spain
Spain
 Brazil
 Australia
 South Africa
 Thailand
 Ukraine
 Switzerland
 Slovakia
 Luxembourg
 Hungary
 Romania
 Denmark
 Ireland
 Estonia
 Belgium
 Italy
Italy
 Finland
 Cyprus
 Lithuania
 Latvia
 Malta
Malta
 Netherlands
 Portugal
 Slovenia
 Sweden
 Argentina
 Colombia
 Ecuador
 Indonesia
 Mexico
 New Zealand
 Norway
 South Korea
 Taiwan
 Turkey
 Czechia
 Austria
 Greece
 Isle of Man
 Bulgaria
 Japan
Japan
 Philippines
 Poland
 Singapore
 Egypt
Egypt
 Chile
Chile
 Malaysia


