In this article by Simone Fiorini and Arun V Gopalakrishnan, authors of the book Mastering jBPM6 , we will build our first BPM application by using the jBPM tool stack. This article will guide you through the following topics:
- Installing the jBPM tool stack
- Hacking the default installation configurations
- Modeling and deploying a jBPM project
- Embedding jBPM inside a standalone Java project
This article gives you the hands-on flexibility of the jBPM tool stack and provides information on hacking the configuration and playing around.
(For more resources related to this topic, see here.)
Installing the jBPM tool stack
A jBPM release comes with an installation zip file, which contains the essentials for the jBPM environment and tools for building a demo runtime for easy hands-on management of the jBPM runtime environment.
For downloading jBPM:
- Go to http://jboss.org/jbpm | Download | Download jBPM 6.2.0.Final | jbpm-6.2.0.Final-installer-full.zip.Use the latest stable version. The content of the book follows the 6.2.0 release.
- Unzip and extract the installer content and you will find an install.html file that contains the helper documentation for installing a demo jBPM runtime with inbuilt projects.
jBPM installation needs JDK 1.6+ to be installed and set as JAVA_HOME and the tooling for installation is done using ANT scripts (ANT version 1.7+).
The tooling for installation is basically an ANT script, which is a straightforward method for installation and can be customized easily. To operate the tooling, the ANT script consists of the ANT targets that act as the commands for the tooling. The following figure will make it easy for you to understand the relevant ANT targets available in the script. Each box represents an ANT target and helps you to manage the environment. The basic targets available are for installing, starting, stopping, and cleaning the environment.
To run the ANT target, install ANT 1.7+, navigate to the installer folder (by using the shell or the command line tool available in your OS), and run the target by using the following command:
ant <targetname>
The jBPM installer comes with a default demo environment, which uses a basic H2 database as its persistence storage. The persistence of jBPM is done using Hibernate; this makes it possible for jBPM to support an array of popular databases including the databases in the following list:
Hibernate or Hibernate ORM is an object relational mapping framework and is used by jBPM to persist data to relation databases. For more details, see http://hibernate.org/.
For installing the demo, use the following command:
ant install.demo
The install command would install the web tooling and the Eclipse tooling, required for modeling and operating jBPM.
ant start.demo
This command will start the application server (JBoss) with the web tooling (the Kie workbench and dashboard) deployed in it and the eclipse tooling with all the plugins installed.
That's it for the installation! Now, the JBoss application server should be running with the Kie workbench and dashboard builder deployed.
You can now access the Kie workbench demo environment by using the URL and log in by using the demo admin user called admin and the password admin:
http://localhost:8080/jbpm-console.
Customizing the installation
The demo installation is a sandbox environment, which allows for an easy installation and reduces time between you getting the release and being able to play around by using the stack. Even though it is very necessary, when you get the initial stuff done and get serious about jBPM, you may want to install a jBPM environment, which will be closer to a production environment. We can customize the installer for this purpose. The following sections will guide you through the options available for customization.
Changing the database vendor
The jBPM demo sandbox environment uses an embedded H2 database as the persistence storage. jBPM provides out of the box support for more widely used databases such as MySQL, PostgreSQL, and so on. Follow these steps to achieve a jBPM installation with these databases:
- Update the build.properties file available in the root folder of the installation to choose the required database instead of H2. By default, configurations for MySQL and PostgreSQL are available. For the support of other databases, check the hibernate documentation before configuring.
- Update db/jbpm-persistence-JPA2.xml, and update the hibernate.dialect property with an appropriate Hibernate dialect for our database vendor.
- Install the corresponding JDBC driver in the application server where we intend to deploy jBPM web tooling.
Manually installing the database schema
By default, the database schema is created automatically by using the Hibernate autogeneration capabilities. However, if we want to manually install the database schemas, the corresponding DDL scripts are available in dbddl-scripts for all major database vendors.
Creating your first jBPM project
jBPM provides a very structured way of creating a project. The structure considers application creation and maintenance for large organizations with multiple departments. This structure is recommended for use as it is a clean and secure way of manning the business process artifacts. The following image details the organization of a project in jBPM web tooling (or the Kie workbench).
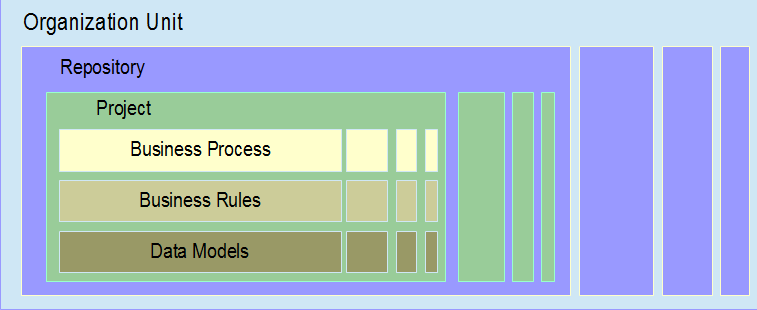
The jBPM workbench comes with an assumption of one business process management suite for an organization. An organization can have multiple organization units, which will internally contain multiple projects and form the root of the project, and as the name implies, it represents a fraction of an organization. This categorization can be visualized in any business organization and is sometimes referred as departments. In an ideal categorization, these organization units will be functionally different and thus, will contain different business processes. Using the workbench, we can create multiple organization units.
The next categorization is the repository. A repository is a storage of business model artifacts such as business processes, business rules, and data models. A repository can be mapped to a functional classification within an organization, and multiple repositories can be set up if these repositories run multiple projects; the handling of these project artifacts have to be kept secluded from each other (for example, for security).
Within a repository, we can create a project, and within a project, we can define and model business process artifacts. This structure and abstraction will be very useful to manage and maintain BPM-based applications.
Let us go through the steps in detail now.
After installation, you need to log into the Kie workbench. Now, as explained previously, we can create a project. Therefore, the first step is to create an organizational unit:
- Click through the menu bars, and go to Authoring | Administration | Organizational Units | Manage Organizational Units.This takes you to the Organizational Unit Manager screen; here, we can see a list of organizational units and repositories already present and their associations.
- Click Add to create an organizational unit, and give the name of the organization unit and the user who is in charge of administering the projects in the organization unit.

- Now, we can add a repository, navigate through the menus, and go to Authoring | Administration | Repositories | New Repository.
- Now, provide a name for the repository, choose the organization unit, and create the repository.

Creating the repository results in (internally) creating a Git repository. The default location of the Git repository in the workbench is $WORKING_DIRECTORY/.niogit and can be modified by using the following system property: -Dorg.uberfire.nio.git.dir.
- Now, we can create a project for the organization unit. Go to Authoring | Project Authoring | Project Explorer. Now, choose your organization unit (here, Mastering-jBPM) from the bread crumb of project categorization.

- Click New Item and choose Project. Now, we can create a project by entering a relevant project name.

Unlock access to the largest independent learning library in Tech for FREE!
Get unlimited access to 7500+ expert-authored eBooks and video courses covering every tech area you can think of.
Renews at €14.99/month. Cancel anytime
- This gives details like project name and a brief summary of the project, and more importantly, gives the group ID, artifact ID, and version ID for the project. Further, Finish the creation of new project.
Those of you who know Maven and its artifact structure, will now have got an insight on how a project is built. Yes! The project created is a Maven module and is deployed as one.
Business Process Modeling
Therefore, we are ready to create our first business process model by using jBPM.
- Go to New Item | Business Process:

Provide the name for the business process; here, we are trying to create a very primitive process as an example.
- Now, the workbench will show you the process modeler for modeling the business process. Click the zoom button in the toolbar, if you think you need more real estate for modeling

Basically, the workbench can be divided into five parts:
- Toolbar (on the top): It gives you a large set of tools for visual modeling and saving the model.
- Object library (on the left side of the canvas): It gives you all the standard BPMN construct stencils, which you can drag and drop to create a model.
- Workspace (on the center): You get a workspace or canvas on which you can draw the process models. The canvas is very intuitive; if you click on an object, it shows a tool set surrounding it to draw the next one or guide to the next object.
- Properties (on the right side of the canvas): It gives the property values for all the attributes associated with the business process and each of its constructs.
- Problems (on the bottom): It gives you the errors on the business process that you are currently modeling. The validations are done on save, and we have provisions to have autosave options.
Therefore, we can start modeling out first process. I assume the role of a business analyst who wants to model a simple process of content writing. This is a very simple process with just two tasks, one human task for writing and the other for reviewing.
We can attach the actor associated with the task by going to the Properties panel and setting the actor. In this example, I have set it as admin, the default user, for the sake of simplicity.

Now, we can save the project by using the Save button; it asks for a check-in comment, which provides the comment for this version of the process that we have just saved. Process modeling is a continuous process, and if properly used, the check-in comment can helps us to keep track on the objectives of process updates.
Building and deploying the project
Even though the project created is minuscular with just a sample project, this is fully functional! Yes, we have completed a business process, which will be very limited in functionality, but with its limited set of functionalities (if any), it can be deployed and operated.
Go to Tools | Project Editor, and click Build & Deploy, as shown in the following screenshot:

To see the deployment listed, go to Deploy | Deployments to see Deployment Units

This shows the effectiveness of jBPM as a rapid application builder using a business process. We can create, model, and deploy a project within a span of minutes.
Running your first process
Here, we start the operation management using jBPM. Now, we assume the role of an operational employee. We have deployed a process and have to create a process instance and run it.
- Go to Process Management | Process Definitions.

- Click New Instance and start the process. This will start a process instance.

- Go to Process Management | Process Instances to view the process instance details and perform life cycle actions on process instances.The example writing process consists of two human tasks. Upon the start of the process instance, the Write task is assigned to the admin. The assigned task can be managed by going to the task management functionality.
- Go to Tasks | Tasks List:

In Tasks List, we can view the details of the human tasks and perform human task life cycle operations such as assigning, delegating, completing, and aborting a task.
Embedding jBPM in a standalone Java application
The core engine of jBPM is a set of lightweight libraries, which can be embedded in any Java standalone application. This gives the enterprise architects the flexibility to include jBPM inside their existing application and leverage the functionalities of BPM.
Modeling the business process using Eclipse tooling
Upon running the installation script, jBPM installs the web tooling as well as the Eclipse tooling. The Eclipse tooling basically consists of the following:
- jBPM project wizard: It helps you to create a jBPM project easily
- jBPM runtime: An easy way of choosing the jBPM runtime version; this associates a set of libraries for the particular version of jBPM to the project
- BPMN Modeler: It is used to model the BPMN process
- Drools plugin: It gives you the debugging and operation management capabilities within Eclipse
Creating a jBPM project using Eclipse
The Eclipse web tooling is available in the installer root folder. Start Eclipse and create a new jBPM Maven project:
- Go to File | New Project | jBPM Project (Maven).
- Provide the project name and location details; now, the jBPM project wizard will do the following:
- Create a default jBPM project for you with the entire initial configuration setup
- Attach all runtime libraries
- Create a sample project
- Set up a unit testing environment for the business process
- The Eclipse workbench is considerably similar to the web tooling workbench.

Similar to web tooling, it contains the toolbox, workspace, palette showing the BPMN construct stencils, and the property explorer.
We can create a new BPMN process by going to New Project Wizard and selecting jBPM | BPMN2 Process. Give the process file name and click Finish; this will create a default BPMN2 template file. The BPMN2 modeler helps to visually model the process by dragging and dropping BPMN constructs from the palette and connecting them using the tool set.
Deploying the process programmatically
For deploying and running the business process programmatically, you have to follow these steps:
KIE is the abbreviation for Knowledge Is Everything.
- Creating the knowledge base: Create the Kie Services, which is a hub giving access to the services provided by Kie:Using the Kie Service, create Kie Container, which is the container for the knowledge base:
KieContainer kContainer = ks.getKieClasspathContainer();
Create and return the knowledge base with the input name:
KieBase kbase = kContainer.getKieBase("kbase");
- Creating a runtime manager: The runtime manger manages the runtime build with knowledge sessions and Task Service to create an executable environment for processes and user tasks.Create the JPA entity manager factory used for creating the persistence service, for communicating with the storage layer:
EntityManagerFactory emf = Persistence.createEntityManagerFactory(
"org.jbpm.persistence.jpa");
Create the runtime builder, which is the dsl style helper to create the runtime environment:
RuntimeEnvironmentBuilder builder = RuntimeEnvironmentBuilder.Factory.get()
.newDefaultBuilder().entityManagerFactory(emf)
.knowledgeBase(kbase);
Using the runtime environment, create the runtime manager:
RuntimeManager RuntimeManager = RuntimeManagerFactory.Factory.get()
.newSingletonRuntimeManager(builder.get(), "com.packt:introductory-sample:1.0");
- Creating the runtime engine: Using the runtime manager, creates the runtime engine that is fully initialized and ready for operation:
RuntimeEngine engine = manager.getRuntimeEngine(null);
- Starting the process: Using the runtime manager, create a knowledge session and start the process:
KieSession ksession = engine.getKieSession();
ksession.startProcess("com.sample.bpmn.hello");
This creates and starts a process instance.
From the runtime manager, we can also access the human task service and interact with its API.
Go to Window | Show View | Others | Drools | Process Instances to view the created process instances:

Writing automated test cases
jBPM runtime comes with a test utility, which serves as the unit testing framework for automated test cases. The unit testing framework uses and extends the capabilities of the JUnit testing framework and basically provides the JUnit life cycle methods and the jBPM runtime environment for testing and tearing down the runtime manager after test execution. Helper methods manage the knowledge base and the knowledge session, getting workitem handlers and assertions to assert process instances and various stages.
For creating a JUnit test case, create a class extending org.jbpm.test.JbpmJUnitBaseTestCase
We can initialize the jBPM runtime by using the previous steps and assert using the helper methods provided by org.jbpm.test.JbpmJUnitBaseTestCase.
For example, we assert the completion of a process as follows:
assertProcessInstanceCompleted(processInstance.getId(), ksession);
Change management – updating deployed process definitions
We have modeled a business process and deployed it; the application end users will create process instances and fulfill their goals by using the business process. Now, as the organization evolves, we need a change in the process; for example, the organization has decided to add one more department. Therefore, we have to update the associated business processes.
Technically, in jBPM, we cannot have an update in an already deployed process definition; we need to have a workaround. jBPM suggests three strategies for a process migration.
- Proceed: We will introduce the new process definition and retire the old definition. Retiring should be taken care of by the application so that all process instance calls for the process are redirected to the new process definition.
- Abort: The existing process is aborted, and we can restart the process instance with the updated process definition. We have to be very careful in this approach if the changes are not compatible with the state of the process instances. This can show abrupt behaviors depending on how complex your process definition is.
- Transfer: The process instance is migrated to the new process definition; that is, the states of the process instance and instances of activity should be mapped. The jBPM out-of-the-box support provides a generic process upgrade API, which can be used as an example.
Summary
This article would have given you the "Hello world" hands-on experience in jBPM. With your jBPM installation ready, we can now dive deep into the details of the functional components of jBPM.
Resources for Article:
Further resources on this subject:

 United States
 Great Britain
 India
India
 Germany
 France
 Canada
 Russia
 Spain
Spain
 Brazil
 Australia
 South Africa
 Thailand
 Ukraine
 Switzerland
 Slovakia
 Luxembourg
 Hungary
 Romania
 Denmark
 Ireland
 Estonia
 Belgium
 Italy
Italy
 Finland
 Cyprus
 Lithuania
 Latvia
 Malta
Malta
 Netherlands
 Portugal
 Slovenia
 Sweden
 Argentina
 Colombia
 Ecuador
 Indonesia
 Mexico
 New Zealand
 Norway
 South Korea
 Taiwan
 Turkey
 Czechia
 Austria
 Greece
 Isle of Man
 Bulgaria
 Japan
Japan
 Philippines
 Poland
 Singapore
 Egypt
Egypt
 Chile
Chile
 Malaysia