Getting started with OMS
The following information will show you how to get started with OMS by setting up a Log Analytics workspace. There are several ways to create a Log Analytics workspace:
- Create a workspace through the Microsoft OMS
Overviewpage - Create a Log Analytics workspace in the Azure portal
- Create and configure a Log Analytics workspace using Azure Resource Manager templates
- Create and configure a Log Analytics workspace using Log Analytics PowerShell cmdlets
This section will focus on creating a Log Analytics workspace and onboarding through the Azure portal.
Getting ready
To get started with OMS Log Analytics, you will need to make use of an Azure account. If you don't have an Azure account, you can create a free account, which will give you access to the Azure service. This free account will be available for 30 days.
How to do it...
We can start the on-boarding process using the following steps:
Creating an Azure account
To create a free account, go through the following steps:
- Navigate to https://azure.microsoft.com/en-us/free/?v=17.23h and follow the instructions to create your account. You will be able to make use of a work, school, or personal email account. You can also create a new Microsoft account that you can authenticate with Azure.
- Sign in and follow the instructions to create an account.
Creating an OMS Log Analytics workspace
Once you have access to the Azure service, you are ready to create your OMS Log Analytics workspace:
- Navigate to the
Azure Portal(http://portal.azure.com) and sign in. - In the Azure Portal, click the
Newbutton and type Log Analytics in the marketplace search field. SelectLog Analytics:
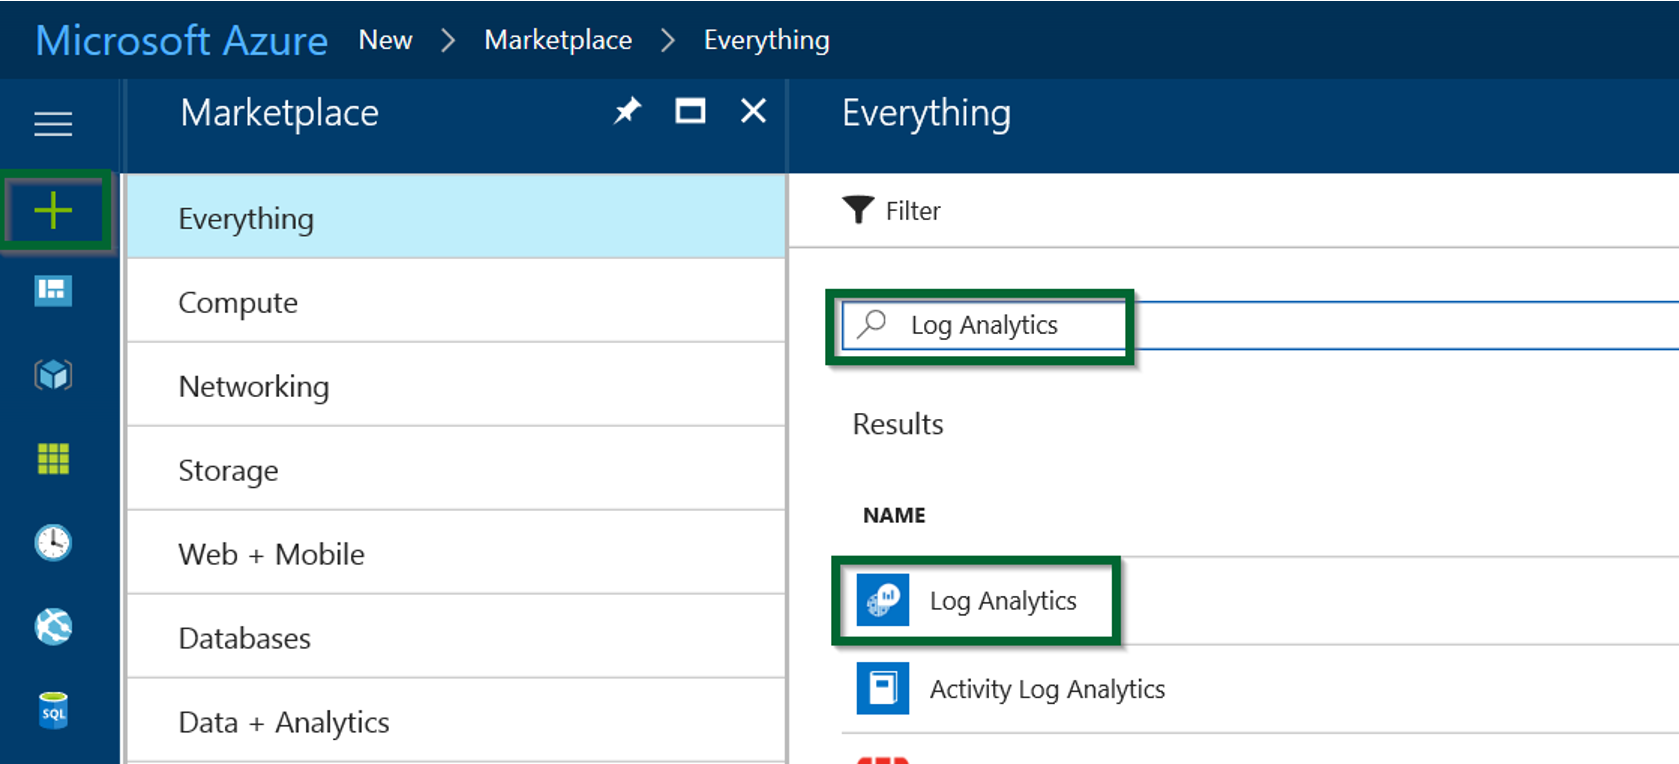
Figure 1.13 Log Analytics workspace
- Click the
Createbutton and enter or select information for the following fields:
- OMS Workspace: Enter a name for your workspace
- Azure subscription: Select the Azure subscription that you would like to assign to your OMS Log Analytics workspace. You can change your OMS workspace Azure subscription at any time.
- Resource group: You can choose to create a new resource group or use an existing one using the radio button. Select the existing resource group from the dropdown.
- Location: Select the Azure region.
- Pricing tier: Select a pricing tier that will govern the cost of your OMS Log Analytics workspace, and the solutions you use. You can choose from the following options:
FreePer Node (OMS)Per GB (Standalone)StandardPremium
Note
A resource group is a container that holds related resources for an Azure solution.

Figure 1.14 - Creating Log Analytics workspace
- Click
OKto finish creating your workspace.
- You can now filter for Log Analytics in the Azure portal to see your new OMS Log Analytics workspace.
- Click on your Log Analytics workspace. You can now review the settings and features for your workspace:
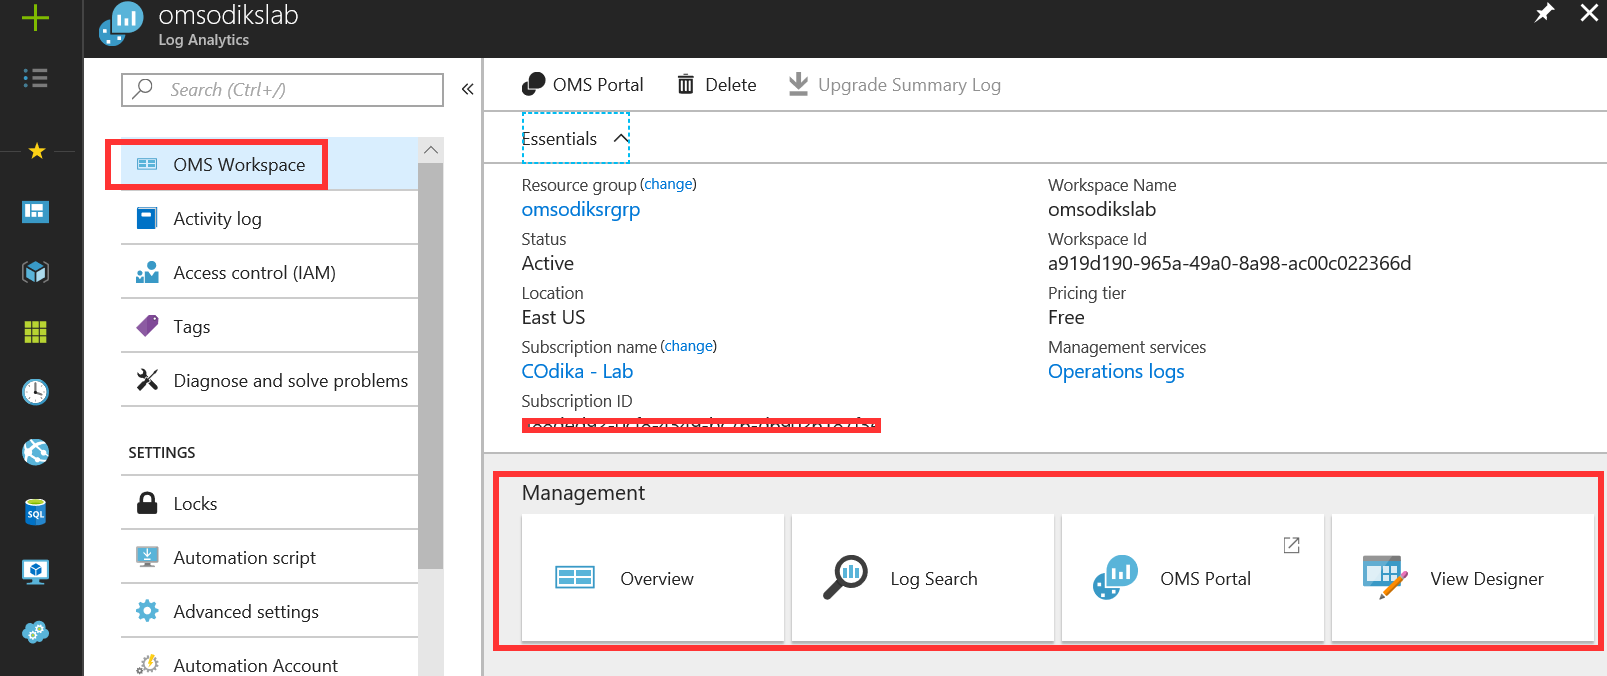
Figure 1.15 - Log Analytics workspace
Adding solution offerings and solutions
After creating the Log Analytics workspace, you can add solution offerings and management solutions to your workspace. Management solutions are collections of logic, data collection, and visualization rules that provide you with information that is pertinent to a particular problem area. Solution offerings are bundles of management solutions.
To add solution offerings and solutions through the Azure portal, go through the following steps:
- Navigate to the Azure portal and click the
Newbutton. Type the name of the solution you would like to add, such asActivity Log Analytics, into the marketplace search field and press Enter.
- Select
Activity Log Analyticsin theEverythingblade, and clickCreate:

Figure 1.16 - Log Analytics solution offerings
- In the
Activity Log Analyticsblade, select the workspace you would like to associate with the management solution and clickCreate:
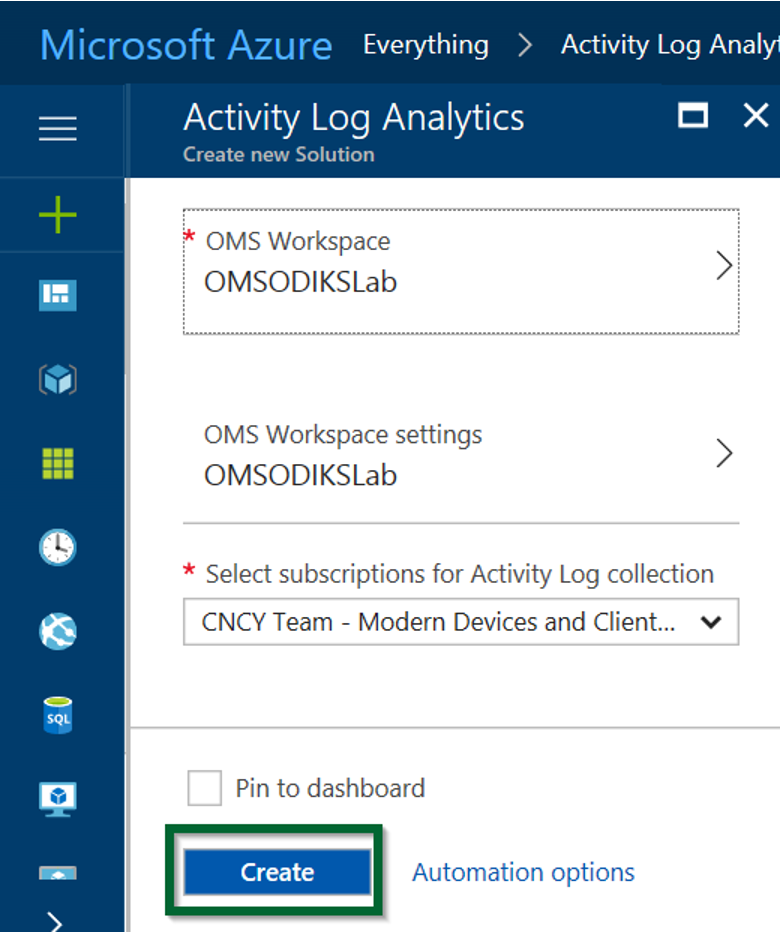
Figure 1.17 - Adding solution offerings to Log Analytics
- Repeat the preceding steps to add additional service offerings and solutions to your workspace.
From the marketplace, follow steps 1-3 to add the Security & Compliance service offering to your workspace to get the Antimalware Assessment and Security and Audit solutions. Additionally, you can add the Automation & Control service to get the System Update Assessment, Change Tracking, and Automation Hybrid Worker solutions:
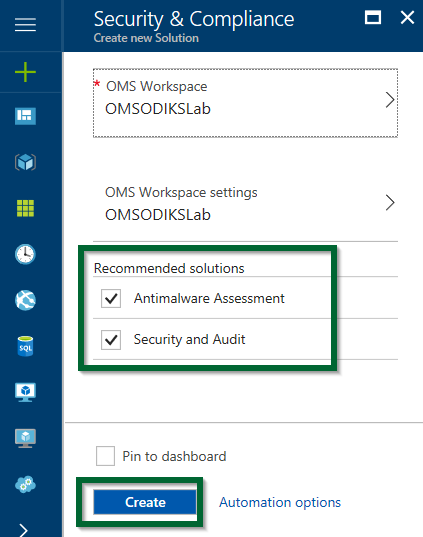
Figure 1.18 - Adding Security and Compliance solutions
- After adding solutions to your workspace, you can view the management solutions by navigating to
Log Analytics, clicking on your workspace name, and, in the Workspace blade, selectingOverviewunderManagement:
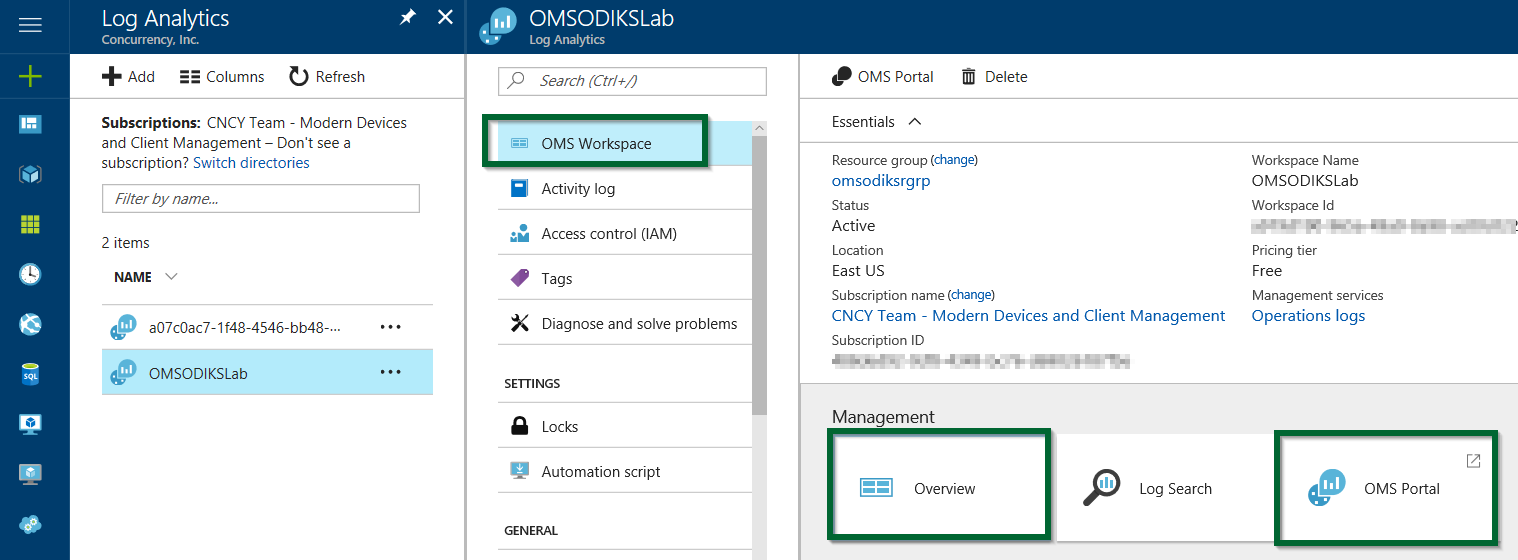
Figure 1.19 - Viewing Log Analytics solutions
Once in the Overview page, you can see the solutions tiles for the solutions that you have added to workspace:
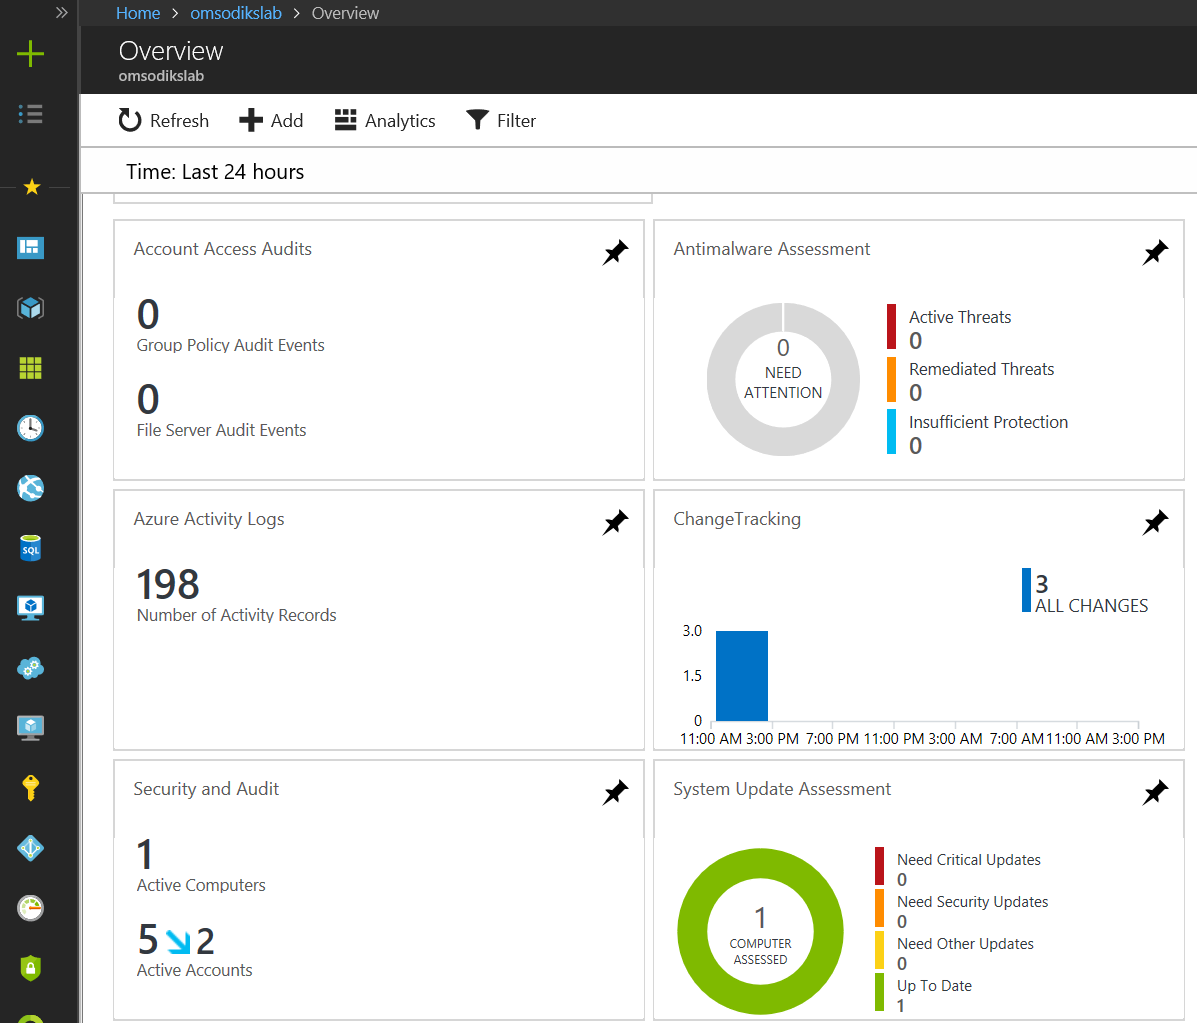
Figure 1.20 - Log Analytics solution tiles in Azure Portal
Note
Alternatively, while in the workspace blade, you can click on OMS Portal to take you to the portal on the OMS website. We'll look at some operations that can be performed in the OMS portal in the following sections of this chapter and in subsequent chapters of this book.
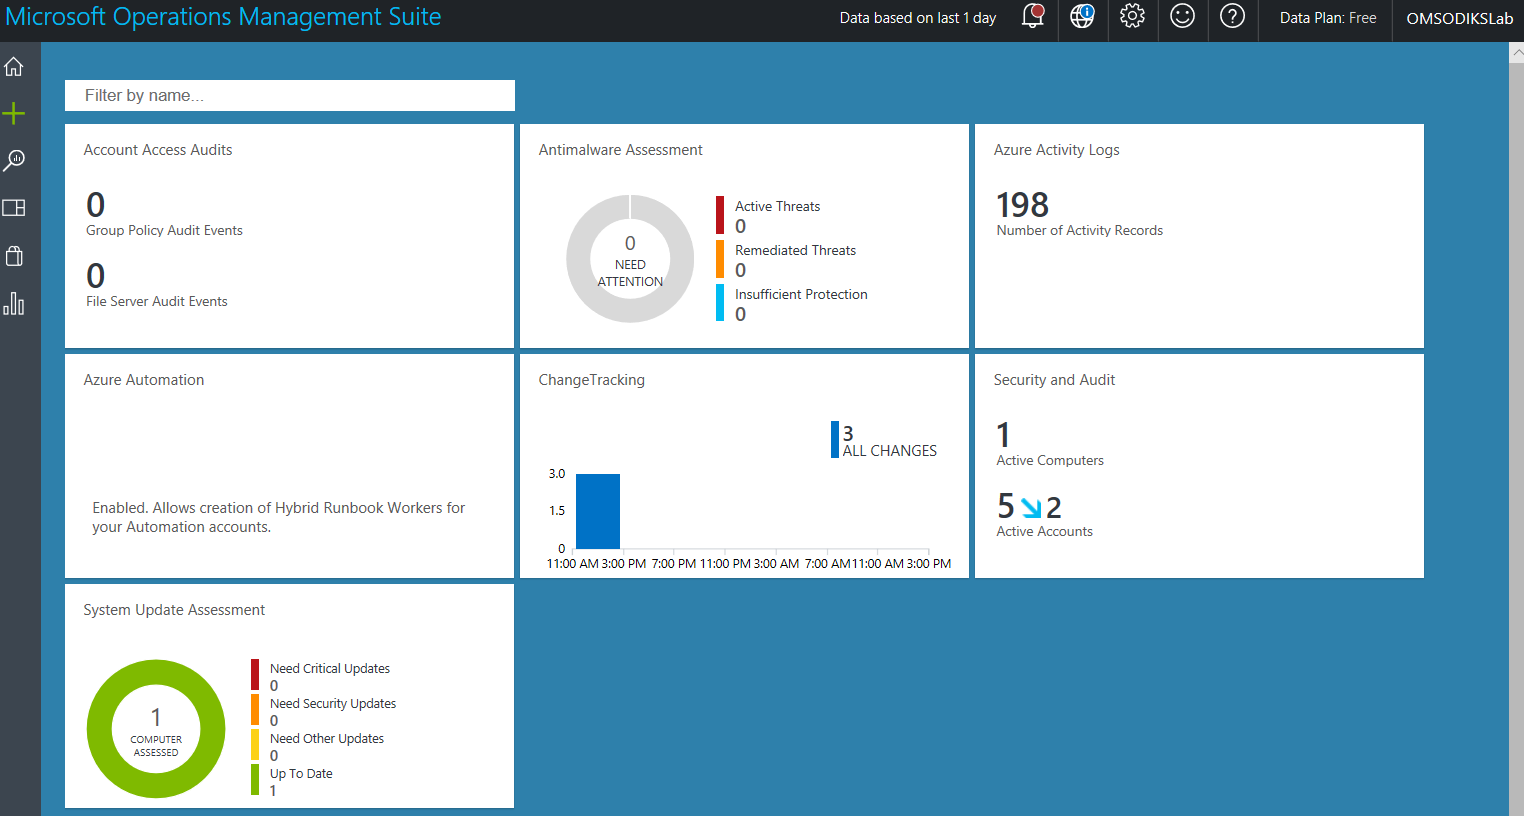
Figure 1.21 - Log Analytics workspace in the OMS portal
Connecting Azure VMs to OMS Log Analytics in Azure portal
After adding solution offerings and solutions to your OMS workspace, you are now ready to connect sources to the workspace to start collecting some data. You can enable the VM extension to connect your Azure VMs to OMS Log Analytics:
- Navigate to and sign in to the Azure portal.
- Search for and navigate to
Log Analyticsand select yourLog Analyticsworkspace - In the
Log Analyticsblade, selectVirtual machinesunderWorkspace Data Sources - Review the list of virtual machines and the OMS connection status for each virtual machine on which you would like to install the agent:
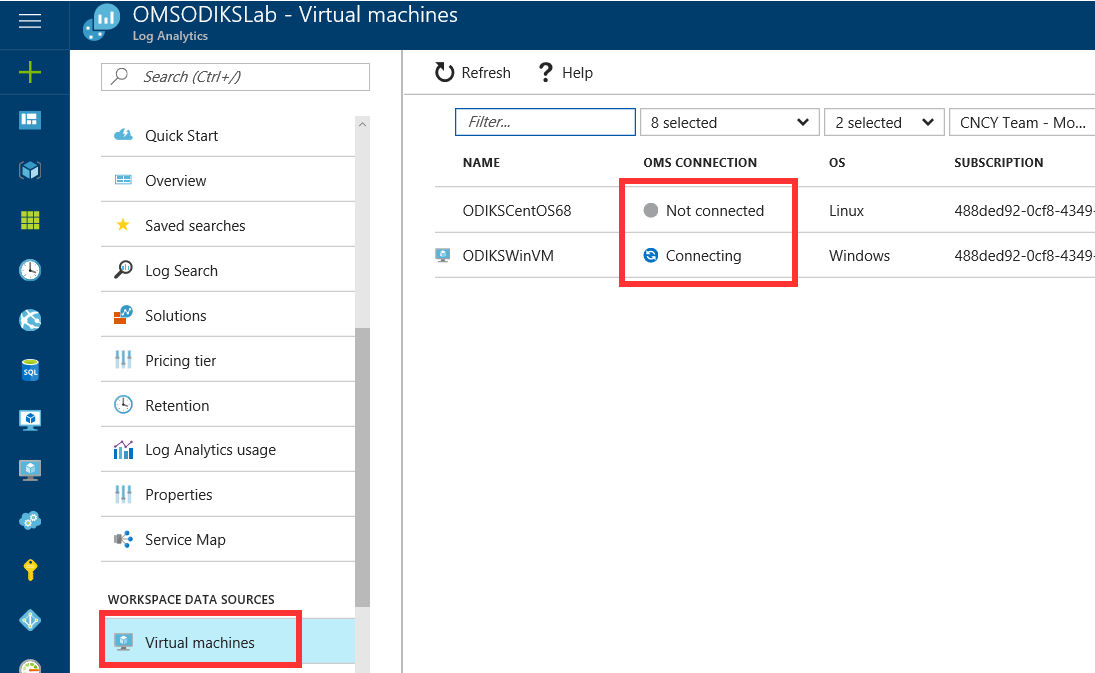
Figure 1.22 - Azure VMs connection to OMS
- Select the virtual machine that you would like to install the agent on, and in the details blade for the VM, select
Connect. This will automatically install and configure the agent for your Log Analytics workspace:
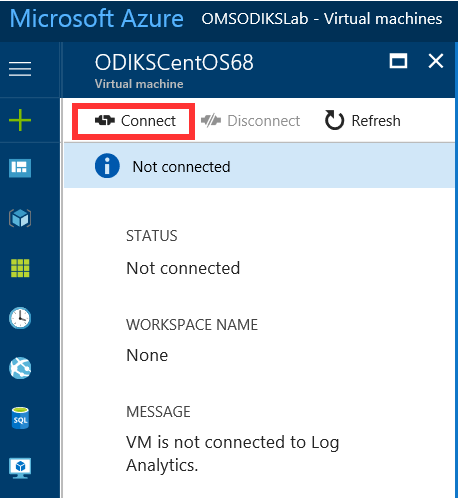
Figure 1.23 - Connecting Azure VMs to OMS Log Analytics
After the agent is installed and connected, the OMS connection status for your workspace will reflect this:
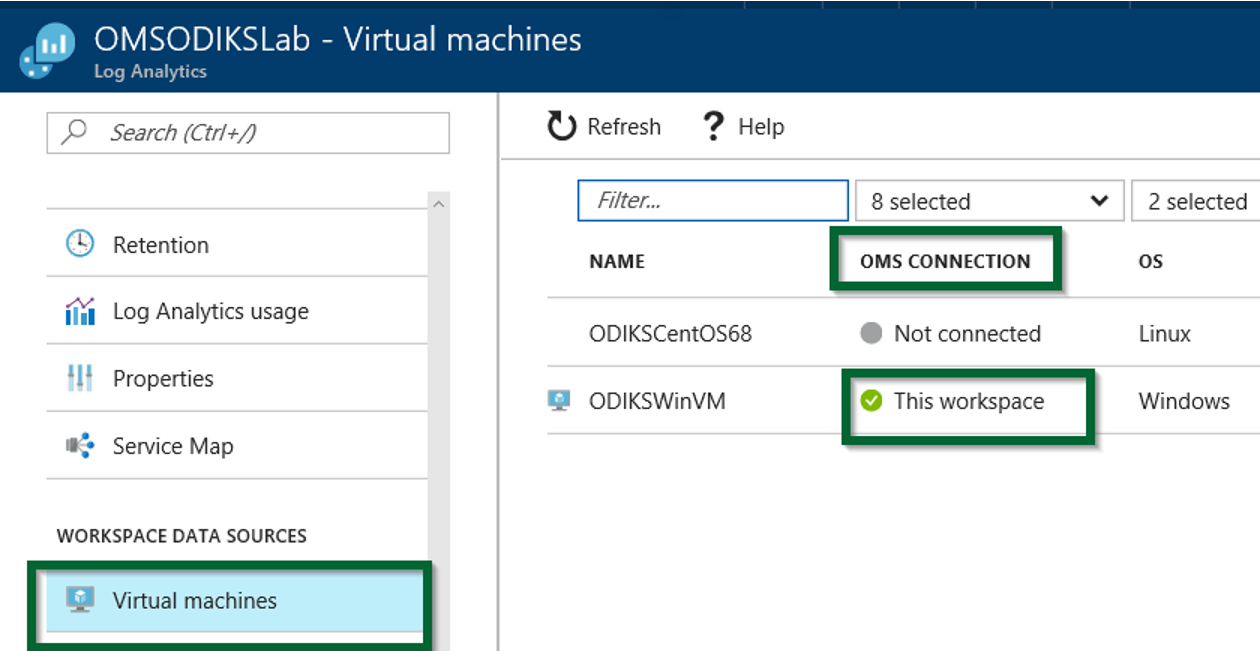
Figure 1.24 - Azure VMs connected to OMS
Connecting Windows computers to OMS Log Analytics
As mentioned earlier, you can directly connect Windows computers to your OMS Log Analytics workspace. To do this, you will need to download the agent setup file from the OMS portal or the Azure portal, install the agent, and configure it for your workspace:
- Navigate to the Azure portal, select
Log Analytics, and select yourLog Analyticsworkspace - In the
Log Analyticsworkspace blade, selectQuick Start, and underChoose a data source to connect to the workspace, selectComputers:
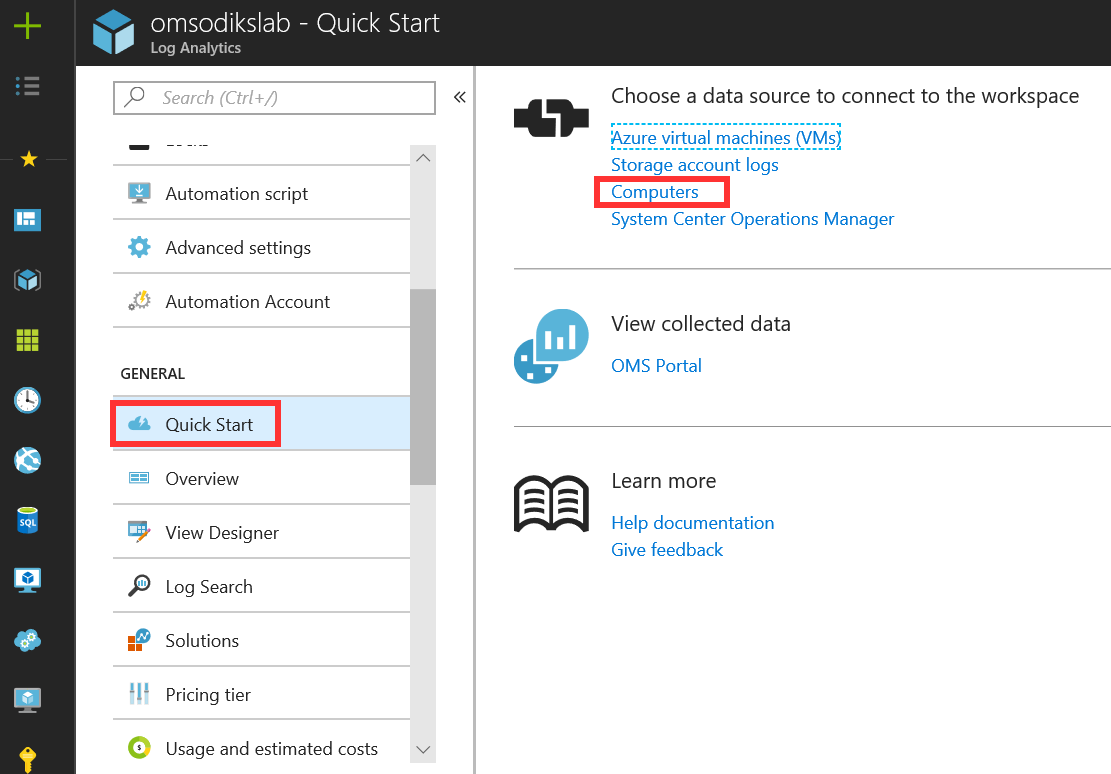
Figure 1.25 - Onboarding Windows computers to Log Analytics
- In the
Direct Agentblade, click theDownload Windows Agentthat applies to your computer processor type to download the setup file - Save the setup file to your preferred directory
- In the
Workspace ID and Keysfields, copy theWorkspace IDandPrimary Keyvalues to a Notepad for use during direct agent installation:
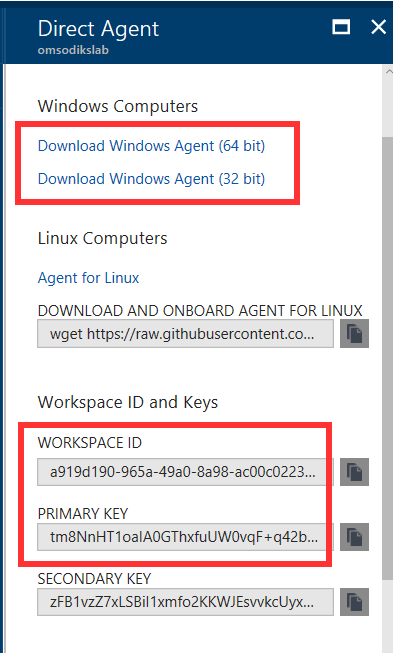
Figure 1.26- Log Analytics Windows agents
- On the computer that you want to manage with OMS Log Analytics, run the setup file, and click
Nexton the Welcome page - On the
License Termspage, read the terms and clickI Agree
- On the
Destination Folderpage, change or keep the default folder and clickNext - In the
Agent Setupoptions page, select theConnect the agent to Azure Log Analytics (OMS)and clickNext
- Paste the Workspace ID and Primary Key into the respective
Workspace IDandWorkspace Keyfields, select your preferredAzure Cloudoption (Azure Commercialis default) and clickNext:
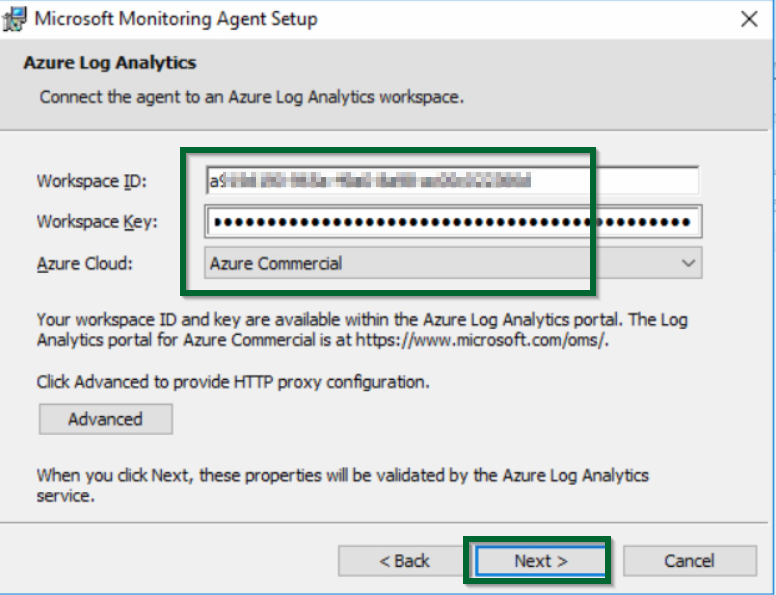
Figure 1.27 - Connecting the Windows Agent to the Log Analytics workspace
- On the
Ready to Installpage, review your choices and clickInstall - Click
Finishonce the configuration completes successfully
- You will now see the Microsoft Monitoring Agent in the
Control Panelof the agent computer. Open the properties of the agent, and under theAzure Log Analytics (OMS)tab you will now see a confirming status -The Microsoft Monitoring Agent has successfully connected to the Microsoft Operations Management Suite Service:
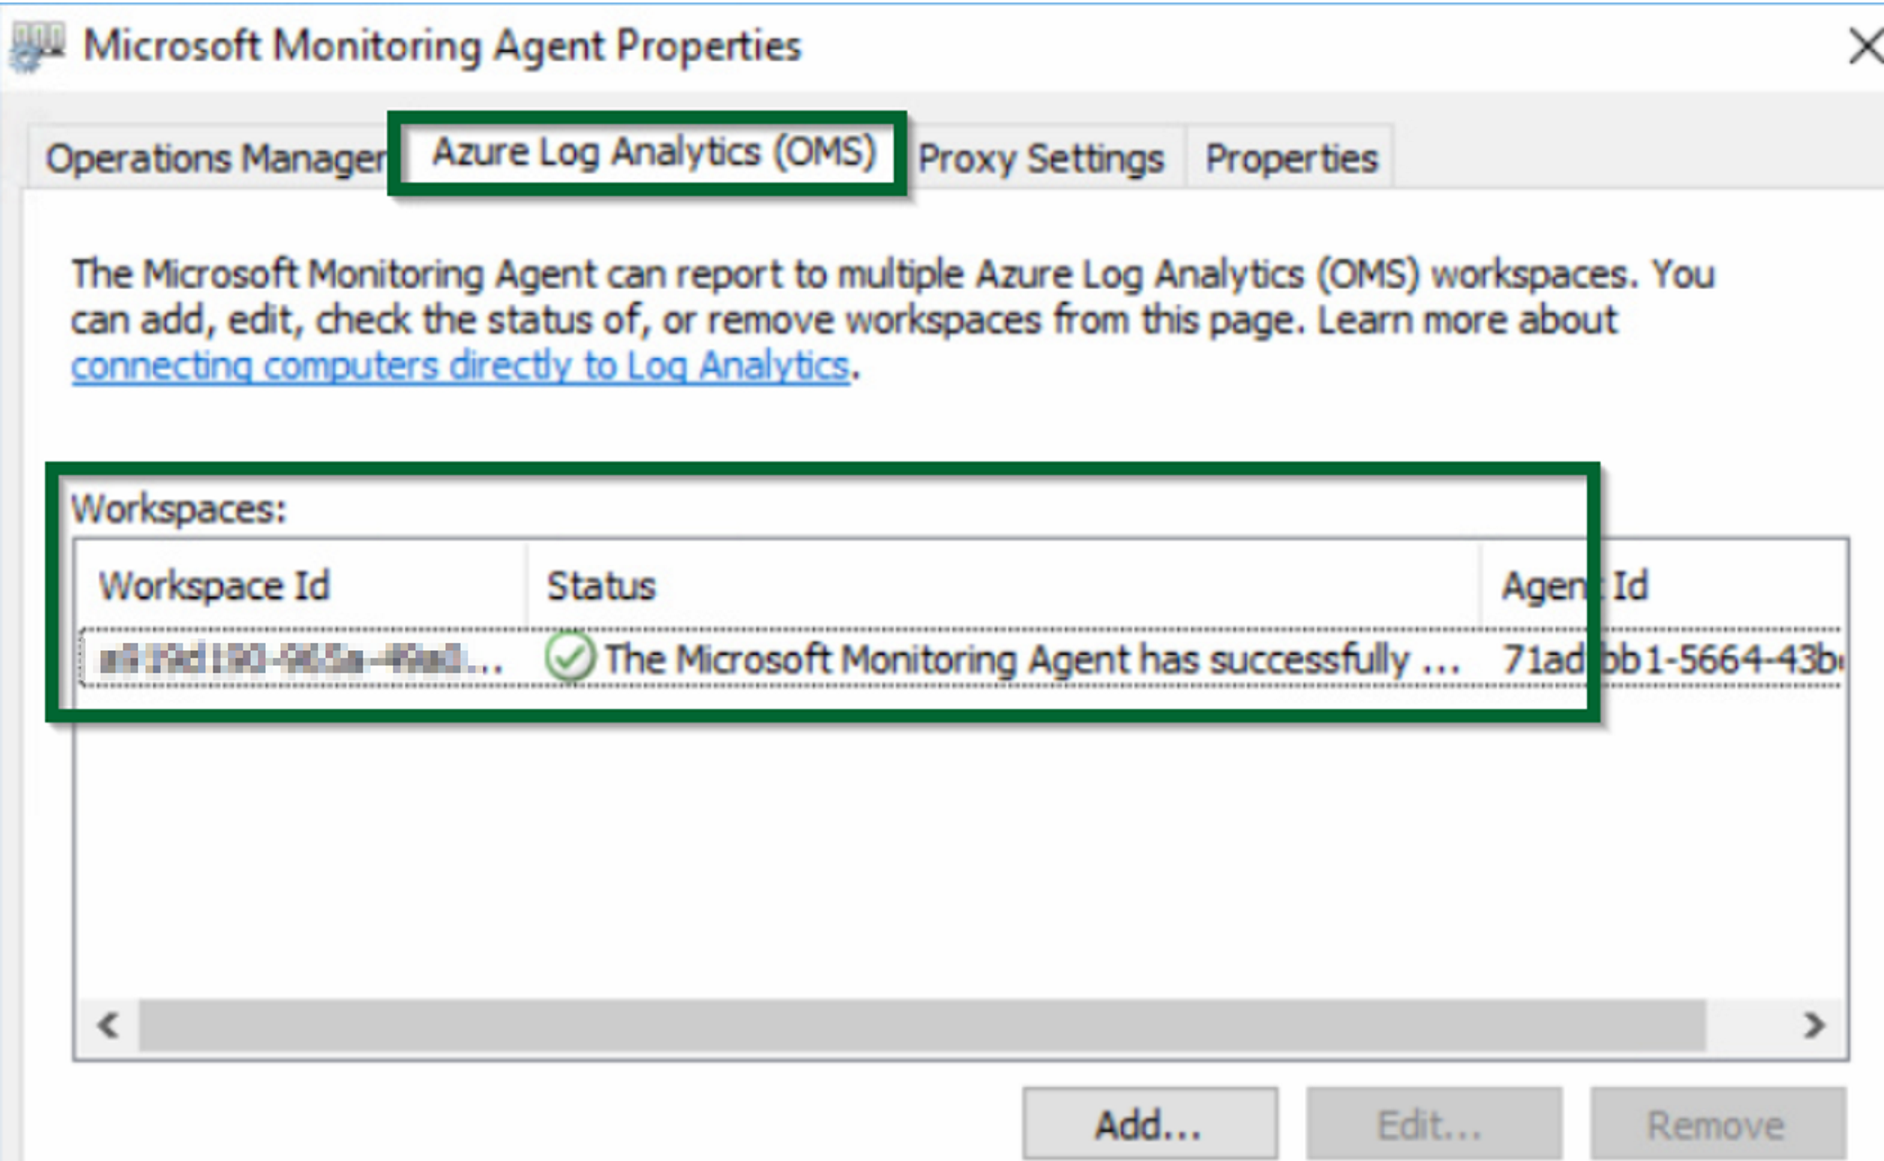
Figure 1.28 - OMS Log Analytics Windows Agent properties
Adding data sources in OMS
As mentioned previously, Log Analytics collects data from the connected sources that you define in your workspace and stores that data in the OMS data stores. The data sources you configure will define the data that is then collected from each connected source. Two data sources that you can start with are Windows events and performance data.
To add a Windows event log data source to OMS, go through the following steps:
- In the OMS console, click the
Settingstile. - In the
Settingspage, click onDataand selectWindows Event Logs. - In the
Log Namefield, type the name of an event log you would like to collect. Log Analytics will suggest common event log names based on your entry.
- Type your log name, or select from the suggestions, and click the
+button to add the event log for collection:
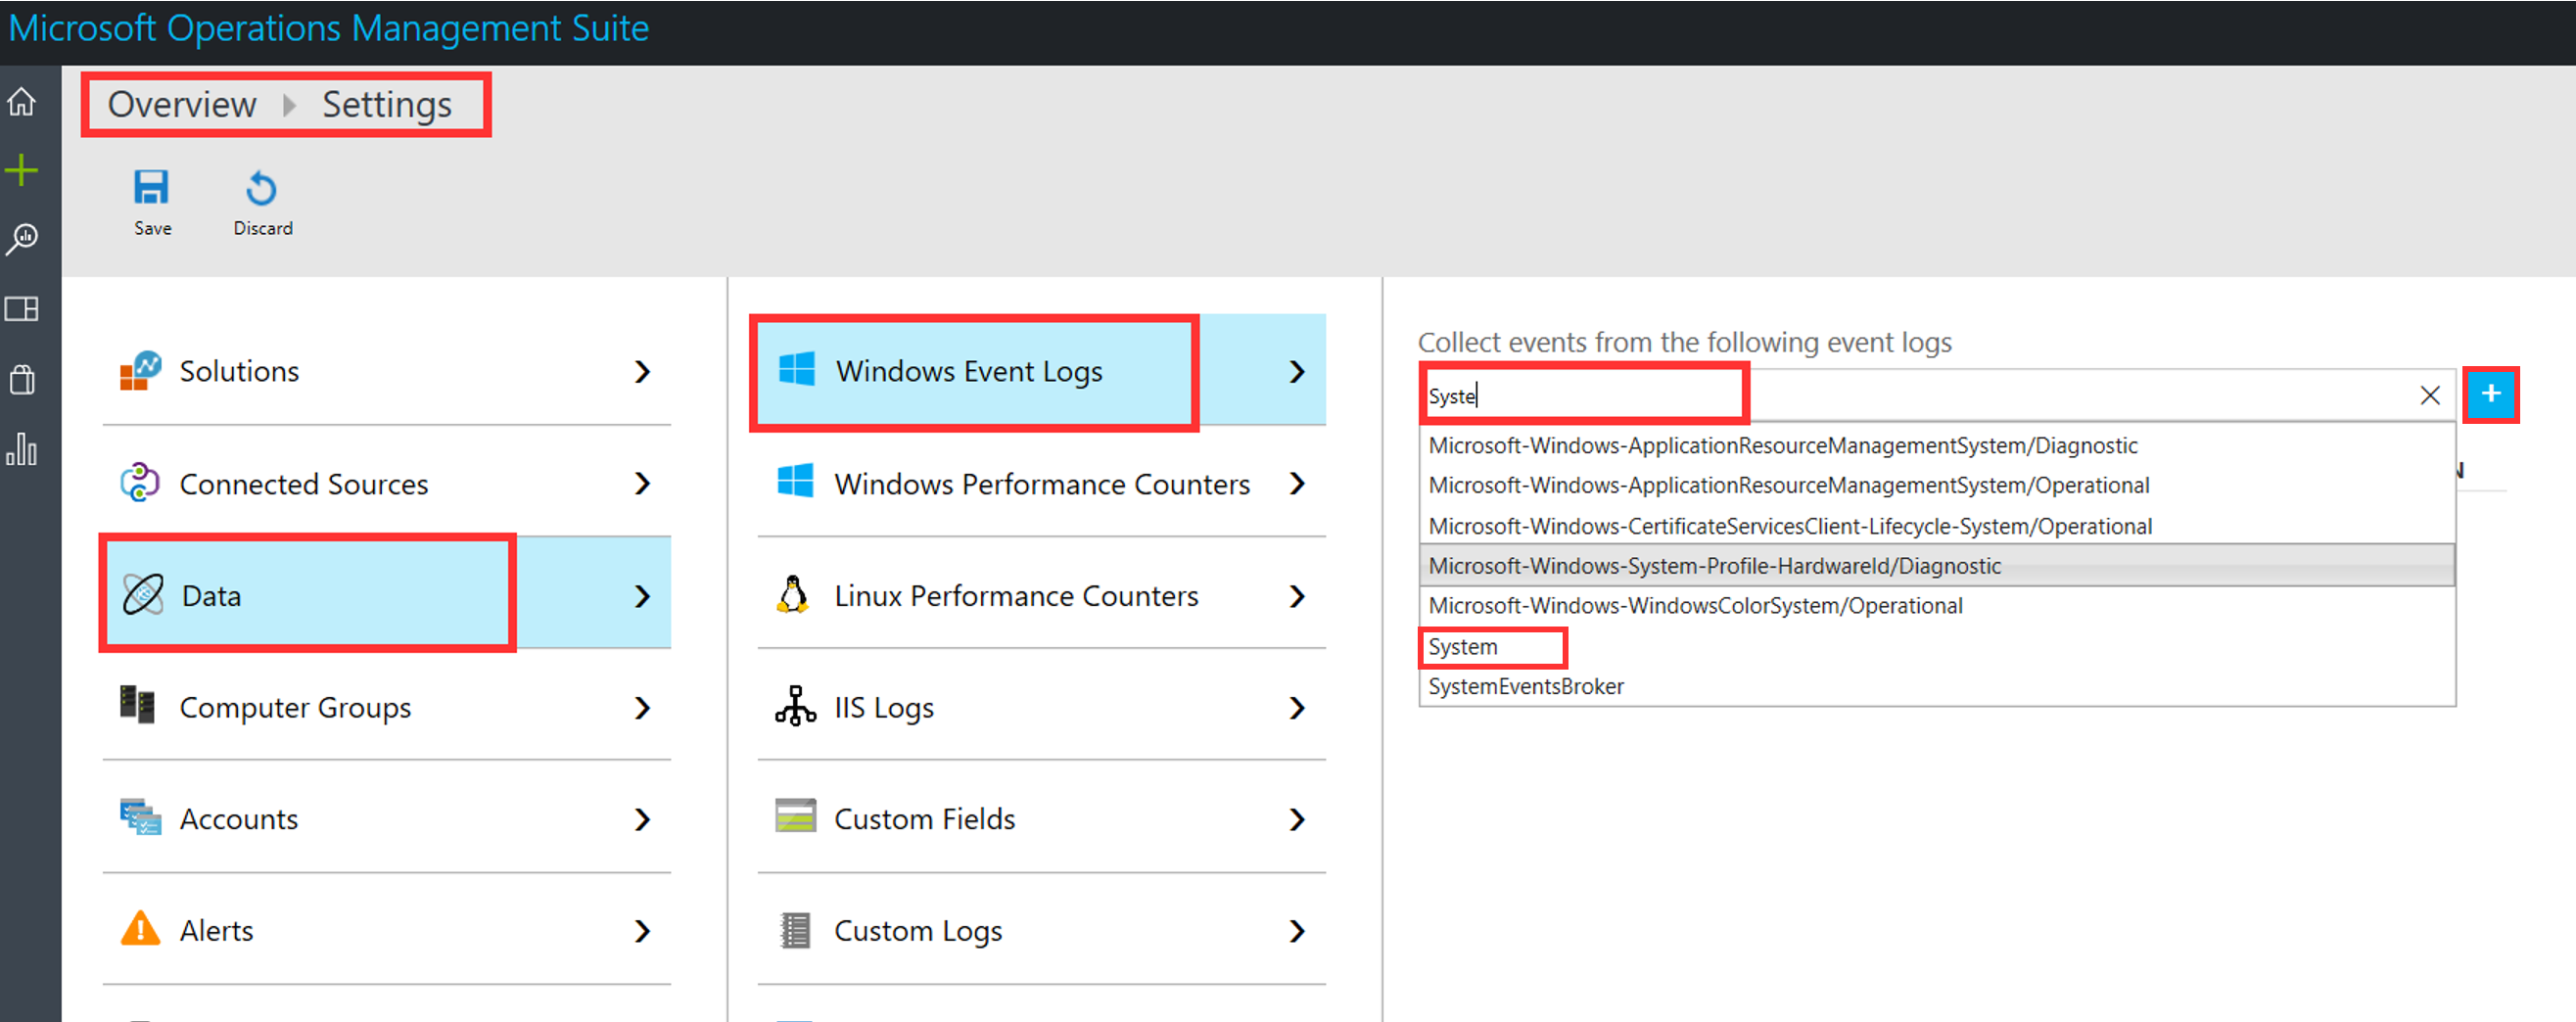
Figure 1.29 - Log Analytics event log collection
Configuring performance data sources in OMS
OMS supports the collection of Windows and Linux performance counters.
Collecting Windows performance counters:
Perform the following steps:
- In the OMS console, click the
Settingstile. - On the
Settingspage, click onDataand clickWindows Performance Counters.
- Click the
Add the selected performance countersbutton to start collecting a list of suggested performance counters. You can uncheck any of the counters before adding the other selections:
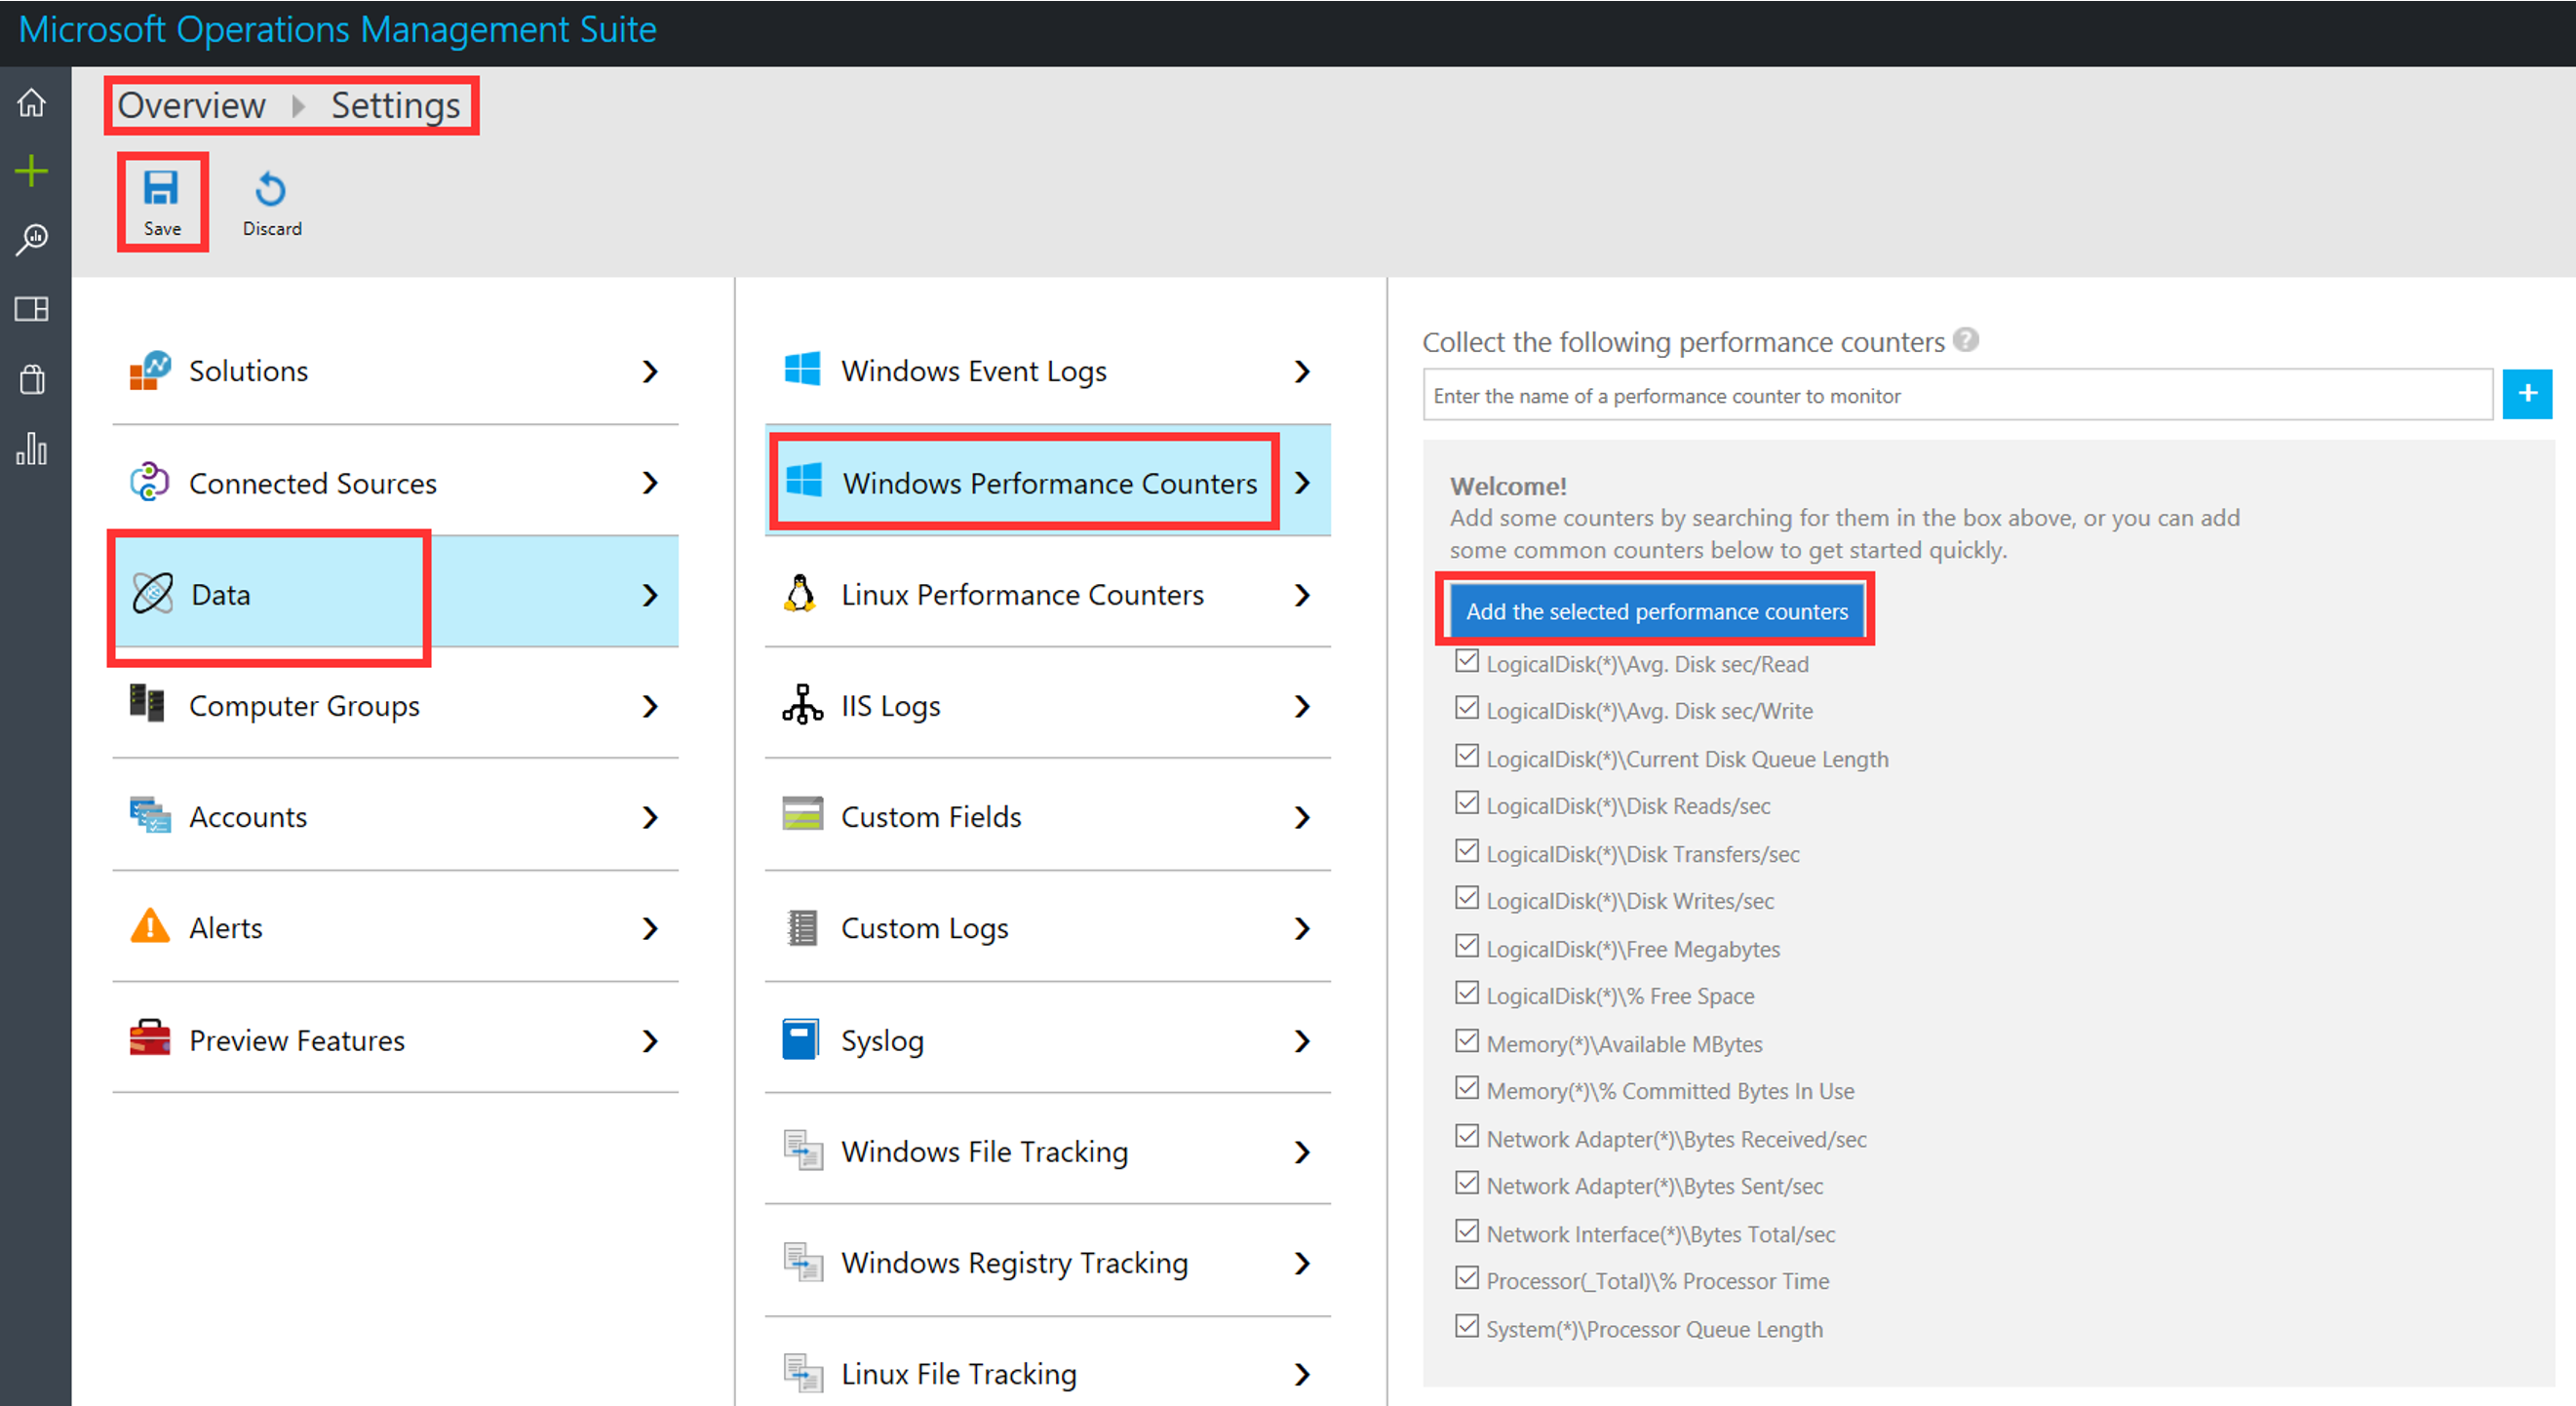
Figure 1.30 - Log Analytics Windows performance counters
- Once the counters are added, review the counters and the sample collection intervals:
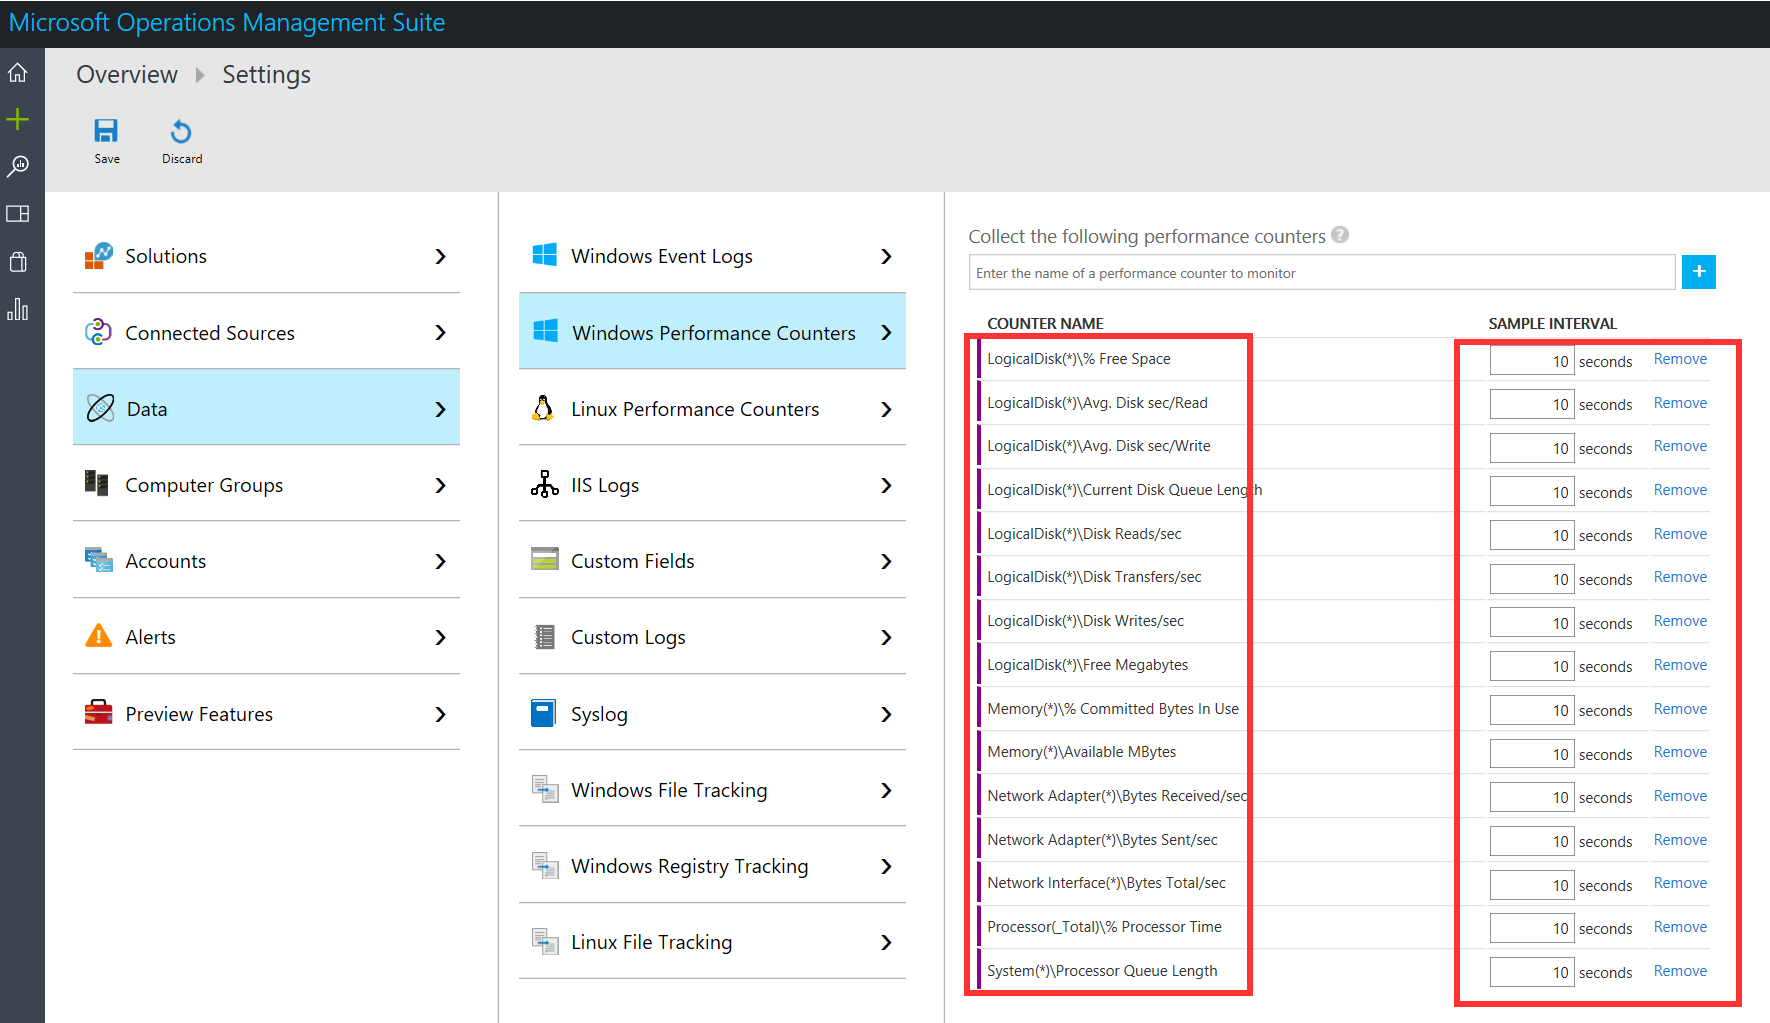
Figure 1.31 Log Analytics Windows performance counters and collection intervals
- Search for additional counters in the entry field, or use the
Removebutton next to the counter sample interval to remove any counters.
Collecting Linux performance counters:
Perform the following steps:
- In the OMS console, click the
Settingstile. - On the
Settingspage, click onDataand clickLinux Performance Counters.
- Click the
Add the selected performance countersbutton to start collecting a list of suggested performance counters. You can uncheck any of the counters before adding the other selections:
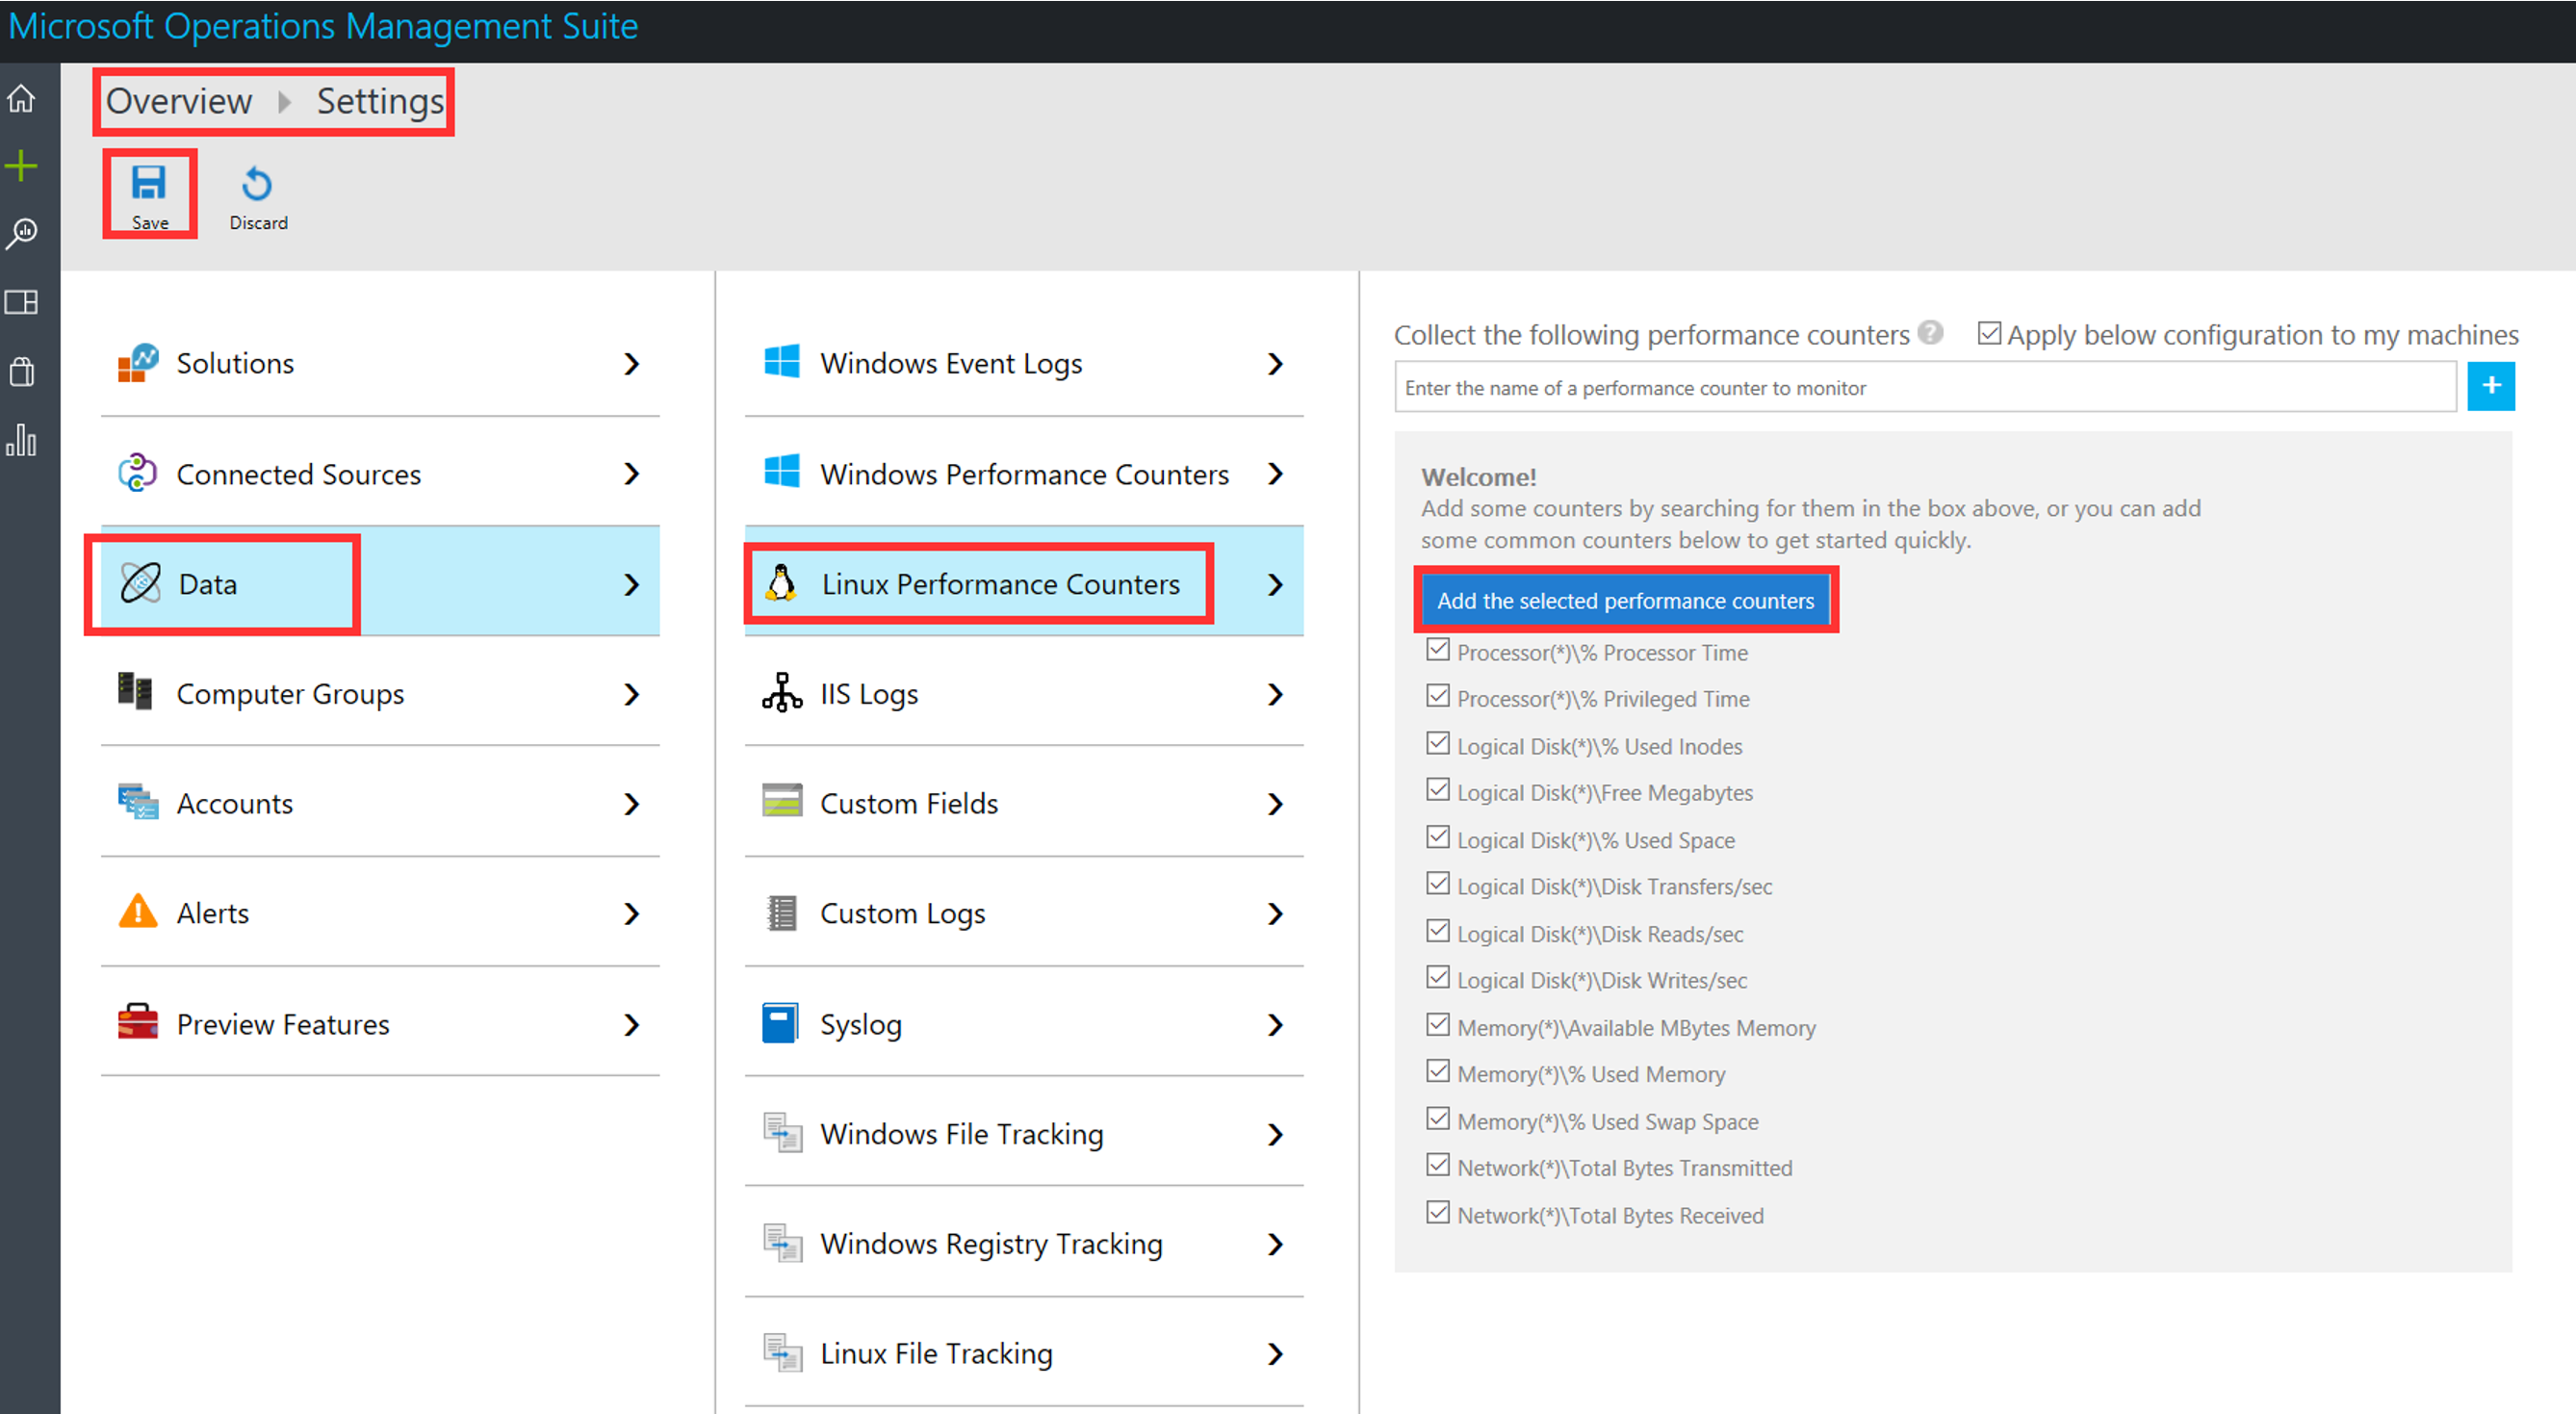
Figure 1.32 - OMS Log Analytics Linux performance counters
How it works...
To get started with OMS, set up a Log Analytics workspace. A workspace is a container and Azure resource in which data is collected, analyzed, and presented in a portal. It includes account information and simple configuration information for a given account. You can have multiple workspaces to manage different datasets. In order to create a workspace, you will need the following:
- An Azure subscription
- A name for your workspace
- An Azure geographical region
You will also need to associate your workspace with an Azure subscription. A workspace can be used as a granular unit of management for specific workloads, functional teams, or other bases. A Log Analytics workspace provides you with the following:
- Granularity for billing
- Data isolation
- Custom workload configuration
- Geographic location flexibility for data storage
You can get started with OMS by creating a workspace using any of the following methods:
- Create a workspace through the Microsoft OMS overview page
- Create a Log Analytics workspace in the Azure portal
- Create and configure a Log Analytics workspace using Azure Resource Manager templates
- Create and configure a Log Analytics workspace using Log Analytics PowerShell cmdlets
You can subsequently view, administer, and configure your workspace through the user interface portals in either Azure or the OMS website.
Once you add solutions to your workspace and connect sources to the workspace, you can then define the data that gets collected from your connected sources by defining and configuring data sources for your workspace. The configured data sources determine the nature of the collected data. The following are some examples of data sources:
- Windows event logs
- Windows and Linux performance counters
- Syslog
- IIS and custom logs
Note
For Windows event logs, Log Analytics will only collect events from the Windows event logs that you specify in your workspace. You will not, however, be able to manually add security events to your workspace. To collect security events, you will need to install the Security and Audit solution or the Security & Compliance solution, which includes the security solution.
The collected data is then stored in the OMS repository as a set of records, with each record type having a set of properties.
This collected data can then be queried using the log search feature to combine and correlate the data, and with the emphasis on particular workloads or problem areas using solutions, you can glean insights and take action on the information derived from the data. You can then further analyze the data using the various visualization capabilities in OMS.
Furthermore, you can manage accounts, users, and groups to have some measure of role-based access to your Log Analytics workspace. This can be done using Azure permissions, and in the OMS portal.
Note
The Microsoft or organizational account that creates a workspace becomes an administrator of the workspace by default.
There's more...
In addition to the Insights & Analytics and Security & Compliance solutions described in the previous section, you can also add solutions for Automation & Control (Update Management, Change Tracking, Azure Automation Hybrid Worker), and Protection & Recovery (Azure Backup and Azure Site Recovery) to your OMS Log Analytics workspace.
Managing users in the OMS portal
Perform the following steps:
- Navigate to the OMS portal (http://oms.microsoft.com) and sign in.
- On the
Overviewpage, click theSettingstile. - Click the
Accountstab and clickManage Users.
While in the Manage Users section, you can perform tasks such as adding and removing users and groups.
Adding a user or group to a workspace
Perform the following steps:
- In the
Manage Userssection, choose the account type to add. You can choose between anOrganizational Account,Microsoft Account, orMicrosoft Support. - Choose the user type:
Administrator, Contributor,orReadOnly User. - Choose whether the account is a
UserorGroup.
- Enter the name of the account and click
Add:
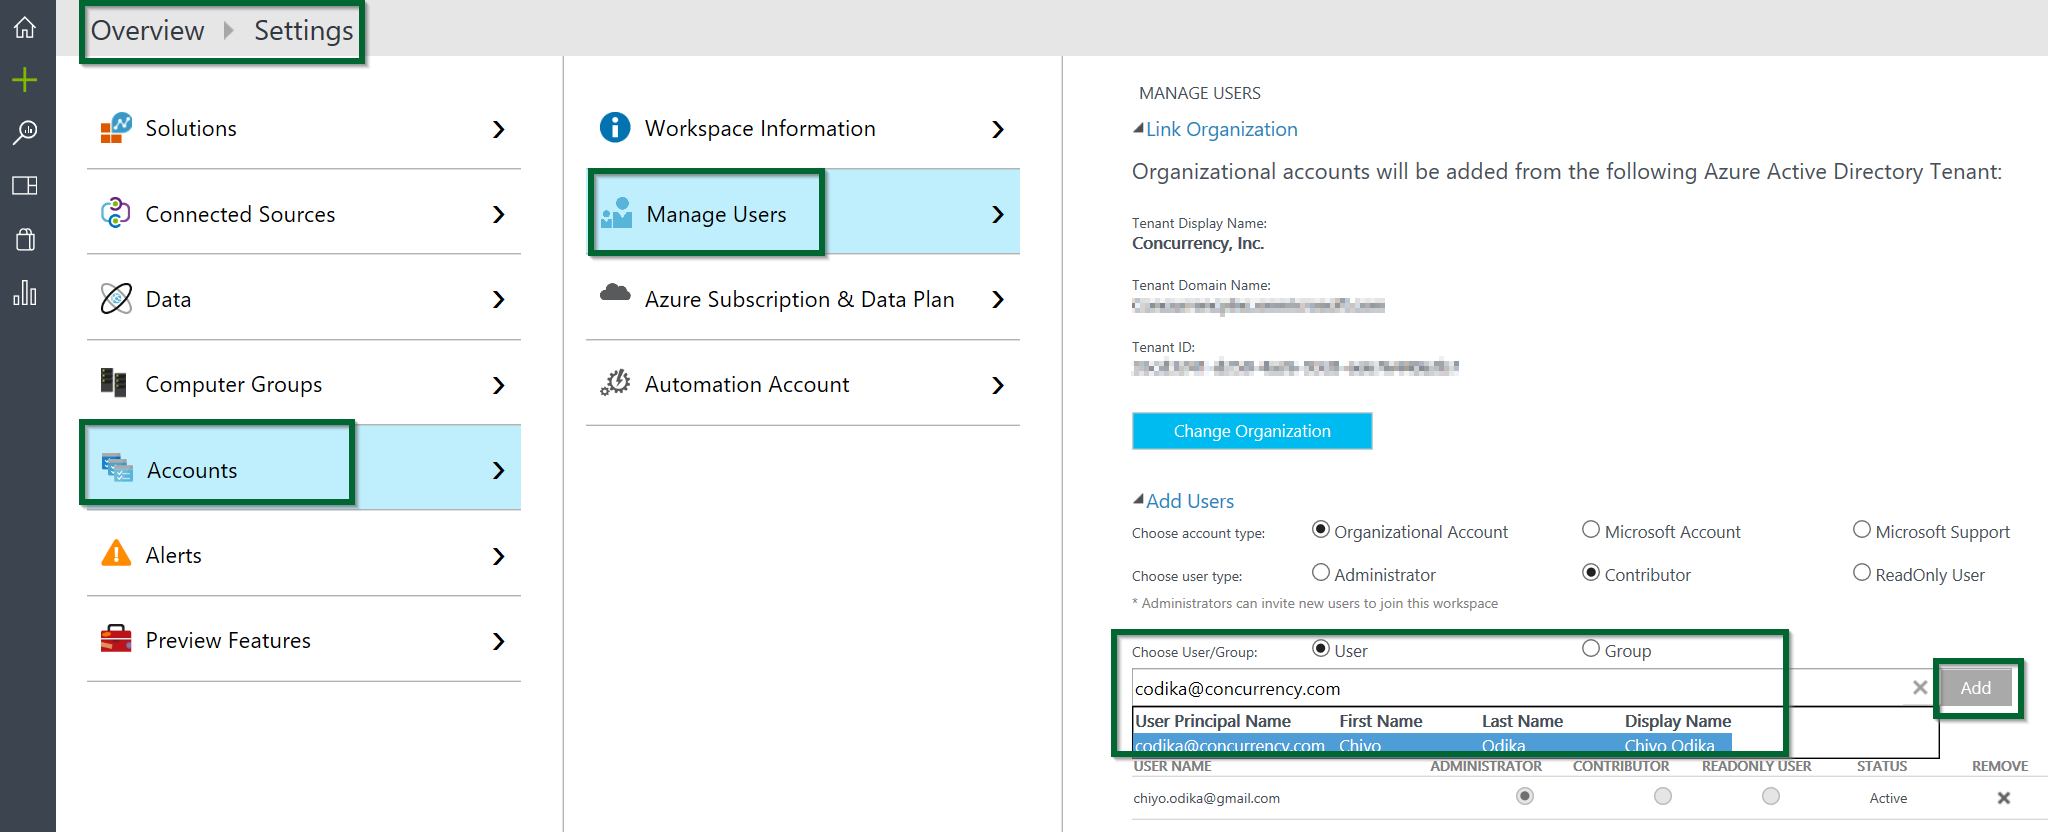
Figure 1.33 - Managing users in the OMS Log Analytics workspace
Note
If you choose the Organizational Account type, when you enter part of the name of a user or group in the account field, a list of matching users and groups will appear in a drop-down box.
Editing or removing a user or group from a workspace
Perform the following steps:
- While still in the
Manage Userssection of theOverview|Settingspage, locate the user or group you would like to edit or remove from the list of users/groups.
- Toggle to the relevant user or group type radio button to edit the user type, or click
REMOVEnext to the username you would like to remove:

Figure 1.34 - Editing users in the Log Analytics workspace
Considerations for other solution offerings
There are additional configurations required for adding the Automation & Control and the Protection & Recovery solutions respectively to your workspace, and for use with OMS.
To add the Automation & Control solution, you must create an Automation account or select an existing Automation account. An Automation account is an Azure resource through which you can manage all of your Azure, cloud, and on-premises resources:
- Navigate to the Azure portal and click the
Newbutton. TypeAutomation & Controlinto the marketplace search field and press Enter - Select
Automation & Controlin theEverythingblade and clickCreate - In the
Create New Solutionblade, click theOMS Workspacebutton and select yourOMS workspace, and check therecommended solutionsyou would like to install and click theOMS Workspace Settingstab
- In the resulting blade, confirm your workspace, Azure
Subscription,Location,Resource group, andPricing tierinformation, and click Automation account
- In the
Automation accountblade, select an existing Automation account or clickCreate an Automation account:
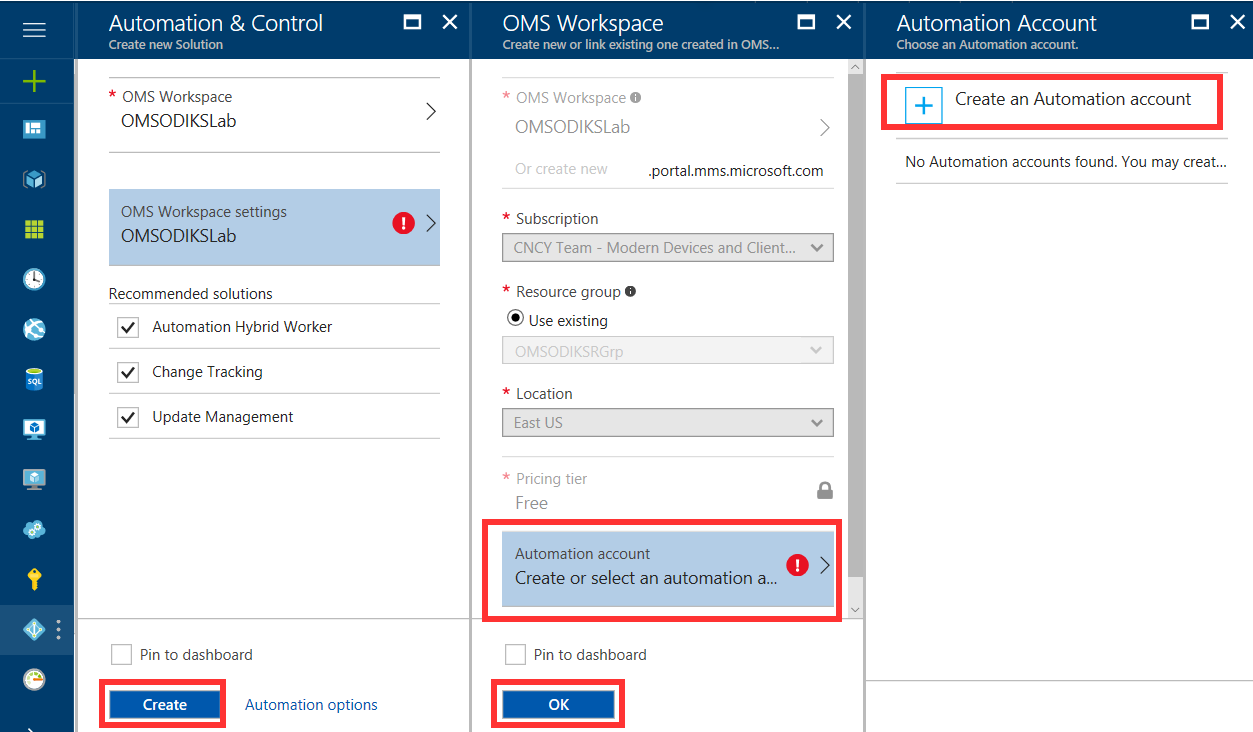
Figure 1.35 - The Automation & Control solution
Note
Creating the Automation account when you add the Automation & Control solution to your workspace establishes the integration with your OMS workspace, and enables you to install related management solutions into your workspace.
- In the
Add Automation Accountblade, enter the name of your Azure Automation account in theNamefield, review theSubscription,Resource group,Location, andAzure Run As accountcreation options, and clickOK:
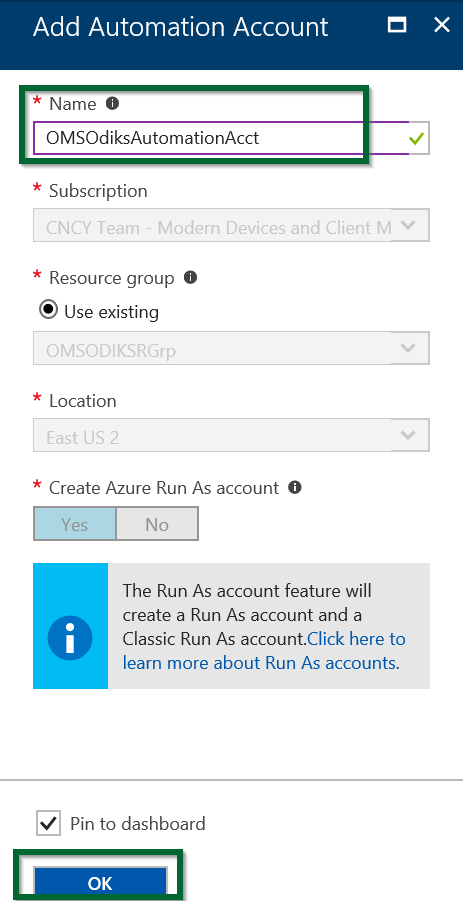
Figure 1.36 - Adding Azure Automation Account
- After the deployments are complete, click
OKin theOMS Workspaceblade, and upon completion of the deployment, clickCreatein theAutomation & Controlblade to finish adding theAutomation & Controlsolution to your workspace.
OMS data retention
When performing analytics against datasets, the duration of that data is an important consideration, as is its retention. OMS offers a variety of pricing tiers to suit your budget and needs, and the retention periods for the various OMS pricing tiers are very well defined. Remember that there are five pricing tiers that you can choose from for your workspace:
- Free: On the free tier, data is retained for seven days
- Per Node (OMS): Log Analytics makes the last 31 days of data available on this tier
- Per GB (Standalone): Log Analytics makes the last 31 days of data on this tier available
- Standard: On the standard tier, data is retained for 30 days
- Premium: Data on the premium tier is retained for 365 days
Note
When you use the OMS and Standalone pricing tiers, you can keep up to 2 years' worth of data (730 days). This is configurable from the Log Analytics Workspace settings in the Azure Portal. There is, however, a retention charge for data stored for more than the default 30 days.
Pricing
The cost of your workspace depends on the pricing tier and the solutions you use. To use OMS entitlements and access all solutions, you can choose between the Per Node (OMS) and Free tiers. Various solutions are also offered in some of the other pricing tiers.
For instance, to use the Network Performance monitoring or Service Map solutions, which are part of the Insights and Analytics solutions, you can choose the Per Node (OMS) or Free tiers. Additionally, to use such solutions as Security and Antimalware (from the Security & Compliance solution) and Update Management and Change Tracking (from the Automation & Control solution) you can choose the Per Node (OMS) or Free pricing tier. Microsoft offers detailed Log Analytics pricing information and a calculator at https://azure.microsoft.com/en-us/pricing/details/log-analytics/?v=17.23h.
See also
Visit the following links for more information:
- Troubleshooting OMS on-boarding issues: https://support.microsoft.com/en-us/help/3126513/how-to-troubleshoot-operations-management-suite-onboarding-issues
- Troubleshooting guide for OMS agents for Linux: https://github.com/Microsoft/OMS-Agent-for-Linux/blob/master/docs/Troubleshooting.md