
Using Kali Linux from a portable device
Installing Kali Linux into a portable device is fairly simple. In some situations, clients do not permit the usage of external laptops inside a secure facility; in such cases, typically, a testing laptop is provided by the client to the pentester to perform scans. Running Kali Linux from a portable device has more advantages during a pentest or RTE:
- It's in the pocket, in the case of a USB or a mobile device
- It can be run live without making any changes to the host operating system
- You can customize the build of Kali Linux and even make the storage persistent
There is a simple three-step process to make a USB into a portable Kali from a Windows PC:
- Download the official Kali Linux image from the following URL:http://docs.kali.org/introduction/download-official-kali-linux-images
- Download
Win32 Disk Imagerfrom https://sourceforge.net/projects/win32diskimager/.
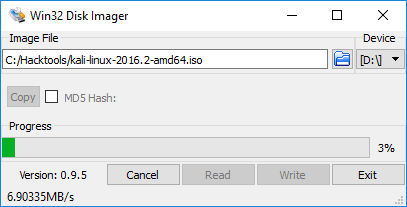
- Open
Win32 Disk Imageras an administrator. Plug the USB drive into the PC's available USB port. You will see something similar to the following screenshot; select the correct drive name and then click onWrite:
Once complete, exit Win32 Disk Imager and safely remove the USB. Kali Linux is now ready on the portable device and can be plugged into any laptop to boot it up live. If your host operating system is Linux, this can be achieved by two standard commands--sudo fdisk -l , which will display all the disks mounted on the drive and
dd if=kali linux.iso of=/dev/nameofthedrive bs=512k. That's it. The dd command-line utility does the convert and copy if it is used for the input file, where of is for the output file and bs is for the block size.