Search icon CANCEL
Subscription
0
Cart icon
Your Cart (0 item)
Close icon
You have no products in your basket yet
Save more on your purchases! discount-offer-chevron-icon
Savings automatically calculated. No voucher code required.
Arrow left icon
All Products
Best Sellers
New Releases
Books
Videos
Audiobooks
Learning Hub
Newsletter Hub
Free Learning
Arrow right icon
timer SALE ENDS IN
0 Days
:
00 Hours
:
00 Minutes
:
00 Seconds
Arrow up icon
GO TO TOP
Learning Google Apps Script

You're reading from   Learning Google Apps Script Customize and automate Google Applications using Apps Script

Arrow left icon
Product type Paperback
Published in Mar 2016
Publisher
ISBN-13 9781785882517
Length 232 pages
Edition 1st Edition
Arrow right icon
Author (1):
Arrow left icon
 Ganapathy Ganapathy
Author Profile Icon Ganapathy
Ganapathy
Arrow right icon
View More author details
Toc

Table of Contents (16) Chapters Close

Learning Google Apps Script
Credits
About the Author
About the Reviewer
www.PacktPub.com
Preface
1. Introducing Google Apps Scripts FREE CHAPTER 2. Creating Basic Elements 3. Parsing and Sending E-mails 4. Creating Interactive Forms 5. Creating Google Calendar and Drive Applications 6. Creating Feed Reader and Translator Applications 7. Creating Interactive Webpages 8. Building a Workflow Application 9. More Tips and Tricks and Creating an Add-on Index

Building an e-mail merger application


Sending personalized e-mails to hundreds of recipients at a time might be a time consuming task. Composing the draft and entering the subject and recipient's e-mail ID for each message might be tedious too. Using this mail merger application, you can send the same kind of information to all recipients, but customized to some extent. For example, greeting an individual.

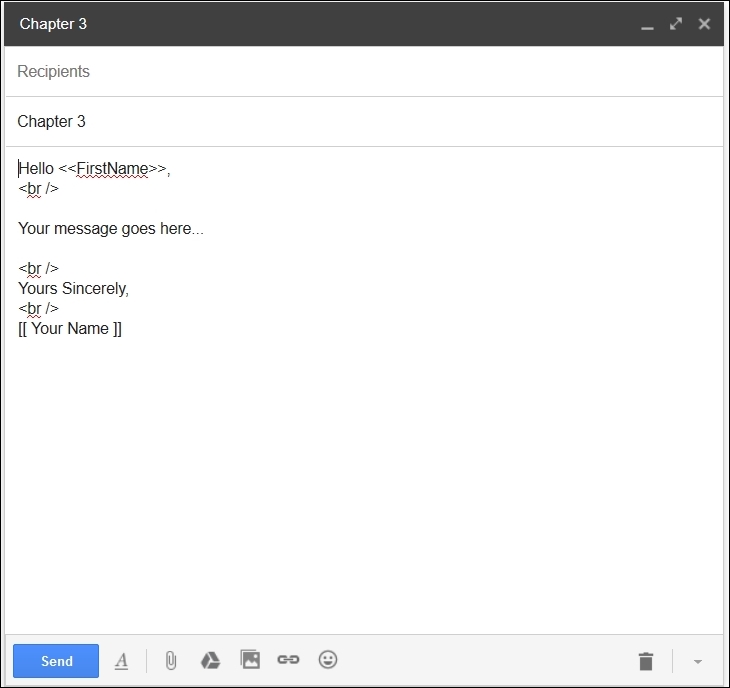
The first step is creating a draft in your Gmail as shown in the following screenshot. The draft is used as a template. You can use any special character to enclose the text to be replaced. In the draft, the code shown in the following screenshot uses left (<<) and right (>>) angled brackets to replace the first name with the First Name column data in an EmailList Sheet. You can include any other placeholder or field as per your requirement. Set up the draft, but don't send it now:

Create a Sheet with the name as EmailList in a new Sheet or existing Sheet. Create the column headers...

lock icon The rest of the chapter is locked
Register for a free Packt account to unlock a world of extra content!
A free Packt account unlocks extra newsletters, articles, discounted offers, and much more. Start advancing your knowledge today.
Unlock this book and the full library FREE for 7 days
Get unlimited access to 7000+ expert-authored eBooks and videos courses covering every tech area you can think of
Renews at £13.99/month. Cancel anytime
Visually different images