Importing audio into unity
Aside from downloading content from the Asset Store, there are a number of ways of introducing content into a Unity project. Most often, the simplest way of adding content to your project is placing the appropriate files into the relevant project folders. Unity is then smart enough to inspect the new files, provided the file type is supported by Unity, and determine the asset type to automatically import the content. Since there are a number of audio file types out there, let's take a look at the audio file format Unity currently supports in the following list:
.wav/.aif: Both of these formats are uncompressed, lossless formats, which means they are exact copies of the original audio. The.aiforiginated on the Mac, while.wavcame from the PC. Now both formats are supported by either operating system.
Note
Compressing audio or other forms of media is done in order to reduce the file size for easy transport or download. Since media compression will cause a loss of quality to the media, the term lossy is used to denote a compressed media format. Whereas, lossless or no loss, denotes a media format with no compression and thus no loss in quality.
.mp3: This is the most common compressed or lossy format for audio. This format became very popular for transferring/downloading music..ogg: This, also known as Ogg Vorbis, was developed as a patent free alternative to mp3. The standard format is lossy but it can support lossless as well.
Note
Unity can also import tracker module formats such as impulse tracker (.it), scream tracker (.s3m), extended module file format (.xm), and the original module file format (.mod). We won't cover these file types until later, in Chapter 10, Composing Music.
Now that you have a better understanding of the supported audio files types, let's import a couple of files into our project in the following exercise here:
- Before importing any content, we will create a new set of folders in the project. This will help us organize and find this content later. As you can see, by just taking a quick look through the
Projectwindow, a game project may contain numerous assets in multiple areas. - Right-click (control + Click on Mac) on the root
Assetsfolder in theProjectwindow. Then, selectCreate|Folderfrom the context menu. - A new folder will be created under the
Assetsfolder with the cursor prompting for input. Name the new folderAudio. - Right-click (control + Click on Mac) on the new
Audiofolder and selectCreate|Folderfrom the context menu. Name the folderAmbientand yourProjectwindow now look like the following screenshot:
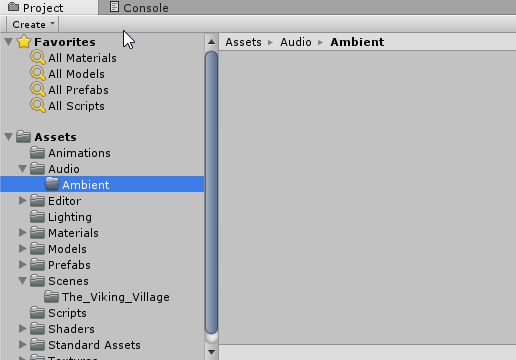
New Audio and Ambient folders created in Project window
- Right-click [control + Click on Mac] on the
Ambientfolder and selectShow in Explorerfrom the context menu. This will open a file explorer on your desktop. Double-click on on theAmbientfolder to open it; the folder should be empty.
- Go to your desktop and open the books downloaded source code
Chapter_1_Audiofolder in another file explorer window. Drag the folders so that they are adjacent to each other and both visible. A sample screenshot is shown here:
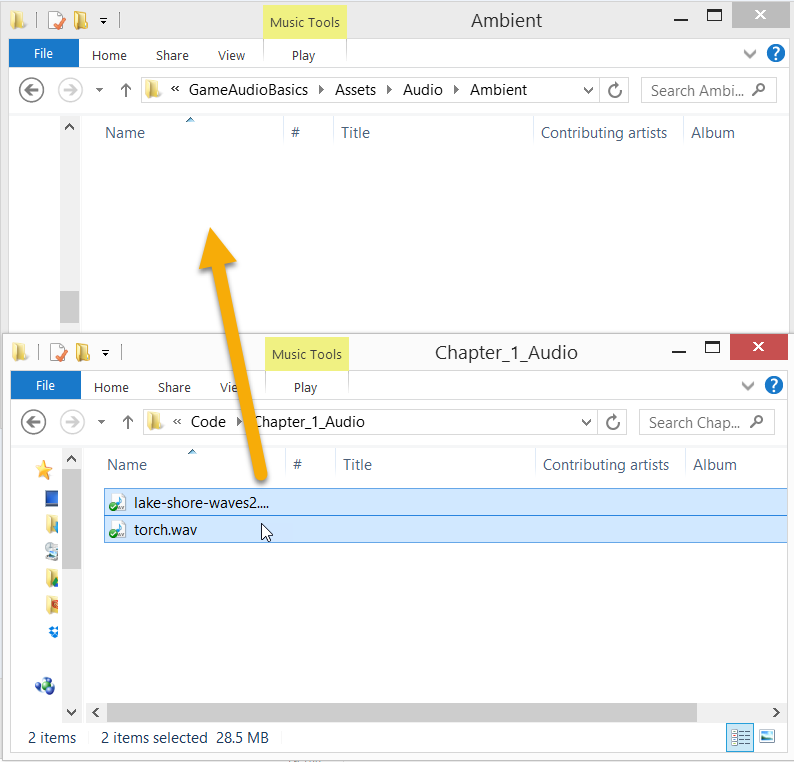
Ambient and source code folder: Chapter_1_Audio side by side
- Drag and drop all the files from the
Chapter_1_Audiofolder into theAmbientfolder. Then, switch back to the Unity editor. After a couple seconds, you should see theAmbientfolder in theProjectwindow update with the imported audio files, as shown here:

Imported audio files showing in project folder
- Select the
lake-shore-waves2.wavaudio clip in the folder and then divert your attention to theInspectorwindow. You should see something similar to what is shown here:
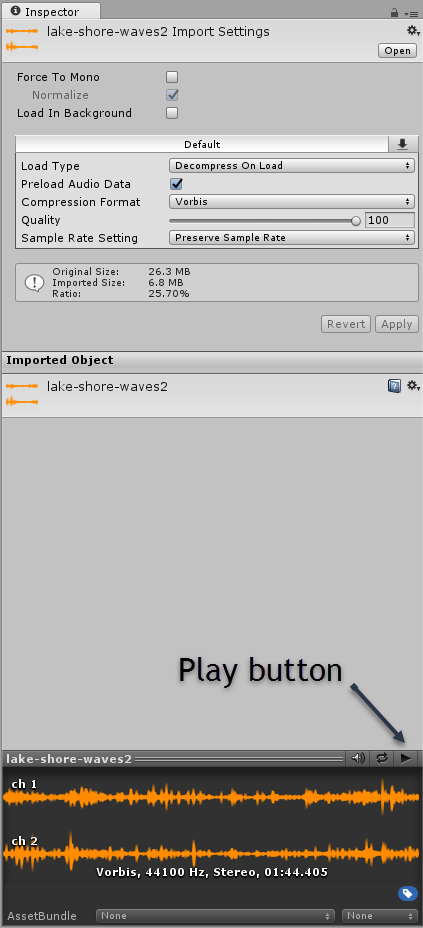
Inspector window showing imported audio clip
- Click on the asset play button, as shown in the preceding screenshot, and enjoy the soothing sounds of waves hitting the lake shore. We will get into more details about what those other properties are in the next section.
Inspecting the imported audio files
Now that we have imported some new audio files into our project, let's take a more detailed look at how Unity handles them by following the exercise here:
- Focus your attention to the bottom of the Inspector window showing the audio file import settings. The following is a labeled screenshot of the details we want to pay attention to:
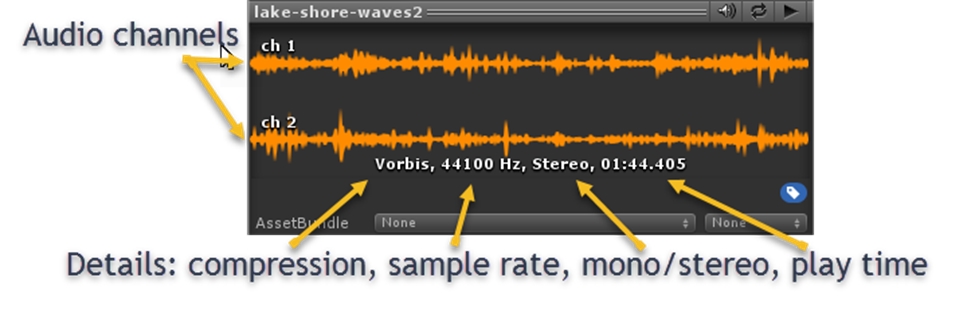
Examining the audio file details
- The following is a definition of what each of those sections/terms mean:
- Audio channels: This shows the various audio channels composed into the file. Unity can support up to eight channels of audio. The file we are showing has two channels in order to support stereo.
- Compression: Unity will automatically apply compression against imported audio files. Very often you will want to stay with the defaults, but we will look at ways of altering the compression method here. Vorbis, the compression type shown, is similar to mp3. The compression formats supported by Unity are: Vorbis, PCM, and ADPCM.
- Sample rate: This represents the frequency at which the audio sample was recorded, displayed as the samples per second. Most audio will be recorded in the range of 44100 and 48000 Hz. Generally, the higher the sample rate, the better quality the audio will be and Unity supports up to 192000 Hz.
- Mono/Stereo: This stipulates if the audio will play in stereo or mono. This setting will be honored if a sound is played in 2D space. However, if the sound is played in 3D, this will change. We will explore 3D sound in more detail at the end of this chapter.
- Play time: This displays the minutes and seconds an audio file will play for.
- Now that we have those definitions under our belt, we will take a look at how to alter some of the import settings. Switch your attention to the top of the
Inspectorwindow as shown in the following screenshot:
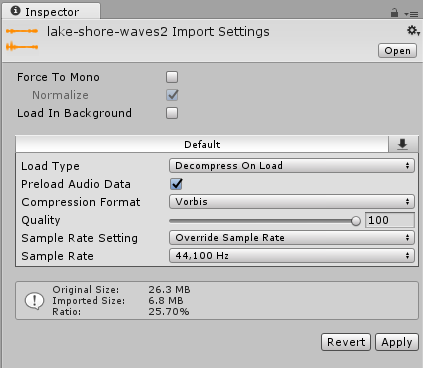
Inspector window audio import settings panel
- Since we will be importing a number of audio files into Unity, it is important we review each of these settings in more detail here:
- Force To Mono: This setting allows you to force Unity to down sample the file into a single channel, which is useful for sounds be played in 3D or you just don't want to play in stereo.
- Normalize: This setting won't activate unless you force mono. Normalize refers to the down sampling process of converting a multichannel sound to a single channel. Normalize all the channels to be sampled at an equalized volume.
- Load In Background: This sets the clip to load in a background while the game is running. If you have a large audio file, you will certainly want to check this setting.
- Load Type: This tells Unity how to load the clip into memory and supports the following settings:
- Decompress On Load: This works well for small to medium size files. The files will be decompressed into memory on load and not suffer any CPU performance when playing.
- Compress in memory: This is best for large files played less frequently. Files will need to be decompressed before playing but the savings in memory may make this a preferred option.
- Streaming: This plays the file directly from the disk. It is a great option for media played infrequently or memory management is an issue.
- Preload Audio Data: By default, the audio clip will be loaded unless this option is unchecked. Again, this is another good option for less frequently played files.
- Compression Format: This is the format used to compress the clip and is dependent on the game build settings. The format will match one of the following settings:
- PCM: The pulse-code modulation is a format best used for smaller file sizes.
- ADPCM: This is the format best used for short sounds with a lot of noise such as footsteps and weapons.
- Vorbis/MP3: This is best used to compress larger files such as our sample file. The quality of compression can be set by the quality slider.
- HEVAG: This is similar to ADPCM.
- Quality: This is a slider that allows you to downgrade the quality of a clip with the benefit of reducing the file size.
- Sample Rate Setting: This sets how the sample rate of the clip should be handled and will be one of the following:
- Preserve Sample Rate: This prevents the sample rate from being modified.
- Optimize Sample Rate: This will select the highest rate sampled within the file and apply that.
- Override Sample Rate: This allows the sample rate of the file to be downgraded. This will generally reduce the audio quality but for some large files or specific audio effects this may be preferred. This setting can never be used to artificially increase the quality or sample rate of a clip.
- Sample Rate: This value can only be changed if the Override Sample Rate setting was selected. Again, a sample can easily be downgraded to reduce the file size and quality but this setting cannot be used to upgrade a file beyond what it was originally recorded at.
- As you can see, there is a lot going on in this panel and initially it may be difficult to grasp all the terminology used. Fortunately, this panel is something we will come back to several times over the course of this book and you will get to become quite familiar with the terms and settings.
Let's use some of that new knowledge to tweak the settings on that torch.wav file we just imported by conducting the following exercise:
- Select the
torch.wavfile in theProjectwindowAssets/Audio/Ambientfolder. - In the Inspector window, check the
Force To Monosetting. The torch clip will be used as a full 3D sound and does not need two channels or stereo. Be sure theNormalizebox is also checked. - Click on the
Applybutton at the bottom of the panel. After a few seconds, this will apply the changes to the audio clip; Notice at the bottom of the Inspector window how the audio is now using only a single channel. Click on the play button to play the clip, you will most likely not hear much difference. - Click on the
Sample Rate Settingdrop down-list and select theOverride Sample Rateoption. Then, open theSample Ratelist and select22050 Hzfrom the list and then click on theApplybutton. After the settings are applied, the preview clip should match the following screenshot:
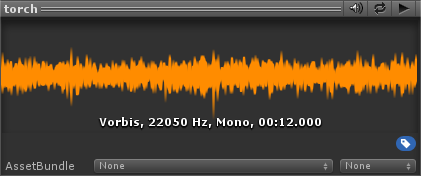
Preview showing modified audio clip settings
- The reason we downgraded the clip is to reduce some of the harsher tones. Feel free to downgrade or adjust the sample further to see the effects it has on the sound quality. Be sure to reset the clip to the settings shown in the preceding screenshot as we will be using this sound later in the chapter.
Note
Downgrading the torch clip to balance the tones may not be an optimal solution in some cases and in fact there are many other ways of equalizing a clip, as we will see. However, optimizing a clip at the source, as we did here, will always be in your best interest. In fact, if your game becomes bogged down due to overuse of audio, one of the core solutions is to optimize the imported file settings first. Audio performance and optimization is something we will cover in more detail in Chapter 11, Audio Performance and Troubleshooting.
- After you are done editing the audio clip settings, select
File|Save Projectfrom the menu. This will save the project and allow us to close the editor now if we need to.
That completes our introduction to importing audio content into Unity. In the next section, we will look at how these clips can be added to our village scene.