Be coherent with the Windows look and feel using TTaskDialog
Version after version, the Windows OS changed its look and feel a lot from mid-2009 when the first Windows 95 came out. Also, the UX guidelines from Microsoft have changed a lot. Do you remember the Multiple Document Interface (MDI) paradigm? It was very popular in the 90s, but now is deprecated and an application using seems old, even if it has been released. Indeed, many Windows applications seem stuck in the past in terms of UI and UX.
What about dialog? Our beloved ShowMessage and MessageDlg have been there since Delphi 1, but now, the modern Windows versions use different dialogs to communicate to users. Many of the standard dialogs contain more than a question and a simple Yes and No. Some dialogs ask something and provide a list of choices using buttons; others have a nice progress bar; others have a nice button with an extended explanation of each choice just inside the button. How can our Delphi application benefit from the new dialogs offered by the OS? In other words, how can we create a coherent look and feel for our dialog windows so that our application does not look old? This recipe shows you how to use the TTaskDialog component.
Getting started
TTaskdialog is a dialog box, somewhat like the standard call to Application.MessageBox in the VCL, but much more powerful. The Task Dialog API has been available since Windows Vista and Windows Server 2008, and your application must be theme enabled to use it (go to Project | Options | Application | Runtime Themes | Enable Runtime Themes).
Besides the usual default set of buttons (OK, Cancel, Yes, No, Retry, and Close), you can define extra buttons and many other customizations. The following Windows APIs provides Task Dialog:
API Name | Description |
|---|---|
| This creates, displays, and operates Task Dialog. The Task Dialog contains application-defined message text and title, icons, and any combination of predefined push buttons. This function does not support the registration of a callback function to receive notifications. |
| This is an application-defined function used with the |
| This creates, displays, and operates Task Dialog. The Task Dialog contains application-defined icons, messages, a title, a verification checkbox, command links, push buttons, and radio buttons. This function can register a callback function to receive notification messages. |
More information about API utilization can be obtained from https://msdn.microsoft.com/en-us/library/windows/desktop/bb787471(v=vs.85).aspx.
While the API can be useful in some border cases, the VCL comes with a very nice component that does all the low-level stuff for us. Let's look at an example program and see how simple it is to create a modern application.
How it works...
Open the TaskDialogs.dproj project so we can examine how it works.
There are six buttons on the form. The first one shows a simple utilization of the Task Dialog API, while the other five show a different utilization of the TTaskDialog component, which wraps that API.
The first button uses the Windows API directly with the following code:
procedure TMainForm.btnAPIClick(Sender: TObject);
var
  LTDResult: Integer;
begin
  TaskDialog(0, HInstance,
    PChar('The Title'),
    PChar('These are the main instructions'),
    PChar('This is another content'),
    TDCBF_OK_BUTTON or TDCBF_CANCEL_BUTTON,
    TD_INFORMATION_ICON, @LTDResult);
  case LTDResult of
    IDOK:
      begin
        ShowMessage('Clicked OK');
      end;
    IDCANCEL:
      begin
        ShowMessage('Clicked Cancel');
      end;
  end;
end;
The TaskDialog function is declared inside the Winapi.CommCtrl.pas unit. So far, you could ask, Why should I use a component forTask Dialogs? Seems quite simple. Yes, it is, if you only want to mimic MessageDlg, but things get complicated very fast if you want to use all the features of the Task Dialog API. So, the second button uses the TTaskDialog component. Let's see the relevant properties configured at design time for the tdSimple component:
object tdSimple: TTaskDialog
  Caption = 'The question'
  CommonButtons = [tcbYes, tcbNo]
  DefaultButton = tcbYes
  ExpandButtonCaption = 'More information'
  ExpandedText =
     'Yes, you have to decide something about this question...' +
       ' but I cannot help you a lot'
  Flags = [tfUseHiconMain, tfUseHiconFooter,
     tfVerificationFlagChecked]
  FooterIcon = 4
  FooterText = 'This is an important question...'
  Text = 'To be or not to be, this is the question. To be?'
  Title = 'William ask:'
end
Note
You can check the runtime appearance at design time by double-clicking on the component above your form, or by selecting Test Dialog from the menu above the component. You can access the menu by right-clicking on the component.
As you can see, only the minimum properties have been set, just to show the power of the component. This configuration shows a dialog with two buttons labeled Yes and No. The TTaskDialog component can be configured at design time using the Object Inspector, or can be configured at runtime by code. In the first example, the configuration is defined at design time so that at runtime we only have to call the Execute method and read the user response. Here's the code that actually uses the tdSimple instance:
procedure TMainForm.btnSimpleClick(Sender: TObject);
begin
  tdSimple.Execute; //show the taskdialog
  if tdSimple.ModalResult = mrYes then
    ShowMessage('yes')
  else
    ShowMessage('no')
end;
Even in this case, it is quite simple, but let's go deeper with the configuration. Let's say that we need a Task Dialog similar to the following screenshot:
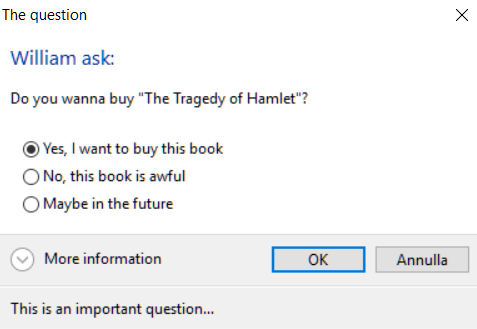
Fig. 1.22: The TTaskDialog component is configured to show three radio buttons
Using the plain API, this is not so simple. So, let's see how to configure the component:
object tdRadioButtons: TTaskDialog
  Caption = 'The question'
  DefaultButton = tcbYes
  ExpandButtonCaption = 'More information'
  ExpandedText =
    'Yes, you have to decide something about this question... ' +
       'but I cannot help you a lot'
  Flags = [tfUseHiconMain, tfUseHiconFooter,
     tfVerificationFlagChecked]
  FooterIcon = 4
  FooterText = 'This is an important question...'
  RadioButtons = <
    item
      Caption = 'Yes, I want to buy this book'
    end
    item
      Caption = 'No, this book is awful'
    end
    item
      Caption = 'Maybe in the future'
    end>
  Text = 'Do you wanna buy "The Tragedy of Hamlet"?'
  Title = 'William ask:'
end
The preceding block of code contains the definition for the three radio buttons. The following code shows the dialog and the retrieval of the result:
procedure TMainForm.btnRadioClick(Sender: TObject);
begin
  tdRadioButtons.Execute;
  if tdRadioButtons.ModalResult = mrOk then
    ShowMessage('Selected radio button ' +
       tdRadioButtons.RadioButton.ID.ToString);
end;
Even in this case, we have defined the properties at design time so that the runtime code is quite simple. Just note that the user's choice is stored in the RadioButton.ID property.
The TTaskDialog.Flags property can greatly change the behavior of the dialog. Here's the meaning of each element of its set:
Flag set element name | If set... |
|---|---|
| Content, footer, and expanded text can include hyperlinks |
| Uses the custom main icon |
| Uses the custom footer icon |
| Permits the Task Dialog to be closed in the absence of a |
| Buttons are displayed as command links using a standard dialog glyph |
| Buttons are displayed as command links without a glyph |
| Displays expanded text in the footer |
| Expanded text is displayed when the Task Dialog opens |
| The verification checkbox is initially checked |
| Displays the progress bar |
| Displays the marquee progress bar |
| Callback dialog will be called every 200 milliseconds |
| The Task Dialog is centered with respect to the parent window |
| Text reads right to left |
| There is no default radio button |
| The Task Dialog can be minimized |
The real power of TaskDialog comes when you build your dialog at runtime. Let's check what the fourth button does under the hood:
procedure TMainForm.btnConfirmClick(Sender: TObject);
var
  LFileName: string;
  LGSearch: String;
const
  GOOGLE_SEARCH = 99;
begin
  LFileName := 'MyCoolProgram.exe';
  tdConfirm.Buttons.Clear;
  tdConfirm.Title := 'Confirm Removal';
  tdConfirm.Caption := 'My fantastic folder';
  tdConfirm.Text :=
    Format('Are you sure that you want to remove ' +
       'the file named "%s"?', [LFileName]);
  tdConfirm.CommonButtons := [];
  with TTaskDialogButtonItem(tdConfirm.Buttons.Add) dobegin
    Caption := 'Remove';
    CommandLinkHint := Format('Delete file %s from the folder.',
       [LFileName]);
    ModalResult := mrYes;
  end;
  with TTaskDialogButtonItem(tdConfirm.Buttons.Add) dobegin
    Caption := 'Keep';
    CommandLinkHint := 'Keep the file in the folder.';
    ModalResult := mrNo;
  end;

  if TPath.GetExtension(LFileName).ToLower.Equals('.exe') thenbeginwith TTaskDialogButtonItem(tdConfirm.Buttons.Add) dobegin
      Caption := 'Google search';
      CommandLinkHint := 'Let''s Google tell us what ' +
         'this program is.';
      ModalResult := GOOGLE_SEARCH;
    end;
  end;

  tdConfirm.Flags := [tfUseCommandLinks];
  tdConfirm.MainIcon := tdiInformation;

  if tdConfirm.Execute thenbegincase tdConfirm.ModalResult of
      mrYes:
        ShowMessage('Deleted');
      mrNo:
        ShowMessage(LFileName + ' has been preserved');
      GOOGLE_SEARCH:
        begin
          LGSearch := Format('https://www.google.it/#q=%s',
             [LFileName]);
          ShellExecute(0, 'open', PChar(LGSearch), nil, nil,
             SW_SHOWNORMAL);
        end;end; //case
  end; //if
end;
It seems like a lot of code, but it is simple and can be easily parameterized and reused inside your program. The resultant dialog is as shown:
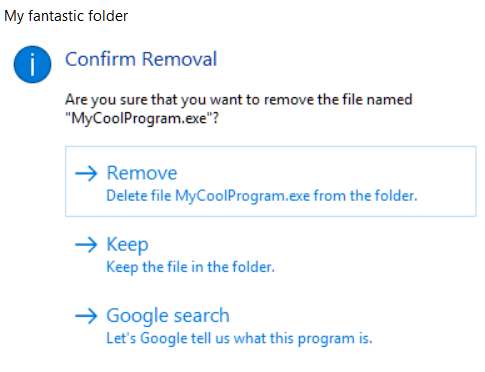
Figure 1.23: The dialog customized by code
The third choice allows the user to search on Google for the program executable name. This is not a common choice in the MessageDlg dialog where buttons are predefined, but using TTaskDialog, you can even ask the user something strange (such as—Do you want to ask Google about it?).
To achieve a better apparent speed, progress bars are great! The Task Dialog API provides a simple way to use progress bars inside dialogs. The classic Delphi solution relays a custom form with a progress bar and some labels (just like the compiling dialog that you see when you compile a program within the Delphi IDE). However, in some cases, you need some simple stuff done and a Task Dialog is enough. If TTaskDialog has the tfCallbackTimer flag and tfShowProgressBar, the OnTimer event will be called every 200 milliseconds (five times a second), and the dialog will show a progress bar that you can update within the OnTimer event handler. However, the OnTimer event handler runs in the main thread so that all the related advice applies (if the UI becomes unresponsive, consider a proper background thread and a queue to send information to the main thread).
This is the design time configuration of tdProgress:
object tdProgress: TTaskDialog
  Caption = 'Please wait'
  CommonButtons = [tcbCancel]
  ExpandButtonCaption = 'More'
  ExpandedText =
    'A prime number (or a prime) is a natural number greater'+
       ' than 1 that has no positive divisors other than 1 ' +
       'and itself.'
  Flags = [tfAllowDialogCancellation, tfShowProgressBar,
tfCallbackTimer]
  FooterIcon = 3
  FooterText = 'Please wait while we are calculate prime numbers'
  Text = 'Let'#39's calculate prime numbers up to 1000'
  Title = 'Calculating prime numbers...'
  VerificationText = 'Remember my choice'
  OnButtonClicked = tdProgressButtonClicked
  OnTimer = tdProgressTimer
end
There are two event handlers, one to handle clicking on the Cancel button inside the dialog and one to handle the callback:
const
  MAX_NUMBERS = 1000;
  NUMBERS_IN_A_SINGLE_STEP = 50;

procedure TMainForm.tdProgressButtonClicked(Sender: TObject;
  ModalResult: TModalResult; var CanClose: Boolean);
beginif not FFinished thenbegin
    tdProgress.OnTimer := nil;
    ShowMessage('Calculation aborted by user');
    CanClose := True;
  end;
end;

procedure TMainForm.tdProgressTimer(Sender: TObject;
   TickCount: Cardinal;
  var Reset: Boolean);
var
  I: Integer;
beginfor I := 1 to NUMBERS_IN_A_SINGLE_STEP dobegin
    if IsPrimeNumber(FCurrNumber) then
      Inc(FPrimeNumbersCount);
    tdProgress.ProgressBar.Position := FCurrNumber * 100
       div MAX_NUMBERS;
    Inc(FCurrNumber);
  end;

  FFinished := FCurrNumber >= MAX_NUMBERS;
  if FFinished thenbegin
    tdProgress.OnTimer := nil;
    tdProgress.ProgressBar.Position := 100;
    ShowMessage('There are ' + FPrimeNumbersCount.ToString +
         ' prime numbers up to ' + MAX_NUMBERS.ToString);
  end;
end;
To not block the main thread, the prime numbers are calculated a few at a time. When the calculation is ended, the callback is disabled by setting the OnTimer event handler to nil.
In other words, the real calculation is done in the main thread, so you should slice your process into smaller parts so that it can be executed one (small) piece at time.
The following code fires the progress Task Dialog:
procedure TMainForm.btnProgressClick(Sender: TObject);
begin
  FCurrNumber := 1;
  FFinished := False;
  FPrimeNumbersCount := 0;
  tdProgress.ProgressBar.Position := 0;
  tdProgress.OnTimer := tdProgressTimer;
  tdProgress.Execute;
end;
Here's the resultant dialog:

Figure 1.24: The Task Dialog with an embedded progress bar
There's more...
The new Task Dialog API can give your application a fresh look, but that comes with a cost because it works only on Vista or better, with enabled themes. So, how do you work around the problem if you need to run the application on Windows XP or on a machine without themes enabled? For button 6, there's simple code to check whether you can safely use the TTaskDialog component or whether you have to go back to the normal ShowMessage or MessageDlg. Here's the event handler for button 6:
procedure TMainForm.btnCheckWinVerClick(Sender: TObject);
var
  LTaskDialog: TTaskDialog;
beginif (Win32MajorVersion >= 6) and ThemeServices.ThemesEnabled thenbegin
    LTaskDialog := TTaskDialog.Create(Self);
    try
      LTaskDialog.Caption := 'MY Fantastic Application';
      LTaskDialog.Title := 'The Cook Task Dialog!';
      LTaskDialog.Text :=
        'This is a Task Dialog, so I''m on Vista ' +
           'or better with themes enabled';
      LTaskDialog.CommonButtons := [tcbOk];
      LTaskDialog.Execute;
    finally
      LTaskDialog.Free;
    end
  end
  else
  begin
    ShowMessage('This is an old and boring ShowMessage, ' +
       'here only to support old Microsoft Windows OS ' +
       '(XP and below)');
  end;
end;
Try to disable the themes for your application and click on button 6.
Obviously, it is strongly suggested that you wrap this code in a function so that you do not have to write the same code repeatedly.