Search icon CANCEL
Subscription
0
Cart icon
Your Cart (0 item)
Close icon
You have no products in your basket yet
Save more on your purchases! discount-offer-chevron-icon
Savings automatically calculated. No voucher code required.
Arrow left icon
All Products
Best Sellers
New Releases
Books
Videos
Audiobooks
Learning Hub
Newsletter Hub
Free Learning
Arrow right icon
timer SALE ENDS IN
0 Days
:
00 Hours
:
00 Minutes
:
00 Seconds
Arrow up icon
GO TO TOP
Building Smart Homes with Raspberry Pi Zero

You're reading from   Building Smart Homes with Raspberry Pi Zero Build revolutionary and incredibly useful home automation projects with the all-new Pi Zero

Arrow left icon
Product type Paperback
Published in Oct 2016
Publisher Packt
ISBN-13 9781786466952
Length 196 pages
Edition 1st Edition
Arrow right icon
Author (1):
Arrow left icon
Marco Schwartz Marco Schwartz
Author Profile Icon Marco Schwartz
Marco Schwartz
Arrow right icon
View More author details
Toc

Table of Contents (17) Chapters Close

Building Smart Homes with Raspberry Pi Zero
Credits
About the Author
About the Reviewer
www.PacktPub.com
Preface
1. Configuring Your Raspberry Pi Zero Board FREE CHAPTER 2. Measure Data Using Your Raspberry Pi Zero Board 3. Building a Smart Home Thermostat 4. Controlling Appliances fromthe Raspberry Pi Zero 5. Making a Smart Plug with the Raspberry Pi Zero 6. Sending Notifications using Raspberry Pi Zero 7. Use the Raspberry Pi Zero to Build a Security System 8. Monitor Your Home from the Cloud 9. Control Appliances from Anywhere 10. Building a Home Automation System with Raspberry Pi Zero Boards Index

Controlling home appliances


In the final section of this chapter, we are going to see how to control appliances in your home that can only be set to on or off, for example, lamps, but also heaters, coffee machines, and other appliances. In this section, you are going to learn how to control a simple desk lamp using your Raspberry Pi Zero.

Let's first see how to assemble the project. Simply connect the Vin+ pin of the PowerSwitch Tail Kit to the GPIO18 pin on the Raspberry Pi Zero, and the two remaining pins of the PowerSwitch Tail to GND.

The following image shows the final result:

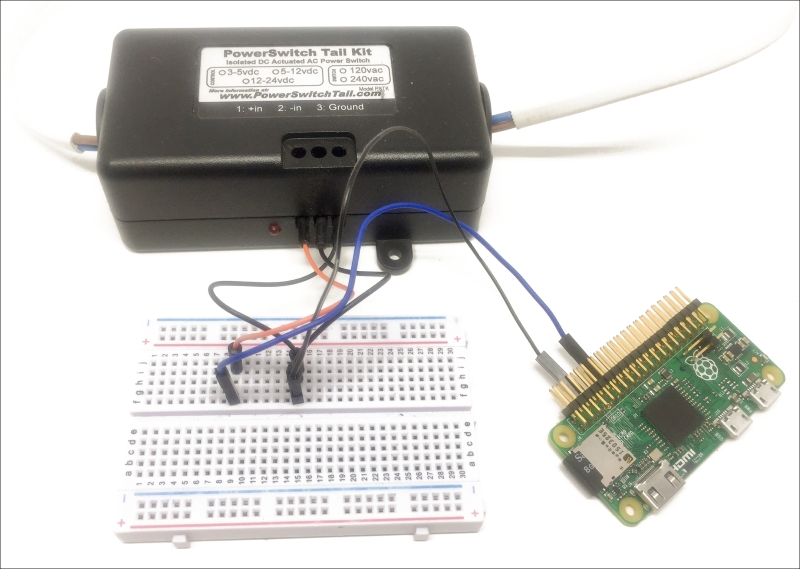
Of course, after this you need to connect a lamp to the project. For that, I used a simple 30W desk lamp. You simply need to connect the appliance you want to control to the female plug of the PowerSwitch Tail, and then connect it to the mains electricity via the male power plug.

We are now going to see how to control the lamp using a simple interface, which will run on our Raspberry Pi. For that, we'll again use...

lock icon The rest of the chapter is locked
Register for a free Packt account to unlock a world of extra content!
A free Packt account unlocks extra newsletters, articles, discounted offers, and much more. Start advancing your knowledge today.
Unlock this book and the full library FREE for 7 days
Get unlimited access to 7000+ expert-authored eBooks and videos courses covering every tech area you can think of
Renews at £13.99/month. Cancel anytime
Visually different images