Installation and Setup
Before you start this book, you need to install the following software. You will find the steps to install these here:
Installing Git LFS
In order to download all the resources from the GitHub of this book and be able to use images to train your neural network model, you will need to install Git LFS (Git Large File Storage). It replaces large files such as audio samples, videos, datasets, and graphics with text pointers inside Git.
If you have not cloned the repository:
- Install Git LFS
- Clone the Git repository
- From the repository folder, execute gitlfs pull
- Done
If the repository is already cloned:
- Install Git LFS
- From the repository folder, execute: gitlfs pull
- Done
Installing Git LFS: https://github.com/git-lfs/git-lfs/wiki/Installation
[Recommended] Google Colaboratory
If you have the option, use Google Colaboratory. It is a free Jupyter notebook environment that requires no setup and runs entirely in the cloud. You can also take advantage of running it on a GPU.
The steps for using it are as follows:
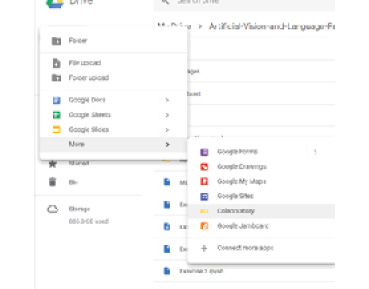
- Upload the entire GitHub to your Google Drive account, so you can use the files that are stored in the repository. Make sure you have made use of Git LFS first to load all the files.
- Go to the folder where you want to open a new Google Colab Notebook, click New > More > Colaboratory. Now, you have a Google Colab Notebook opened and saved in the corresponding folder, and you are ready to use Python, Keras, or any other library that is already installed.
- If you want to install a specific library, you can do so using the “pip” package installation or any other command-line installation and adding “!” at the beginning. For instance, “!pip install sklearn”, which would install scikit-learn.
- If you want to be able to load files from your Google Drive, you need to execute these two lines of code in a Google Colab cell:
from google.colab import drive
drive.mount(‘drive’)
- Then, open the link that appears in the output and log in with the Google account that you used to create the Google Colab Notebook.
- You can now navigate to where the files were uploaded using ls to list the files in the current directory and cd to navigate to a specific folder:

- Now, the Google Colab Notebook is capable of loading any file and performing any task, just like a Jupyter notebook opened in that folder would do.
Installing ROS Kinetic
These are the steps you must follow to install the framework in your Ubuntu system:
- Prepare Ubuntu for accepting the ROS software:
sudosh -c ‘echo “deb http://packages.ros.org/ros/ubuntu $(lsb_release -sc) main” > /etc/apt/sources.list.d/ros-latest.list’
- Configure the download keys:
sudo apt-key adv --keyserver hkp://ha.pool.sks-keyservers.net:80 --recv-key 421C365BD9FF1F717815A3895523BAEEB01FA116
- Ensure that the system is updated:
sudo apt-get update
- Install the full framework to not miss functionalities:
sudo apt-get install ros-kinetic-desktop-full
- Initialize and update rosdep:
sudo rosdep init
rosdep update
- Add environment variables to the bashrc file if you want to avoid declaring them each time you work with ROS:
echo “source /opt/ros/kinetic/setup.bash” >> ~/.bashrcsource ~/.bashrc
Note
It might be appropriate to reboot your computer after this process for the system to implement the new configuration.
- Check that the framework is correctly working by starting it:
roscore
Configuring TurtleBot
Note
It may happen that TurtleBot is not compatible with your ROS distribution (we are using Kinetic Kame), but don’t worry, there are lots of robots that you can simulate in Gazebo. You can look up different robots and try to use them with your ROS distribution.
This is the configuration process for TurtleBot:
- Install its dependencies:
sudo apt-get install ros-kinetic-turtlebotros-kinetic-turtlebot-apps ros-kinetic-turtlebot-interactions ros-kinetic-turtlebot-simulator ros-kinetic-kobuki-ftdiros-kinetic-ar-track-alvar-msgs
- Download the TurtleBot simulator package in your catkin workspace:
cd ~/catkin_ws/src
git clone https://github.com/turtlebot/turtlebot_simulator
- After that, you should be able to use TurtleBot with Gazebo.
If you get an error trying to visualize TurtleBot in Gazebo, download the turtlebot_simulator folder from our GitHub and replace it.
Start ROS services:
roscore
Launch TurtleBot World:
cd ~/catkin_ws
catkin_make
sourcedevel/setup.bash
roslaunchturtlebot_gazeboturtlebot_world.launch
Basic Installation of Darknet
Follow these steps for installing Darknet:
- Download the framework:
git clone https://github.com/pjreddie/darknet
- Switch to the downloaded folder and run the compilation command:
cd darknet
make
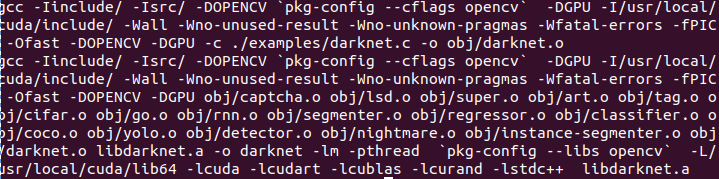
You should see an output like the following if the compilation process was correctly completed:

The Darknet compilation output
Advanced Installation of Darknet
This is the installation process that you must complete in order to achieve the chapter objectives. It will allow you to use GPU computation to detect and recognize objects in real time. Before performing this installation, you must have some dependencies installed on your Ubuntu system, such as:
- NVIDIA drivers: Drivers that will allow your system to correctly work with your GPU. As you may know, it must be an NVIDIA model.
- CUDA: This is an NVIDIA toolkit that provides a development environment for building applications that need GPU usage.
- OpenCV: This is a free artificial vision library, which is very useful for working with images.
Note
It is important to consider that all these dependencies are available in several versions. You must find the version of each tool that is compatible with your specific GPU and system.
Once your system is ready, you can perform the advanced installation:
- Download the framework if you didn’t do the basic installation:
git clone https://github.com/pjreddie/darknet
- Modify the Makefile first lines to enable OpenCV and CUDA. It should be as follows:
GPU=1
CUDNN=0
OPENCV=1
OPENMP=0
DEBUG=0
- Save Makefile changes, switch to darknet directory and run the compilation command:
cd darknet
make
Now, you should see an output similar to this one:
The Darknet compilation with CUDA and OpenCV
Installing YOLO
Before performing this installation, you must have some dependencies installed on your Ubuntu system, as mentioned in the advanced installation of Darknet.
Note
It is important to take into account that all these dependencies are available in several versions. You must find the version of each tool that is compatible with your specific GPU and system.
Once your system is ready, you can perform the advanced installation:
- Download the framework:
git clone https://github.com/pjreddie/darknet
- Modify the Makefile first lines to enable OpenCV and CUDA. It should be as follows:
GPU=1
CUDNN=0
OPENCV=1
OPENMP=0
DEBUG=0
- Save Makefile changes, switch to the darknet directory, and run the compilation command:
cd darknet
Make