Search icon CANCEL
Subscription
0
Cart icon
Your Cart (0 item)
Close icon
You have no products in your basket yet
Save more on your purchases! discount-offer-chevron-icon
Savings automatically calculated. No voucher code required.
Arrow left icon
All Products
Best Sellers
New Releases
Books
Videos
Audiobooks
Learning Hub
Newsletter Hub
Free Learning
Arrow right icon
timer SALE ENDS IN
0 Days
:
00 Hours
:
00 Minutes
:
00 Seconds
Arrow up icon
GO TO TOP
Arduino Essentials

You're reading from   Arduino Essentials Enter the world of Arduino and its peripherals and start creating interesting projects

Arrow left icon
Product type Paperback
Published in Feb 2015
Publisher Packt
ISBN-13 9781784398569
Length 206 pages
Edition 1st Edition
Tools
Arrow right icon
Author (1):
Arrow left icon
 Perea Perea
Author Profile Icon Perea
Perea
Arrow right icon
View More author details
Toc

Table of Contents (17) Chapters Close

Arduino Essentials
Credits
About the Author
About the Reviewer
www.PacktPub.com
Preface
1. Meeting the Arduino Family FREE CHAPTER 2. The Arduino Development Environment 3. Interacting with the Environment the Digital Way 4. Controlling Outputs Softly with Analog Outputs 5. Sensing the Real World through Digital Inputs 6. Analog Inputs to Feel Between All and Nothing 7. Managing the Time Domain 8. Communicating with Others 9. Dealing with Interrupts 10. Arduino in a Real Case – Greenhouse Control Index

Breadboard connections diagram


All that said, I'm sure you will see it clearly in the breadboard connections diagram, where you can notice how the two upper legs of the momentary push button are left on the upper-side connections block of the breadboard without connecting anything to them and separating them from the other two legs, thanks to the central space of the breadboard.

You can also see how once we push the button, the current flows from the positive rail to the ground through the switch and the current limiting resistor, and it is in just this point, after the switch and before the resistor, where we take a wire to the Arduino pin that we will use as a digital input.

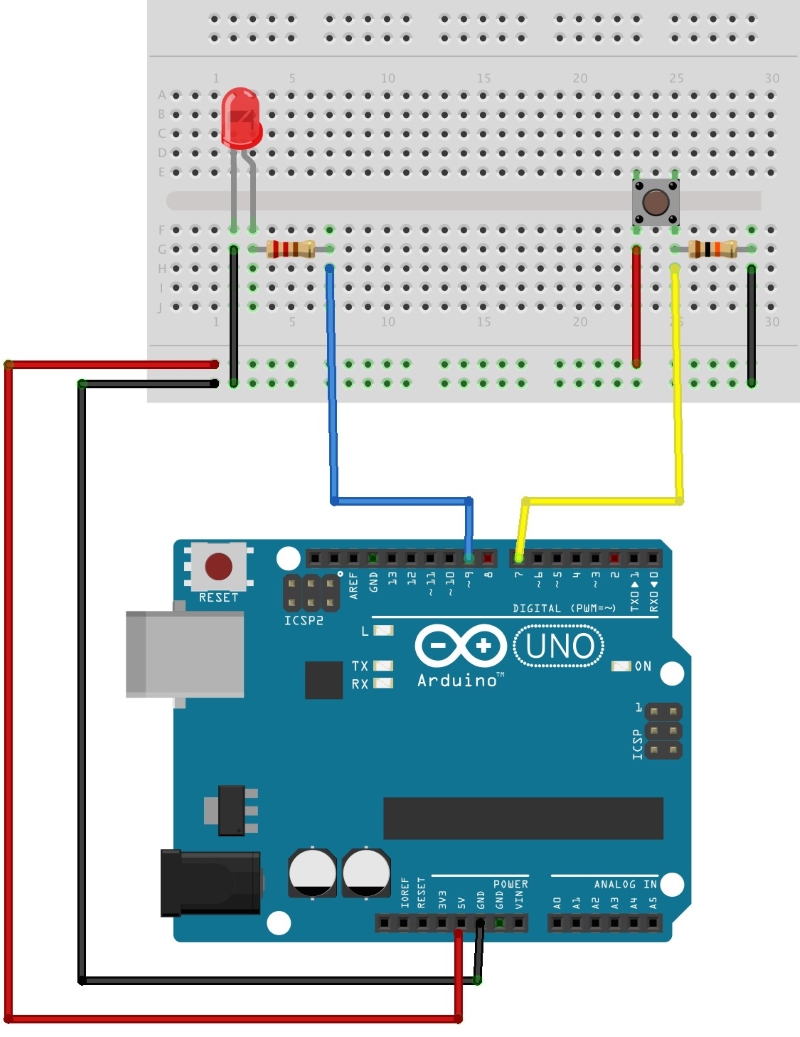
A breadboard connections diagram of the digital input circuit

lock icon The rest of the chapter is locked
Register for a free Packt account to unlock a world of extra content!
A free Packt account unlocks extra newsletters, articles, discounted offers, and much more. Start advancing your knowledge today.
Unlock this book and the full library FREE for 7 days
Get unlimited access to 7000+ expert-authored eBooks and videos courses covering every tech area you can think of
Renews at £13.99/month. Cancel anytime
Visually different images