Deploying your skins and containers
Like a module, skins must be packaged and deployed to your DNN server. Once deployed, they will appear on the Skins page under the Admin menu for preview and applying to the portal.
In previous article, we saw how to create new skins directly on a test DNN portal. This allows you to edit the files and immediately see the results just by refreshing your browser. But once a skin has been fully developed, this recipe will show you how to package your skin into a portable ZIP file using the package wizard.
Once created, you can install the skin package on the DNN site by logging in as SuperUser then uploading the ZIP file and installing the skin package as an extension. The skin is installed in the Portals_defaultSkins folder.
As of DNN 5.x, only the SuperUser can deploy skins. This was done as a security precaution as skins can now contain user-written code.
Getting ready
For this recipe you will need skin files to deploy. We will use the skin files from the previous article, from the recipe: Creating a simple ASCX skin.
How to do it...
- Begin by logging in as the SuperUser.
- Look under the Host menu and select Extensions.
- The first step is to look under the installed extensions and find the SampleASCXSkin under the Skins section. If you see it, skip to step 8, otherwise you must create the extension first. Start by selecting Create Extension from the action menu (or click on the link at the bottom of the page).
- Choose Skin from Extension Type drop down and fill out the form as shown:
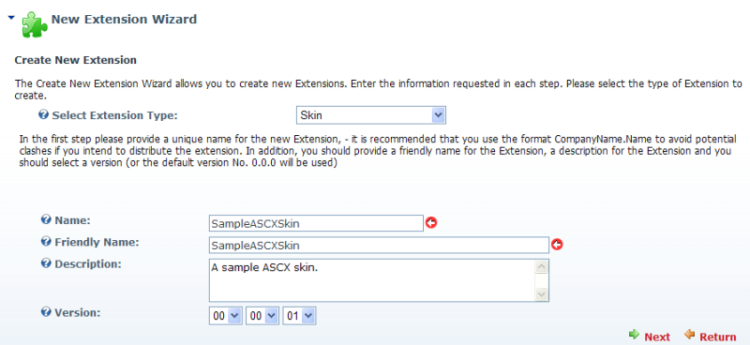
(Move the mouse over the image to enlarge.)
- Click on Next.
- Provide the owner information and click on Next.
- The SampleASCXSkin skin will now appear in the list of extensions.
- Click on the Edit icon next to the name.
- Scroll to the bottom and click on the link Create Package.
- The Create Package screen will display. Click on Next.
- On the next screen you will see the files of the skin. Click on Next.
- Next, the manifest is displayed. Click on Next.
- The wizard will now generate a file name for the ZIP file using the owner name and the skin name. Click on Next.
- The wizard will now complete with a summary page. You will now find a ZIP file in the /Install/Skin folder. Click on Return to close the wizard.
- Once the file is packaged in a ZIP file you can upload and install it.
Exploring Skin Objects
In this recipe we will expand the sample ASCX skin and demonstrate additional Skin Objects you can use.
Getting ready
To follow along with this recipe you must have completed the following recipe:
Creating a simple ASCX skin
Here is a diagram of the new page layout we will create:

How to do it...
- Start by locating the default skin folder within your test DNN portal (Portals_defaultSkins).
- Next, create a new folder to hold the skin files. Call this folder DetailedASCXSkin.
- Launch the Development Tool.
- Open the SampleASCXSkin.ascx file from the Creating a simple ASCX skin recipe.
- Add the following register directive after the existing directives:
<%@ Register TagPrefix="dnn" TagName="BREADCRUMB"
Src="~/Admin/Skins/BreadCrumb.ascx" %>
<%@ Register TagPrefix="dnn" TagName="TEXT"
Src="~/Admin/Skins/Text.ascx" %>
<%@ Register TagPrefix="dnn" TagName="LINKS"
Src="~/Admin/Skins/Links.ascx" %>
<%@ Register TagPrefix="dnn" TagName="COPYRIGHT"
Src="~/Admin/Skins/Copyright.ascx" %>
<%@ Register TagPrefix="dnn" TagName="CURRENTDATE"
Src="~/Admin/Skins/CurrentDate.ascx" %>
Unlock access to the largest independent learning library in Tech for FREE!
Get unlimited access to 7500+ expert-authored eBooks and video courses covering every tech area you can think of.
Renews at £15.99/month. Cancel anytime
- Next, replace the existing Login_Style DIV with a new DIV encompassing both Login and User links:
<%--By placing the SkinObjects inside a parent DIV they share the
same style--%>
<div class="bread_bg">
<div id="bread_style">
<dnn:TEXT runat="server" id="dnnTEXT"
CssClass="breadcrumb_text" Text="You are here"
ResourceKey="Breadcrumb" />
<span>
<dnn:BREADCRUMB runat="server" id="dnnBREADCRUMB"
CssClass="Breadcrumb"
RootLevel="0" Separator=" > " />
</span>
</div>
<div id="login_style" class="user">
<dnn:USER runat="server" id="dnnUSER" CssClass="user" />
|
<dnn:LOGIN runat="server" id="dnnLOGIN" CssClass="user" />
</div>
</div>
- Lastly, leave the ContentPane DIV as it is and add these new DIVs right below it:
<div class="bot_bg links">
<dnn:LINKS runat="server" id="dnnLINKS" CssClass="links"
Level="Root" Separator=" |
" />
</div>
<div class="bot_pad">
<div id="copy_style" class="footer">
<dnn:COPYRIGHT runat="server" id="dnnCOPYRIGHT"
Align CssClass="footer" />
</div>
<div id="date_style" class="footer">
<dnn:CURRENTDATE runat="server" id="dnnCURRENTDATE"
Align CssClass="footer" />
</div>
</div>
Separating the Copyright and Date into separate DIVs allow us to put one in the lower-left corner and one in the lower-right corner of the page.
- Select Save SampleASCXSkin.ascx As… from the File menu.
- Browse to the DetailedASCXSkin folder and save the file as DetailedASCXSkin.ascx.
- These new Skin Objects will need styles. Open the skin.css file from the Creating a simple ASCX skin recipe.
- Add the following styles to the bottom of the skin.css file:
/*breadcrumbs*/
.Breadcrumb, a.Breadcrumb:link, a.Breadcrumb:active,
a.Breadcrumb:visited {color: #800000; font-size: 13px;}
a.Breadcrumb:hover {color: #C00;}
.bread_bg {background-color: #EAEAEA; fontfamily:
Verdana, Arial, Helvetica, sans-serif; border-left: solid
1px #EAEAEA; border-right: solid 1px #EAEAEA; margin: 0 5px 0 5px;
height: 30px;}
#bread_style {float: left; padding: 10px 0px
0px 17px; color: #000000; font-size: 13px;}
/* for the bottom of the page */
.bot_bg {background-color: #EAEAEA;
border-left: solid 1px #EAEAEA;border-right: solid 1px #EAEAEA;
border-bottom: solid 1px #EAEAEA; padding: 10px; margin: 0 5px 0
5px;}
.bot_pad {font-family: Verdana, Arial,
Helvetica, sans-serif; margin-bottom: 20px; padding: 0 30px 0
20px;}
#terms_style {float: left;}
#copy_style {float: left;}
#date_style {float: right; padding: 0px 0px 0px
10px; }
/*links*/
.links {text-align: center;}
.links, a.links:link, a.links:active, a.links:visited {fontweight:
bold; color: #800000; font-size: 11px;}
a.links:hover {color: #C00;}
/* Sets the font size and text color of the footer at the bottom
of the page */
.footer, a.footer:link, a.footer:active, a.footer:visited {color:
#800000; font-size: 12px;}
a.footer:hover {color: #C00;}
- With these styles we are positioning the Breadcrumb links just below the menu on the left. The Login and User links remain on the right side, ContentPane and RightPane stay the same, and the new Links, Copyright, and CurrentDate controls are arranged along the bottom of the page.
- Select Save skin.css As… from the File menu.
- Browse to the DetailedASCXSkin folder and save the file as skin.css.
- To see how the new skin will look on the site, log in as the SuperUser.
- Look under the Admin menu and select Skins.
- The new DetailedASCXSkin will now appear:

- Click on Preview to see how the skin looks:

- See how the breadcrumbs (You are here:) appear on the left under the menu, user and login are on the right, and links along the bottom and the copyright message and current date appear in the bottom corners.
There's more...
If you're curious to see which Skin Objects are available on your DNN site, you can log in as the SuperUser and select Extensions under the Host menu. This will list all the skin objects and their version number.
Some skin objects may not be installed by default and will not appear in this list until installed.

 United States
 Great Britain
 India
India
 Germany
 France
 Canada
 Russia
 Spain
Spain
 Brazil
 Australia
 South Africa
 Thailand
 Ukraine
 Switzerland
 Slovakia
 Luxembourg
 Hungary
 Romania
 Denmark
 Ireland
 Estonia
 Belgium
 Italy
Italy
 Finland
 Cyprus
 Lithuania
 Latvia
 Malta
Malta
 Netherlands
 Portugal
 Slovenia
 Sweden
 Argentina
 Colombia
 Ecuador
 Indonesia
 Mexico
 New Zealand
 Norway
 South Korea
 Taiwan
 Turkey
 Czechia
 Austria
 Greece
 Isle of Man
 Bulgaria
 Japan
Japan
 Philippines
 Poland
 Singapore
 Egypt
Egypt
 Chile
Chile
 Malaysia


