
Organizing project files
Android Studio gives you a fairly standard Java project structure, that is, you have your main source sets, tests, a resources directory, and so on, but that doesn't really cover all of your organizational needs. If you check the project structure we created, you might note some patterns:
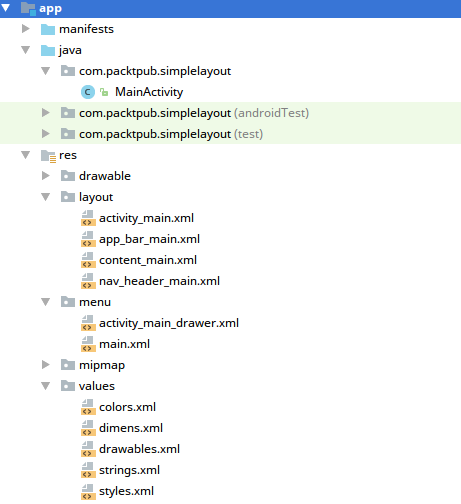
You'll first note that only a single
Activitywas created--MainActivity, but thisActivitytemplate has generated four layout files.Only
activity_main.xmlis actually referenced byMainActivity; all the other files are included via the resource system.The next thing to note is that the layout file referenced by
MainActivityis named asactvitity_main.xml; this is a standard naming pattern that Android Studio will actually suggest when creating newActivityclasses. It's a good idea, because it helps separate layouts used forActivityclasses from those used elsewhere.Next, take a look at the names of the other layout files. Each of them is also prefixed with
nav,app_bar, andcontent. These prefixes help group the layout files logically in a file manager and in the IDE.Finally, you'll note that the
valuesdirectory has several XML files in it. The entirevaluesdirectory is actually treated as one big XML file by the resource compiler, but it helps keep it organized by the type of resources being declared.
Note
Use filename prefixes in the resources directories (especially layouts) to keep things organized. You cannot break things down into subdirectories, so a prefix is the only way to group files together logically. Common prefixes are "activity", "fragment", "content", and "item", which are commonly used to prefix layouts that are used to render list items and so on.
- If you open the
MainActivityclass now, you'll see how the layout is loaded and bound. The first thingMainActivitydoes when it's created is to callonCreateto its parent class (which is a mandatory step, and failure to do so will result in an exception). Then, it loads its layout file using thesetContentViewmethod. This method call does two things at once: it loads the layout XML file, and adds its root widget as the root of theActivity(replacing any widgets that were already there). TheRclass is defined by the resource compiler, and kept in sync for you by Android Studio. Every file and value resource will have its own unique identifier, which allows you to keep things tightly bound together. Rename a resource file, and its corresponding field will change:
setContentView(R.layout.activity_main);
You'll then note that
MainActivityretrieves various widgets that were included in the layout files by their own IDs (also defined in theRclass). ThefindViewByIdmethod searches through theActivitylayout for a widget with the correspondingid, and then returns it:
// MainActivity.java
Toolbar toolbar = (Toolbar) findViewById(R.id.toolbar);
setSupportActionBar(toolbar);
Note
The findviewById method works by traversing all of the widgets in an Activity in a series of loops. There is no lookup table or optimize this process. As such, you should call the findViewById method in onCreate and keep a class-field reference to each of the View objects you'll need.
The preceding code snippet will return the
Toolbarobject declared in theapp_bar_main.xmllayout resource file:
<!-- app_bar_main.xml -->
<android.support.v7.widget.Toolbar
    android:id="@+id/toolbar"
    android:layout_width="match_parent"
    android:layout_height="?attr/actionBarSize"
    android:background="?attr/colorPrimary"
    app:popupTheme="@style/AppTheme.PopupOverlay" />
Note
findViewById can also be found on the View class, but it's a relatively expensive operation, so when you have widgets that will be used again in an Activity, they should be assigned to fields in the class.