In this article written by Jon Jenkins, author of the book Learning Xero, the author wants us to learn all of the Xero core purchase processes from posting purchase bills and editing contacts to making supplier payments. You will learn how the purchase process works and how that impacts on inventory.
By the end of this article,you will have a thorough understanding of the purchase dashboard and its component parts as well as the ability to easily navigate to the areas you need.
These are the topics we'll cover in this article:
- Understanding the purchase dashboard layout
- Adding new contacts and posting bills
- Adding new inventory items to bills
(For more resources related to this topic, see here.)
Dashboard
The purchases dashboard in Xero is your one-stop shop for everything you need to manage the purchases for the business. To get to the purchases dashboard,you can click on Bills you need to payon the main dashboard or navigate to Accounts|Purchases. We have highlighted the major elements that make up the following dashboard.
On the right-hand side of the Dashboard, you will find a Search button. Use it to save time searching by bill number, reference, supplier, or amount, and drill down even further by selecting withina date range by due date or transaction date.

On the left-hand side of the dashboard, you have the main controls for performing tasks such as adding a new bill, repeating bill, credit note, or purchase order.

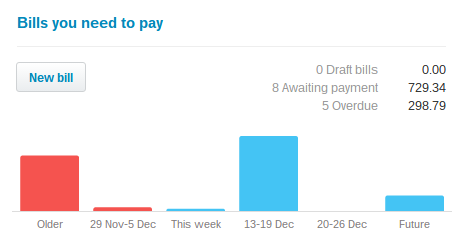
Under the main controls are the summary figures of the purchases, with the figure in brackets representing the number of transactions that make up the figure and the numerical value representing the total of those transactions. Clicking on any of these sections will drill down to the bills that make up that total.

You can also see draft bills that need approval. Untilbills have been approved (so anything with a Draft or Awaiting Approval status), they will not be included in any reports you run within Xero, such as the profit and loss account.So, if you have an approval process within your business,ensure that people adhere to it to improve the level of accuracy of reports.
Once you click on the summary, you will see the following table, which shows the bills making up that selection. You can also see tabs relating to the other criteria within Xero, making it easy to navigate between the various lists without having to perform searches or navigating away from this screen and breaking your workflow.
This view also allows you to add new transactions and mark bills as Paid, providing you with an uninterrupted workflow across the process of making purchases.

Addingcontacts
You can add a contact in Xero when raising abill to avoid navigating away and coming back, but you cannot enter any of the main contact details at that point. If you need to enter a purchase order to a new supplier,we would recommend that you add the supplier first by navigating to Contacts|All Contacts|Add Contact, so you have all the correct details for issuing the document.
Importing
When you first start using Xero or even if you have been using it for a while, you may have a separate database elsewhere with your contacts. You can import these into Xero using the predetermined CSV file template. This will enable you to keep all of your records in sync.
Navigate to the Contacts|All Contacts|Import as shown in the following screenshot:

When you click on Import, this action will then take you to a screen where you can download the Xero contact import template. Download the file so that you can compile your file for importing. We would recommend doing a search in the Xero Help Guide at this point on Import Contact and take a look through the guide shown in the following screenshot before you attempt to import to ensure that you have configured the file correctly and there is a smaller chance of the file being rejected:

Editing a contact
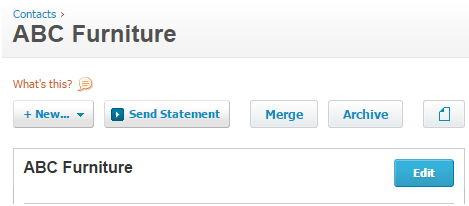
Once a contact record has been set up, you can edit the details by navigating to Contacts|Suppliers. From here, you can find the supplier you need using the letters at the top or using the Search facility.
When you click on the supplier, the Edit button will take you into the contact record so that you can make changes as required. Ensure that you save any changes you have made.
A few of the options you may wish to complete here to make the processing of purchases a bit easier and quicker is to add defaults. The items that you can default are the pieces of account code where you would like to post the bills and whether the amounts are exclusive or inclusive of tax. These will help make it quicker to post bills and reduce the likelihood of mispostings. These can, of course, be overwritten when posting bills.

You can also choose a default VAT tax rate, which again can resolve issues where people are not sure which tax rate to use.

There are various other default settings you can choose in the contact record, and we do suggest that you take a look at these to see where you can both reduce the opportunity for mistakes being made while making it quicker to process bills.
Purchasing
Getting the payment of suppliers bills correct is fundamental to running a tight ship. Making mistakes when it comes to purchasing goods can lead to incorrect stock holding, overpayments to suppliers, or deliveries being put on hold, which can have a significant impact on the trading of the business. It is therefore crucial that you do things in the correct way.
Standardbills
There are many ways to create a bill in Xero. From the Bills you need to paysection on the right-hand side of the main dashboard when you first login, click on New bill, as shown in the following screenshot:
Alternatively, you can do it by navigating to Accounts |Purchases | New.
You may also notice that when you have drilled down into any of the summary items on the dashboard, above each tab, you will also see the option to add new bill, as shown in the following screenshot:

As you can see, there are many ways to raise a new bill, but whichever way you do it, you will then be shown this screen:

If you start typing the supplier name in the From field, you will be provided with a list of supplier names beginning with those letters to make it easier and quicker to make a selection. If there is no contact recordat this point, you can click on + add contact to add a new supplier name so that you can complete raising the bill. As you start typing,Xero will provide a list of possible matches, so be careful not to set up multiple supplier accounts.
Unlock access to the largest independent learning library in Tech for FREE!
Get unlimited access to 7500+ expert-authored eBooks and video courses covering every tech area you can think of.
Renews at €14.99/month. Cancel anytime
The Datefield of the bill will default to the day on which you raise the bill. You can change this if you wish to. If you tab through Due Date, it will default to the day the bill is raised. If you have selected business-wide default payment terms, then the date will default to what you have selected.Likewise, if you have set a supplier default credit term, then that will override the business default at this point.
The Reference field is where you will enter the supplier invoice number.
The paper icon allows you to upload items, suchas a copy of the bill, a purchase order, or a contract perhaps,and attach them to the bill. It is up to you, but attaching documents, such as bills, makes life a lot easier as clicking on the paper icon allows you to see the document on screen, so no more sifting through filing cabinets and folders. You can also attach more than one document if you need to.
You can use the Total field as a double-check if you like, but you do not have to use it. If you prefer, you can enter the bill total in this field. However, if what you have entered does not total when you try to post the invoice, this action will tell you, and you can adjust accordingly.
You can change the currencyof the bill at this point using the Currency field,but again, if you have suppliers that bill you a different currency, we would suggest setting this as a default in the contact record to avoid posting the supplier bill in the wrong currency. If you do not have multiple currencies set up in Xero, you will not see this option when posting a bill.
The Amounts arefield can be used to toggle between tax-exclusive and tax-inclusive values, which makes it easier when posting bills.If you have the gross purchase figure, you would use the tax inclusive figure and allow Xero to automatically calculate the VAT for you without using a calculator.
Inventory items
Inventory items on a bill can save a lot of unnecessary data entry if you have standard services or products that you purchase within the business. You can add an inventory item when posting a bill, or you can add them by navigating to Settings|General Settings|Inventory Items. If you have decided to use inventory items, it would be sensible to do some from the start and use the Import file to set them up quickly and easily.
Each time you post a bill, you can then select the inventory item;this will pull through the default description and amounts for that inventory item. You can then adjust the descriptions as necessary but it saves you from having to type your product descriptions over and over again.

If you are using inventory items, the amount you have purchased will be recorded against the inventory item.If you useXero for inventory control, it will make the necessary adjustments between your inventory on hand and the cost of goods sold in the profit and loss account.
If you do not use inventory items, as a minimum, you will need to enter a description, a quantity, the unit price, the purchases account you are posting it to, and the tax rate to be used. Along with making the data entry quicker, inventory items give you the ability to run purchase reports by items, meaning that you do not have to set up a different account code for each type of goods you wish to generate reportsfor. It is worth taking some time to think about what you want to report on before posting your first bills.
Once you have finished entering your bill details, you can then save your billor approve your bill. The User Roles that have been assigned to the employees will drive the functionality they have available here. If you choose to save a bill this appears in the Draft section of the purchase summary on the dashboard. If you have a purchase workflow in your business where a member of staff can raise but not approve a bill, then Save would be the option for them.
As you can see in the following screenshot,there are several options available. If you are posting several bills in one go, you would choose Save & add another as this saves you from being sent to the purchases dashboard each time and then having to navigate back to this section.

In order for a bill to be posted the accounts ledgers, it will need to be approved.

Once the bill has been approved, you will see that a few extra options have now appeared both above and below the invoice. Above the invoice, you now have the ability toprint the invoice as a PDF, attach a document, or edit the bill by clicking on Bill Options.

Under the bill, you will now have a new box appear, which gives you the ability to mark the bill as paid if it has been paid.

Under this, you now have the History & Notes section, which gives you a full audit trail of what has happened to the bill, includingif anyone has edited the bill.

Repeatingbills
The process for raising a repeating bill is exactly the same as for a standard bill except for completing the additional fields shown in the following screenshot. You can choose the frequency of the bill to repeat, the date it is to start from and the end date which is optional. The Due Datefield is set in the bill settings as default to your business default or the supplier default if you have a default set up in the Contact record.

Before you can save the bill,you will have to select how you want the bill to be posted. If you select Save as Draft,someone will have to approve each bill. If you select Approve,the bill will get posted to the accounting records with no manual intervention.
Here are a couple of points to note if using repeating bills:
- You would only want to use this for invoices where there are regular items to be posted to the same account code and for the same amount.
- It is easy to forget that you have set these up and end up posting the bill as well and duplicating transactions.
- You can set a reference for the repeating bill and this will be the same for all bills posted. If you were to select the Save as Draft option rather than the Approve option, it will give you a chance to amend the reference to the correct invoice number before posting.
- You can enter placeholders to add the Week, Month, Year or a combination of those to ensure that the correct narrative is used in the description.However, use this for reference and avoid the point raised previously about using Save as Draft instead of Approve.
Xeronetwork key
The Xero Network Keyallows you to receive your bill's data directly into your Xero draft purchases section from someone else's salesledger if they use Xero. This can be a massive time saver if you are doing lots of transactions with other Xero users. Each Xero subscription has its own unique Xero Network Key, which you can share with the other Xero business by entering it into the relevant field in the contact record.

If you opt to do this, your bill data will be passed through to the Draft Purchases section in Xero and you will need to check the details, enter the account code to post it to, and then approve. Here, minimal data entry is required, and this is a much quicker process.
To locate your Xero Network Key to be provided to the other Xero user,navigate to Settings|General Settings|Xero to Xero.

Batch payments
If you pay multiple invoices from a single supplier or your bank gives you the ability to produce a BACS file to import to your online banking, then you may wish to use batch payments.
Batch Payments speed up the process of paying suppliers and reconciling the bank account. It can do this in three ways:
- You can mark lots of invoices from multiple suppliers as paid at the same time.
- You can create a file to be imported into your online banking.
- When the supplier payments appear on the bank feed, the amount paid from the online banking will match with what you have allocated in Xero, meaning that autosuggest comes into play and will make the correct suggestion rather than you having to use Find & Match to find all of the individual payments you allocated. This is time consuming and error prone.
Summary
We have successfully added a purchases bill and identified the different types of bills available in Xero.
In this article, we have run through the major purchases functions and we setup Repeating Bills. We explored how to use inventory items to make the purchases invoicing process even easier and quicker. On top of that, we have also looked at how to navigate around the purchases dashboard, how to make changes, and also how to track exactly what has happened to a bill.
Resources for Article:
Further resources on this subject:

 United States
 Great Britain
 India
India
 Germany
 France
 Canada
 Russia
 Spain
Spain
 Brazil
 Australia
 South Africa
 Thailand
 Ukraine
 Switzerland
 Slovakia
 Luxembourg
 Hungary
 Romania
 Denmark
 Ireland
 Estonia
 Belgium
 Italy
Italy
 Finland
 Cyprus
 Lithuania
 Latvia
 Malta
Malta
 Netherlands
 Portugal
 Slovenia
 Sweden
 Argentina
 Colombia
 Ecuador
 Indonesia
 Mexico
 New Zealand
 Norway
 South Korea
 Taiwan
 Turkey
 Czechia
 Austria
 Greece
 Isle of Man
 Bulgaria
 Japan
Japan
 Philippines
 Poland
 Singapore
 Egypt
Egypt
 Chile
Chile
 Malaysia


