In this article by Jarosław Krochmalski, author of the book IntelliJ IDEA Essentials, we will talk about working with VCS systems such as Git and Subversion. While working on the code, one of the most important aspects is version control. A Version Control System (VCS) (also known as a Revision Control System) is a repository of source code files with monitored access. Every change made to the source is tracked, along with who made the change, why they made it, and comments about problems fixed or enhancements introduced by the change. It doesn't matter if you work alone or in a team, having the tool to efficiently work with different versions of the code is crucial. Software development is usually carried out by teams, either distributed or colocated. The version control system lets developers work on a copy of the source code and then release their changes back to the common codebase when ready. Other developers work on their own copies of the same code at the same time, unaffected by each other's changes until they choose to merge or commit their changes back to the project. Currently, probably the most popular version control system is Git. After reading this article, you will be able to set up the version control mechanism of your choice, get files from the repository, commit your work, and browse the changes. Let's start with the version control setup.
(For more resources related to this topic, see here.)
Enabling version control
At the IDE level, version control integration is provided through a set of plugins. IntelliJ IDEA comes bundled with a number of plugins to integrate with the most popular version control systems. They include Git, CVS, Subversion, and Mercurial. The Ultimate edition additionally contains Clearcase, Visual SourceSafe, and Perforce plugins. You will need to enable them in the Plugins section of the Settings dialog box.
If you find the VCS feature is not enough and you are using some other VCS, try to find it in the Browse Repositories dialog box by choosing VCS Integration from the Category drop-down menu, as shown here:

The list of plugins here contains not only integration plugins, but also some useful add-ons for the installed integrations. For example, the SVN Bar plugin will create a quick access toolbar with buttons specific for Subversion (SVN) actions. Feel free to browse the list of plugins here and read the descriptions; you might find some valuable extensions.
The basic principles of working with the version control systems in IntelliJ IDEA are rather similar. We will focus on the Git and Subversion integration. This article should give you an overview of how to deal with the setup and version control commands in IntelliJ IDEA in general. If you have the necessary plugins enabled in the Settings dialog box, you can start working with the version control. We will begin with fetching the project out of the version control. Doing this will set up the version control automatically so that further steps will not be required unless you decide not to use the default workflow. Later, we will cover setting the VCS integration manually, so you will be able to tweak IntelliJ's behavior then.
Checking out the project from the repository
To be able to work on the files, first you need to get them from the repository. To get the files from the remote Git repository, you need to use the clone command available in the VCS menu, under the Checkout from Version Control option, as shown here:

In the Clone Repository dialog box, provide necessary options, such as the remote repository URL, parent directory, and the directory name to clone into, as shown in the following screenshot:

After successful cloning, IntelliJ IDEA will suggest creating a project based on the cloned sources. If you don't have the remote repository for your project, you can work with the offline local Git repository. To create a local Git repository, select Create Git repository from the VCS menu, as shown in the following screenshot:

This option will execute the git init command in the directory of your choice; it will most probably be the root directory of your project.
For the time being, the Git plugin does not allow you to set up remote repositories. You will probably need to set up the remote host for your newly created Git repository before you can actually fetch and push changes.
If you are using GitHub for your projects, the great GitHub integration plugin gives you the option to share the project on GitHub. This will create the remote repository automatically.
Later, when you want to get the files from the remote repository, just use the Git Pull command. This will basically retrieve changes (fetch) and apply them to the local branch (merge).
To obtain a local working copy of a subversion repository, choose Checkout from Version Control and then Subversion from the VCS menu. In the SVN Checkout Options dialog box, you will be able to specify Subversion-specific settings, such as a revision that needs to be checked (HEAD, for example). Again, IntelliJ IDEA will ask if you want to create the project from checked out sources. If you accept the suggestion to create a new project, New Project from Existing Code Wizard will start.
Fetching the project out of the repository will create some default VCS configuration in IntelliJ IDEA. It is usually sufficient, but if needed, the configuration can be changed. Let's discuss how to change the configuration in the next section.
Configuring version control
The VCS configuration in IntelliJ IDEA can be changed at the project level. Head to the Version Control section in the Settings dialog box, as shown here:

The Version Control section contains options that are common for all version control systems and also specific options for the different VCS systems (enabled by installing the corresponding plugins). IntelliJ IDEA uses a directory-based model for version control. The versioning mechanism is assigned to a specific directory that can either be a part of a project or can be just related to the project. This directory is not required to be located under the project root.
Multiple directories can have different version control systems linked.
To add a directory into the version control integration, use the Alt + Insert keyboard shortcut or click on the green plus button; the Add VCS Directory Mapping dialog box will appear.
You have the option to put all the project contents, starting from its base directory to the version control or limit the version control only to specific directories. Select the VCS system you need from the VCS drop-down menu, as shown in the following screenshot:

By default, IntelliJ IDEA will mark the changed files with a color in the Project tool window, as shown here:

If you select the Show directories with changed descendants option, IntelliJ IDEA will additionally mark the directories containing the changed files with a color, giving you the possibility to quickly notice the changes without expanding the project tree, as shown in the following screenshot:

The Show changed in last <number> days option will highlight the files changed recently during the debugging process and when displaying stacktraces.
Displaying the changed files in color can be very useful. If you see the colored file in the stacktrace, maybe the last change to the file is causing a problem.
The subsequent panes contain general version control settings, which apply to all version control systems integrated with the IDE. They include specifying actions that require confirmation, background operations set up, the ignored files list, and issuing of navigation configuration.
In the Confirmation section, you specify what version control actions will need your confirmation. The Background section will tell IntelliJ IDEA what operation it should perform in the background, as shown in the following screenshot:

If you choose to perform the operation in the background, IntelliJ IDEA will not display any modal windows during and after the operation. The progress and result will be presented in the status bar of the IDE and in the corresponding tool windows. For example, after the successful execution of the Git pull command, IntelliJ IDEA will present the Update Project Info tool window with the files changed and the Event Log tool window with the status of the operation, as shown in the following screenshot:

In the Ignored Files section, you can specify a list of files and directories that you do not want to put under version control, as shown in the following screenshot:
Unlock access to the largest independent learning library in Tech for FREE!
Get unlimited access to 7500+ expert-authored eBooks and video courses covering every tech area you can think of.
Renews at AU $19.99/month. Cancel anytime

To add a file or directory, use the Alt + Insert keyboard shortcut or hit the green plus (+) icon. The Ignore Unversioned Files dialog box will pop up as shown here:
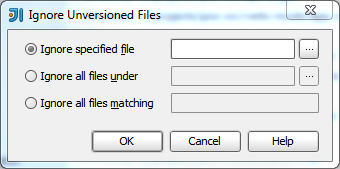
You can now specify a single file or the directory you want to ignore. There is also the possibility to construct the filename pattern for files to be ignored. Backup and logfiles are good candidates to be specified here, for example.
Most of the version control systems support the file with a list of file patterns to ignore. For Git, this will be the .gitignore file. IntelliJ IDEA will analyze such files during the project checkout from the existing repository and will fill the Ignored files list automatically.
In the Issue Navigation section, you can create a list of patterns to issue navigation. IntelliJ IDEA will try to use these patterns to create links from the commit messages. These links will then be displayed in the Changes and Version Control tool windows. Clicking on the link will open the browser and take you to the issue tracker of your choice. IntelliJ IDEA comes with predefined patterns for the most popular issue trackers: JIRA and YouTrack. To create a link to JIRA, click on the first button and provide the URL for your JIRA instance, as shown in the following screenshot:

To create a link to the YouTrack instance, click on the OK button and provide the URL to the YouTrack instance. If you do not use JIRA or YouTrack, you can also specify a generic pattern. Press the Alt + Insert keyboard shortcut to add a new pattern. In the IssueID field, enter the regular expression that IntelliJ IDEA will use to extract a part of the link. In the Issue Link field, provide the link expression that IntelliJ IDEA will use to replace a issue number within. Use the Example section to check if the resulting link is correct, as shown in the following screenshot:

The next sections in the Version Control preferences list contain options specific to the version control system you are using. For example, the Git-specific options can be configured in the Git section, as shown here:

You can specify the Git command executable here or select the associated SSH executable that will be used to perform the network Git operations such as pull and push.
The Auto-update if push of the current branch was rejected option is quite useful—IntelliJ IDEA will execute the pull command first if the push command fails because of the changes in the repository revision. This saves some time.We should now have version control integration up and running. Let's use it.
Working with version control
Before we start working with version control, we need to know about the concept of the changelist in IntelliJ IDEA. Let's focus on this now.
Changelists
When it comes to newly created or modified files, IntelliJ IDEA introduces the concept of a changelist. A changelist is a set of file modifications that represents a logical change in the source. Any modified file will go to the Default changelist. You can create new changelists if you like. The changes contained in a specific changelist are not stored in the repository until committed. Only the active changelist contains the files that are going to be committed. If you modify the file that is contained in the non-active change list, there is a risk that it will not be committed. This takes us to the last section of the common VCS settings at Settings | Version Control | Changelist conflicts. In this section, you can configure the protection of files that are present in the changelist that is not currently active. In other words, you define how IntelliJ IDEA should behave when you modify the file that is not in the active changelist.
The protection is turned on by default (Enable changelist conflict tracking is checked). If the Resolve Changelist Conflict checkbox is marked, the IDE will display the Resolve Changelist Conflict dialog box when you try to modify such a file. The possible options are to either shelve the changes (we will talk about the concept of shelving in a while), move a file to the active changelist, switch changelists to make the current changelist active, or ignore the conflict. If Highlight files with conflicts is checked and if you try to modify a file from the non-active change list, a warning will pop up in the editor, as shown in the following screenshot:

Again, you will have the possibility to move the changes to another change list, switch the active change list, or ignore the conflict. If you select Ignore, the change will be listed in the Files with ignored conflicts list, as shown in the following screenshot:

The list of all changelists in the project is listed in the Commit Changes dialog box (we will cover committing files in a while) and in the first tab of the Changes tool window, as shown here:

You can create a new changelist by using the Alt + Insert keyboard shortcut. The active list will have its name highlighted in bold. The last list is special; it contains the list of unversioned files.
You can drag-and-drop files between the changelists (with the exception of unversioned files).
Now that we know what a changelist is, let's add some files to the repository now.
Adding files to version control
You will probably want newly created files to be placed in version control. If you create a file in a directory already associated with the version control system, IntelliJ IDEA will add the file to the active changelist automatically, unless you configured this differently in the Confirmation section of the Version Control pane in the Settings dialog box. If you decided to have Show options before adding to version control checked, IntelliJ IDEA will ask if you want to add the file to the VCS, as shown here:

If you decide to check the Remember, don't ask again checkbox, IntelliJ IDEA will throw the future new files into version control silently. You can also add new files to the version control explicitly. Click on the file or directory you want to add in the Project tool window and choose the corresponding VCS command; for example:

Alternatively, you can open the Changes tool window, and browse Unversioned Files, where you can right-click on the file you want to add and select Add to VCS from the context menu, as shown in the following screenshot:

If there are many unversioned files, IntelliJ IDEA will render a link that allows you to browse the files in a separate dialog box, as shown in the following screenshot:

In the Unversioned Files dialog box, right-click on the file you want to add and select Add to VCS from the context menu, as shown in the following screenshot:

From now on, the file will be ready to commit to the repository.
If you've accidently added some files to version control and want to change them to unversioned, you can always revert the file so that it is no longer marked as part of the versioned files.
Summary
After reading this article, you know how to set up version control, get the project from the repository, commit your work, and get the changes made by other members of your team. Version control in IntelliJ IDEA is tightly integrated into the IDE. All the versioning activities can be executed from the IDE itself—you will not need to use an external tool for this. I believe it will shortly become natural for you to use the provided functionalities. Not being distracted by the use of external tools will result in higher effectiveness.
Resources for Article:
Further resources on this subject:

 United States
 Great Britain
 India
India
 Germany
 France
 Canada
 Spain
Spain
 Brazil
 Australia
 South Africa
 Thailand
 Switzerland
 Slovakia
 Luxembourg
 Hungary
 Romania
 Denmark
 Ireland
 Estonia
 Belgium
 Italy
Italy
 Finland
 Cyprus
 Lithuania
 Latvia
 Malta
Malta
 Netherlands
 Portugal
 Slovenia
 Sweden
 Argentina
 Colombia
 Ecuador
 Indonesia
 Mexico
 New Zealand
 Norway
 South Korea
 Taiwan
 Turkey
 Czechia
 Austria
 Greece
 Isle of Man
 Bulgaria
 Japan
Japan
 Philippines
 Poland
 Singapore
 Egypt
Egypt
 Chile
Chile
 Malaysia