In this article by Gavin Henrick and Karen Holland, author of the book Moodle Administration Essentials, roles play a key part in the ability of the Moodle site. They are able to restrict the access of users to only the data they should have access to, and whether or not they are able to alter it or add to it. In each course, every user will have been assigned a role when they are enrolled, such as teacher, student, or customized role.
In this article, we deal with the essential areas of role management that every administrator may have to deal with:
- Cloning a role
- Creating a new role
- Creating a course requester role
- Overriding a permission in a role in a course
- Testing a role
- Manually adding a role to a user in a course
- Enabling self-enrolment for a course
(For more resources related to this topic, see here.)
Understanding terminologies
There are some key terms used to describe users' abilities in Moodle and how they are defined, which are as follows:
- Role: A role is a set or collection of permissions on different capabilities. There are default roles like teacher and student, which have predefined sets of permissions.
- Capability: A capability is a specific behavior in Moodle, such as Start new discussions (mod/forum:startdiscussion), which can have a permission set within a role such as Allow or Not set/Inherit.

- Permission: Permission is associated with a capability. There are four possible values: allow, prevent, prohibit, or not set.
- Not set: This means that that there is not a specific setting for this user role, and Moodle will determine if it is allowed, if set in a higher context.
- Allow: The permission is explicitly granted for the capability.
- Prevent: The permission is removed for the capability, even if allowed in a higher context. However, it can be overridden at a specific context.
- Prohibit: The permission is completely denied and cannot be overridden at any lower context.
By default, the only configuration option displayed is Allow. To show the full list of options in the role edit page, click on the Show advanced button, just above the Filter option, as shown in the following image:

- Context: A context is an area of Moodle, such as the whole system, a category, a course, an activity, a block, or a user. A role will have permission for a capability on a specific context.
An example of this will be where a student can start a discussion in a specific forum. This is set up by enabling a permission to Allow for the capability Start new discussions for a Student role on that specific forum.
Standard roles
There are a number of different roles configured in Moodle, by default these are:
- Site administrator: The site administrator can do everything on the site including creating the site structure, courses, activities, and resources, and managing user accounts.
- Manager: The manager can access courses and modify them. They usually do not participate in teaching courses.
- Course creator: The course creator can create courses when assigned rights in a category.
- Teacher: The teacher can do anything within a course, including adding and removing resources and activities, communicating with students, and grading them.
- Non-editing teacher: The non-editing teacher can teach and communicate in courses and grade students, but cannot alter or add activities, nor change the course layout or settings.
- Student: The student can access and participate in courses, but cannot create or edit resources or activities within a course.
- Guest: The guest can view courses if allowed, but cannot participate. Guests have minimal privileges, and usually cannot enter text anywhere.
- Authenticated user: The role all logged in users get.
- Authenticated user on the front page role: A logged in user role for the front page only.
Managing role permissions
Let's learn how to manage permissions for existing roles in Moodle.
Cloning a role
It is possible to duplicate an existing role in Moodle. The main reasons for doing this will be so that you can have a variation of the existing role, such as a teacher, but with the role having reduced capabilities. For instance, to stop a teacher being able to add or remove students to the course, this process will be achieved by creating a course editing role, which is a clone of the standard editingteacher role with enrolment aspects removed. This is typically done when students are added to courses centrally with a student management system.
To duplicate a role, in this case editing teacher:
- Log in as an administrator level user account.
- In the Administration block, navigate to Site administration | Users | Permissions | Define roles.

- Click on the Add a new role button.

- Select an existing role from the Use role or archetype dropdown.
- Click on Continue.

- Enter the short role name in the Short name field. This must be unique.
- Enter the full role name in the Custom full name field. This is what appears on the user interface in Moodle.
- Enter an explanation for the role in the Description field. This should explain why the role was created, and what changes from default were planned.
- Scroll to the bottom of the page.
- Click on Create this role.
This will create a duplicate version of the teacher role with all the same permissions and capabilities.
Creating a new role
It is also possible to create a new role. The main reason for doing this would be to have a specific role to do a specific task and nothing else, such as a user that can manage users only. This is the alternative to cloning one of the existing roles, and then disabling everything except the one set of capabilities required.
To create a new role:
- Log in as an administrator level user account.
- In the Administration block, navigate to Site administration | Users | Permissions | Define roles.
- Click on the Add a new role button.
- Select No role from the Use role or archetype dropdown.
- Click on Continue.
- Enter the short role name in the Short name field. This must be unique.
- Enter the full role name in the Custom full name field. This is what appears on the user interface in Moodle.
- Enter an explanation for the role in the Description field. This should explain why the role was created.
- Select the appropriate Role archetype, in this case, None. The role archetype determines the permissions when a role is reset to default and any new permissions for the role when the site is upgraded.
- Select Context types where this role may be assigned.
- Set the permissions as required by searching for the appropriate Capability and clicking on Allow.
- Scroll to the bottom of the page.
- Click on Create this role.
This will create the new role with the settings as defined.
If you want the new role to appear in the course listing, you must enable it by navigating to Administration block | Site administration | Appearance | Courses | Course Contacts.
Creating a course requester role
There is a core Moodle feature that enables users to request a course to be created. This is not normally used, especially as students and most teachers just have responsibility within their own course context. So, it can be useful to create a role just with this ability, so that a faculty or department administrator can request a new course space when needed, without giving the ability to all users.
There are a few steps in this process:
- Remove the capability from other roles.
- Set up the new role.
- Assign the role to a user at the correct context.
- Firstly, we remove the capability from other roles by altering the authenticated user role as shown:
- In the Administration block, navigate to Site administration | Users | Permissions | Define roles.
- Click on edit for the Authenticated user role.

- Enter the request text into Filter.
- Select the Not set radio button under moodle/course:request to change the Allow permission.

- Scroll to the bottom of the page.
- Click on Save changes.
- Next, we create the new role with the specific capability set to Allow.
- In the Administration block, navigate to Site administration | Users | Permissions | Define roles.
- Click on the Add a new role button.
- Select No role from the Use role or archetype dropdown.
- Click on Continue.

- Enter courserequester in the Short name field.
- Enter Course Requester in the Custom full name field. This is what appears on the user interface in Moodle.
- Enter the explanation for the role in the Description field.
- Select system under Context types where this role may be assigned.
- Change moodle/course:request to Allow.
- Scroll to the bottom of the page.
- Click on Create this role.
- Lastly, you assign the role to a user at system level. This is different from giving a role to a user in a course.
- In the Administration block, navigate to Site administration | Users | Permissions | Assign system roles.
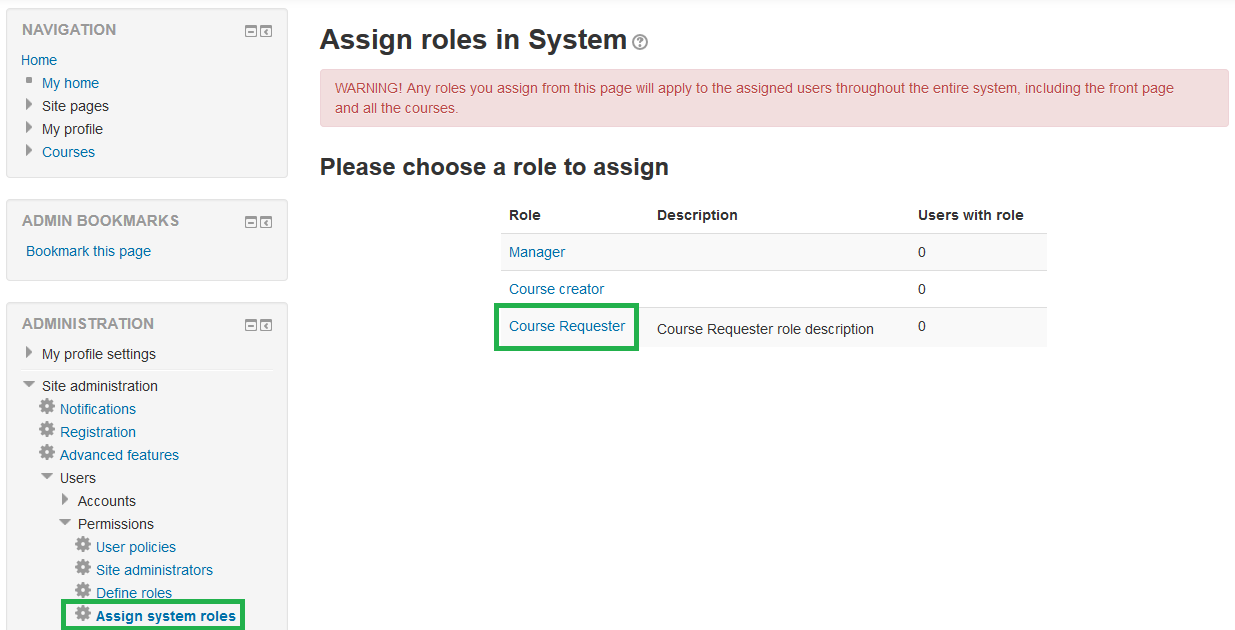
- Click on Course Requester.
- Search for the specific user in the Potential user list.
- Select the user from the list, using the Search filter if required.
- Click on the Add button.
Any roles you assign from this page will apply to the assigned users throughout the entire system, including the front page and all the courses.
Applying a role override for a specific context
You can change how a specific role behaves in a certain context by enabling an override, thereby granting or removing, the permission in that context.
An example of this is, in general, students cannot rate a forum post in a forum in their course. When ratings are enabled, only the manager, teacher, and non-editing teacher roles are those with permission to rate the posts. So, to enable the students to rate posts, you need to change the permissions for the student role on that specific forum.
Unlock access to the largest independent learning library in Tech for FREE!
Get unlimited access to 7500+ expert-authored eBooks and video courses covering every tech area you can think of.
Renews at AU $19.99/month. Cancel anytime
Browse to the forum where you want to allow students to rate forum posts. This process assumes that the rating has been already enabled in the forum.
- From the Forum page, go to the Administration block, then to Forum administration, and click on the link to Permissions.

- Scroll down the page to locate the permission Rate posts. This is the mod/forum:rate capability. By default, you should not see the student role listed to the right of the permission.

- Click on the plus sign (+) that appears below the roles already listed for the Rate posts permission.
- Select Student from the Select role menu, and click on the Allow button. Student should now appear in the list next to the Rate posts permission.
Participants will now be able to rate each other's posts in this forum. Making the change in this forum does not impact other forums.
Testing a role
It is possible to use the Switch role to feature to see what the other role behaves like in the different contexts. However, the best way to test a role is to create a new user account, and then assign that user the role in the correct context as follows:

- Create the new user by navigating to Site administration | Users | Accounts | Add a new user.
- Assign your new user the role in the correct context, such as system roles or in a course as required.
- Log in with this user in a different browser to check what they can do / see.
Having two different roles logged in at the same time, each using a different browser, means that you can test the new role in one browser while still logged in as the administrator in your main browser. This saves so much time when building courses especially.
Manually adding a user to a course
Depending on what your role is on a course, you can add other users to the course by manually enrolling them to the course.
In this example, we are logged in as the administrator, which can add a number of roles, including:
- Manager
- Teacher
- Non-Editing Teacher
- Student
To enrol a user in your course:
- Go to the Course administration menu in the Administration block.
- Expand on the User settings.
- Click on the Enrolled users link.

- This brings up the enrolled users page that lists all enrolled users—this can be filtered by role and by default shows the enrolled participants only.
- Click on the Enrol users button.
- From the Assign roles dropdown, select which role you want to assign to the user. This is limited to the roles which you can assign.
- Search for the user that you want to add to the course.
- Click on the Enrol button to enroll the user with the assigned role.
- Click on Finish enrolling users.
The page will now reload with the new enrolments. To see the users that you added with the given role, you may need to change the filter to the specific role type.
This is how you manually add someone to a Moodle course.
User upload CSV files allow you to include optional enrolment fields, which will enable you to enroll existing or new users. The sample user upload CSV file will enroll each user as a student to both specified courses, identified by their course shortnames: Teaching with Moodle, and Induction.

Enabling self-enrolment for a course
In addition to manually adding users to a course, you can configure a course so that students can self-enroll onto the course, either with or without an enrolment key or password.
There are two dependencies required for this to work:
- Firstly, the self-enrolment plugin needs to be enabled at the site level. This is found in the Administration block, by navigating to Site Administration | Plugins | Enrolments | Manage enroll plugins. If it is not enabled, you need to click on the eye icon to enable it. It is enabled by default in Moodle.

- Secondly, you need to enable the self-enrolment method in the course itself, and configure it accordingly.
In the course that you want to enable self-enrolment, the following are the essential steps:
- In the Administration block, navigate to Administration | Course administration | Users | Enrolment methods.
- Click on the eye icon to turn on the Self enrolment method.
- Click on the cogwheel icon to access the configuration for the Self enrolment method.

- You can optionally enter a name for the method into the Custom instance name field; however, this is not required. Typically, you would do this if you are enabling multiple self-enrolment options and want to identify them separately.

- Enter an enrolment key or password into the Enrolment key field if you want to restrict self-enrolment to those who are issued the password. Once the user knows the password, they will be able to enroll.
If you are using groups in your course, and configure them with different passwords for each group, it is possible to use the Use group enrolment keys option to use those passwords from the different groups to automatically place the self-enrolling users into those groups when they enroll, using the correct key/password.
- If you want the self-enrolment to enroll users as students, leave the Default assigned role as Student, or change it to whichever role you intend it to operate for.
Some organizations will give one password for the students to enrol with and another for the teachers to enrol with, so that the organization does not need to manage the enrolment centrally. So, having two self-enrolment methods set up, one pointing at student and one at teacher, makes this possible.
- If you want to control the length of enrolment, you can do this by setting the Enrolment duration column. In this case, you can also issue a warning to the user before it expires by using Notify before enrolment expires and Notification threshold options.
- If you want to specify the length of the enrolment, you can set this with Start date and End date.
- You can un-enroll the user if they are inactive for a period of time by setting Unenroll to inactive after a specific number of days.
- Set Max enrolled users if you want to limit the number of users using this specific password to enroll to the course. This is useful if you are selling a specific number of seats on the course.
- This self-enrolment method may be restricted to members of a specified cohort only. You can enable this by selecting a cohort from the dropdown for the Only cohort members setting.
- Leave Send course welcome message ticked if you want to send a message to those who self-enroll. This is recommended.
- Enter a welcome message in the Custom welcome message field. This will be sent to all users who self-enroll using this method, and can be used to remind them of key information about the course, such as a starting date, or asking them to do something like complete the icebreaker in the course.
- Click on Save changes.
Once enabled and configured, users will now be able to self-enroll and will be added as whatever role you selected. This is dependent on the course itself being visible to the users when browsing the site.
Other custom roles
Moodle docs has a list of potential custom roles with instructions on how to create them including:
- Parent
- Demo teacher
- Forum moderator
- Forum poster role
- Calendar editor
- Blogger
- Quiz user with unlimited time
- Question Creator
- Question sharer
- Course requester role
- Feedback template creator
- Grading forms publisher
- Grading forms manager
- Grade view
- Gallery owner role
For more information, check https://docs.moodle.org/29/en/Creating_custom_roles.
Summary
In this article, we looked at the core administrator tasks in role management, and the different aspects to consider when deciding which approach to take in either extending or reducing role permissions.
Resources for Article:
Further resources on this subject:

 United States
 Great Britain
 India
India
 Germany
 France
 Canada
 Spain
Spain
 Brazil
 Australia
 South Africa
 Thailand
 Switzerland
 Slovakia
 Luxembourg
 Hungary
 Romania
 Denmark
 Ireland
 Estonia
 Belgium
 Italy
Italy
 Finland
 Cyprus
 Lithuania
 Latvia
 Malta
Malta
 Netherlands
 Portugal
 Slovenia
 Sweden
 Argentina
 Colombia
 Ecuador
 Indonesia
 Mexico
 New Zealand
 Norway
 South Korea
 Taiwan
 Turkey
 Czechia
 Austria
 Greece
 Isle of Man
 Bulgaria
 Japan
Japan
 Philippines
 Poland
 Singapore
 Egypt
Egypt
 Chile
Chile
 Malaysia