In this article by Maya Posch, the author of the book Mastering C++ Multithreading, we will learn to work through and understand a basic multithreaded C++ application.
While generally threads are used to work on a task more or less independently from other threads, there are many occasions where one would want to pass data between threads, or even control other threads, such as from a central task scheduler thread. This article looks at how such tasks are accomplished.
Topics covered in this article include:
- Use of mutexes, locks and similar synchronization structures.
- The use of condition variables and signals to control threads.
- Safely passing and sharing data between threads.
(For more resources related to this topic, see here.)
Safety first
The central problem with concurrency is that of ensuring safe access to shared resources, including when communicating between threads. There is also the issue of threads being able to communicate and synchronize themselves.
What makes multithreaded programming such a challenge is to be able to keep track of each interaction between threads, ensure that each and every form of access is secured while not falling into the traps of deadlocks and data races.
In this article we will look at a fairly complex example involving a task scheduler. This is a form of high-concurrency, high-throughput situation where many different requirements come together, with many potential traps, as we will see in a moment.
The scheduler
A good example of multithreading with a significant amount of synchronization and communication between threads is the scheduling of tasks. Hereby the goal is to accept incoming tasks and assign them to work threads as quickly as possible.
Hereby a number of different approaches are possible. Often one has worker threads running in an active loop, constantly polling a central queue for new tasks. Disadvantages of this approach include the wasting of processor cycles on said polling and the congestion which forms at the synchronization mechanism used, generally a mutex.Furthermore, this active polling approach scales very poorly when the number of worker threads increase.
Ideally, each worker thread would idly wait until it is needed again. To accomplish this, we have to approach the problem from the other side: not from the perspective of the worker threads, but of that of the queue. Much like the scheduler of of an operating system, it is the scheduler which is aware of both tasks which require processing, as well as available worker threads.
In this approach, a central scheduler instance would accept new tasks and actively assign them to worker threads. Said scheduler instance may also manage these worker threads, such as their number and priority depending on the number of incoming tasks and the type of task or other properties.
High-level view
At its core, our scheduleror dispatcher is quite simple, functioning like a queue with all of the scheduling logic built into it:
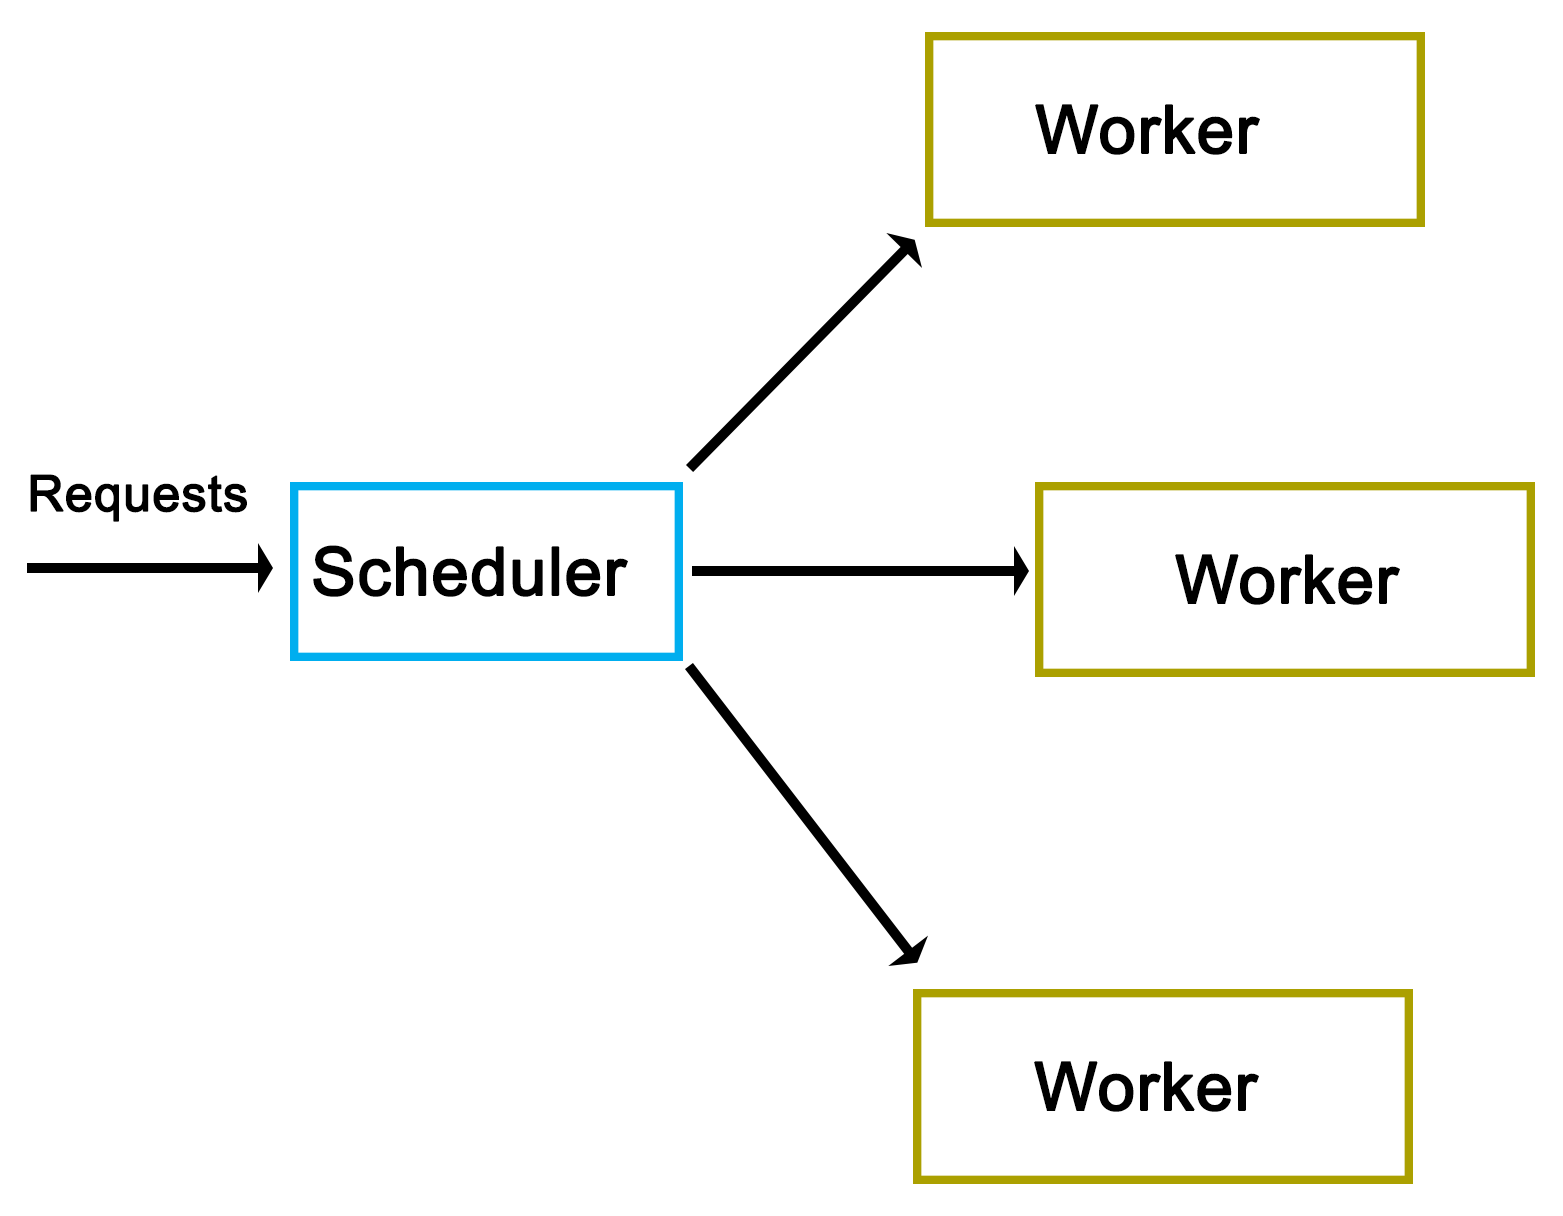
As one can see from the high-level view, there really isn't much to it. As we'll see in a moment, the actual implementation does however have a number of complications.
Implementation
As is usual, we start off with the main function, contained in main.cpp:
#include "dispatcher.h"
#include "request.h"

#include <iostream>
#include <string>
#include <csignal>
#include <thread>
#include <chrono>

using namespace std;


sig_atomic_t signal_caught = 0;
mutex logMutex;
The custom headers we include are those for our dispatcher implementation, as well as the Request class we'll be using.
Globally we define an atomic variable to be used with the signal handler, as well as a mutex which will synchronize the output (on the standard output) from our logging method.
void sigint_handler(int sig) {
signal_caught = 1;
}
Our signal handler function (for SIGINT signals) simply sets the global atomic variable we defined earlier.
void logFnc(string text) {
logMutex.lock();
cout << text <<"n";
logMutex.unlock();
}
In our logging function we use the global mutex to ensure writing to the standard output is synchronized.
int main() {
signal(SIGINT, &sigint_handler);
Dispatcher::init(10);
In the main function we install the signal handler for SIGINT to allow us to interrupt the execution of the application. We also call the static init() function on the Dispatcher class to initialize it.
cout <<"Initialised.n";

int cycles = 0;
Request* rq = 0;
while (!signal_caught && cycles < 50) {
rq = new Request();
rq->setValue(cycles);
rq->setOutput(&logFnc);
Dispatcher::addRequest(rq);
cycles++;
}
Next we set up the loop in which we will create new requests. In each cycle we create a new Request instance and use its setValue() function to set an integer value (current cycle number). We also set our logging function on the request instance before adding this new request to the Dispatcher using its static addRequest() function.
This loop will continue until the maximum number of cycles have been reached, or SIGINT has been signaled, using Ctrl+C or similar.
his_thread::sleep_for(chrono::seconds(5));

Dispatcher::stop();
cout <<"Clean-up done.n";

return 0;
}
Finally we wait for five seconds, using the thread's sleep_for() function and the chrono::seconds() function from the chrono STL header.
We also call the stop() function on the Dispatcher before returning.
Request class
A request for the Dispatcher always derives from the pure virtual AbstractRequest class:
#pragma once
#ifndef ABSTRACT_REQUEST_H
#define ABSTRACT_REQUEST_H


class AbstractRequest {
//

public:
virtual void setValue(int value) = 0;
virtual void process() = 0;
virtual void finish() = 0;
};

#endif
This class defines an API with three functions which a deriving class always has to implement, of which the process() and finish() functions are the most generic and likely to be used in any practical implementation. The setValue() function is specific to this demonstration implementation and would likely be adapted or extended to fit a real-life scenario.
The advantage of using an abstract class as the basis for a request is that it allows the Dispatcher class to handle many different types of requests, as long as they all adhere to this same basic API.
Using this abstract interface, we implement a basic Request class:
#pragma once
#ifndef REQUEST_H
#define REQUEST_H

#include "abstract_request.h"


#include <string>

using namespace std;


typedef void (*logFunction)(string text);


class Request : public AbstractRequest {
int value;
logFunction outFnc;

public:
void setValue(int value) { this->value = value; }
void setOutput(logFunction fnc) { outFnc = fnc; }
void process();
void finish();
};

#endif
In its header file we first define the logging function pointer's format. After this we implement the request API, adding the setOutput() function to the base API, which accepts a function pointer for logging. Both setter functions merely assign the provided parameter to their respective private class members.
Next, the class function implementations:
#include "request.h"

void Request::process() {
outFnc("Starting processing request " + std::to_string(value) + "...");

//
}


void Request::finish() {
outFnc("Finished request " + std::to_string(value));
}Both of these implementations are very basic, merely using the function pointer to output a string indicating the status of the worker thread.
In a practical implementation, one would add the business logic to the process()function, with the finish() function containing any functionality to finish up a request, such as writing a map into a string.
Worker class
Next, the Worker class. This contains the logic which will be called by the dispatcher in order to process a request:
#pragma once
#ifndef WORKER_H
#define WORKER_H

#include "abstract_request.h"

#include <condition_variable>
#include <mutex>

using namespace std;


class Worker {
condition_variable cv;
mutex mtx;
unique_lock<mutex> ulock;
AbstractRequest* request;
bool running;
bool ready;

public:
Worker() { running = true; ready = false; ulock = unique_lock<mutex>(mtx); }
void run();
void stop() { running = false; }
void setRequest(AbstractRequest* request) { this->request = request; ready = true; }
void getCondition(condition_variable* &cv);
};

#endif
Whereas the adding of a request to the dispatcher does not require any special logic, the Worker class does require the use of condition variables to synchronize itself with the dispatcher. For the C++11 threads API, this requires a condition variable, a mutex and a unique lock.
The unique lock encapsulates the mutex and will ultimately be used with the condition variable as we will see in a moment.
Beyond this we define methods to start and stop the worker, to set a new request for processing and to obtain access to its internal condition variable.
Moving on, the rest of the implementation:
#include "worker.h"
#include "dispatcher.h"

#include <chrono>

using namespace std;


void Worker::getCondition(condition_variable* &cv) {
cv = &(this)->cv;
}


void Worker::run() {
while (running) {
if (ready) {
ready = false;
request->process();
request->finish();
}

if (Dispatcher::addWorker(this)) {
// Use the ready loop to deal with spurious wake-ups.
while (!ready && running) {
if (cv.wait_for(ulock, chrono::seconds(1)) == cv_status::timeout) {
// We timed out, but we keep waiting unless
// the worker is
// stopped by the dispatcher.
}
}
}
}
}
Beyond the getter function for the condition variable, we define the run() function, which the dispatcher will run for each worker thread upon starting it.
Its main loop merely checks that the stop() function hasn't been called yet, which would have set the running boolean value to false and ended the work thread. This is used by the dispatcher when shutting down, allowing it to terminate the worker threads. Since boolean values are generally atomic, setting and checking can be done simultaneously without risk or requiring a mutex.
Moving on, the check of the ready variable is to ensure that a request is actually waiting when the thread is first run. On the first run of the worker thread, no request will be waiting and thus attempting to process one would result in a crash. Upon the dispatcher setting a new request, this boolean variable will be set to true.
If a request is waiting, the ready variable will be set to false again, after which the request instance will have its process() and finish() functions called. This will run the business logic of the request on the worker thread's thread and finalize it.
Unlock access to the largest independent learning library in Tech for FREE!
Get unlimited access to 7500+ expert-authored eBooks and video courses covering every tech area you can think of.
Renews at €14.99/month. Cancel anytime
Finally, the worker thread adds itself to the dispatcher using its static addWorker() function. This function will return false if no new request was available, causing the worker thread to wait until a new request has become available. Otherwise the worker thread will continue with the processing of the new request that the dispatcher will have set on it.
If asked to wait, we enter a new loop which will ensure that upon waking up from waiting for the condition variable to be signaled, we woke up because we got signaled by the dispatcher (ready variable set to true), and not because of a spurious wake-up.
Last of all, we enter the actual wait() function of the condition variable, using the unique lock instance we created before, along with a timeout. If a timeout occurs, we can either terminate the thread, or keep waiting. Here we choose to do nothing and just re-enter the waiting loop.
Dispatcher
As the last item, we have the Dispatcher class itself:
#pragma once
#ifndef DISPATCHER_H
#define DISPATCHER_H

#include "abstract_request.h"
#include "worker.h"

#include <queue>
#include <mutex>
#include <thread>
#include <vector>

using namespace std;


class Dispatcher {
static queue<AbstractRequest*> requests;
static queue<Worker*> workers;
static mutex requestsMutex;
static mutex workersMutex;
static vector<Worker*> allWorkers;
static vector<thread*> threads;

public:
static bool init(int workers);
static bool stop();
static void addRequest(AbstractRequest* request);
static bool addWorker(Worker* worker);
};

#endif
Most of this should look familiar by now. As one should have surmised by now, this is a fully static class.
Moving on with its implementation:
#include "dispatcher.h"

#include <iostream>
using namespace std;


queue<AbstractRequest*> Dispatcher::requests;
queue<Worker*> Dispatcher::workers;
mutex Dispatcher::requestsMutex;
mutex Dispatcher::workersMutex;
vector<Worker*> Dispatcher::allWorkers;
vector<thread*> Dispatcher::threads;


bool Dispatcher::init(int workers) {
hread* t = 0;
Worker* w = 0;
for (int i = 0; i < workers; ++i) {
w = new Worker;
allWorkers.push_back(w);
 = new thread(&Worker::run, w);
hreads.push_back(t);
}
}
After setting up the static class members, the init() function is defined. It starts the specified number of worker threads, keeping a reference to each worker and thread instance in their respective vector data structures.
bool Dispatcher::stop() {
for (int i = 0; i < allWorkers.size(); ++i) {
allWorkers[i]->stop();
}

cout <<"Stopped workers.n";

for (int j = 0; j < threads.size(); ++j) {
hreads[j]->join();

cout <<"Joined threads.n";
}
}
In the stop() function each worker instance has its stop() function called. This will cause each worker thread to terminate, as we saw earlier in the Worker class description.
Finally, we wait for each thread to join (that is, finish), prior to returning.
void Dispatcher::addRequest(AbstractRequest* request) {
workersMutex.lock();
if (!workers.empty()) {
Worker* worker = workers.front();
worker->setRequest(request);
condition_variable* cv;
worker->getCondition(cv);
cv->notify_one();
workers.pop();
workersMutex.unlock();
}
else {
workersMutex.unlock();
requestsMutex.lock();
requests.push(request);
requestsMutex.unlock();
}
}
The addRequest() function is where things get interesting. In this one function a new request is added. What happens next to it depends on whether a worker thread is waiting for a new request or not. If no worker thread is waiting (worker queue is empty), the request is added to the request queue.
The use of mutexes ensures that the access to these queues occurs safely, as the worker threads will simultaneously try to access both queues as well.
An import gotcha to note here is the possibility of a deadlock. That is, a situation where two threads will hold the lock on a resource, with the other thread waiting for the first thread to release its lock before releasing its own. Every situation where more than one mutex is used in a single scope holds this potential.
In this function the potential for deadlock lies in the releasing of the lock on the workers mutex and when the lock on the requests mutex is obtained. In the case that this function holds the workers mutex and tries to obtain the requests lock (when no worker thread is available), there is a chance that another thread holds the requests mutex (looking for new requests to handle), while simultaneously trying to obtain the workers mutex (finding no requests and adding itself to the workers queue).
The solution hereby is simple: release a mutex before obtaining the next one. In the situation where one feels that more than one mutex lock has to be held it is paramount to examine and test one's code for potential deadlocks. In this particular situation the workers mutex lock is explicitly released when it is no longer needed, or before the requests mutex lock is obtained, preventing a deadlock.
Another important aspect of this particular section of code is the way it signals a worker thread. As one can see in the first section of the if/else block, when the workers queue is not empty, a worker is fetched from the queue, has the request set on it and then has its condition variable referenced and signaled, or notified.
Internally the condition variable uses the mutex we handed it before in the Worker class definition to guarantee only atomic access to it. When the notify_one() function (generally called signal() in other APIs) is called on the condition variable, it will notify the first thread in the queue of threads waiting for the condition variable to return and continue.
In the Worker class'run() function we would be waiting for this notification event. Upon receiving it, the worker thread would continue and process the new request. The thread reference will then be removed from the queue until it adds itself again once it is done processing the request.
bool Dispatcher::addWorker(Worker* worker) {
bool wait = true;
requestsMutex.lock();
if (!requests.empty()) {
AbstractRequest* request = requests.front();
worker->setRequest(request);
requests.pop();
wait = false;
requestsMutex.unlock();
}
else {
requestsMutex.unlock();
workersMutex.lock();
workers.push(worker);
workersMutex.unlock();
}

return wait;
}
With this function a worker thread will add itself to the queue once it is done processing a request. It is similar to the earlier function in that the incoming worker is first actively matched with any request which may be waiting in the request queue. If none are available, the worker is added to the worker queue.
Important to note here is that we return a boolean value which indicates whether the calling thread should wait for a new request, or whether it already has received a new request while trying to add itself to the queue.
While this code is less complex than that of the previous function, it still holds the same potential deadlock issue due to the handling of two mutexes within the same scope. Here, too, we first release the mutex we hold before obtaining the next one.
Makefile
The Makefile for this dispatcher example is very basic again, gathering all C++ source files in the current folder and compiling them into a binary using g++:
GCC := g++

OUTPUT := dispatcher_demo
SOURCES := $(wildcard *.cpp)
CCFLAGS := -std=c++11 -g3

all: $(OUTPUT)

$(OUTPUT):
$(GCC) -o $(OUTPUT) $(CCFLAGS) $(SOURCES)

clean:
rm $(OUTPUT)

.PHONY: all
Output
After compiling the application, running it produces the following output for the fifty total requests:
$ ./dispatcher_demo.exe
Initialised.
Starting processing request 1...
Starting processing request 2...
Finished request 1
Starting processing request 3...
Finished request 3
Starting processing request 6...
Finished request 6
Starting processing request 8...
Finished request 8
Starting processing request 9...
Finished request 9
Finished request 2
Starting processing request 11...
Finished request 11
Starting processing request 12...
Finished request 12
Starting processing request 13...
Finished request 13
Starting processing request 14...
Finished request 14
Starting processing request 7...
Starting processing request 10...
Starting processing request 15...
Finished request 7
Finished request 15
Finished request 10
Starting processing request 16...
Finished request 16
Starting processing request 17...
Starting processing request 18...
Starting processing request 0…
At this point we we can already clearly see that even with each request taking almost no time to process, the requests are clearly being executed in parallel. The first request (request 0) only starts being processed after the 16th request, while the second request already finishes after the ninth request, long before this.
The factors which determine which thread and thus which request is processed first depends on the OS scheduler and hardware-based scheduling. This clearly shows just how few assumptions one can be made about how a multithreaded application will be executed, even on a single platform.
Starting processing request 5...
Finished request 5
Starting processing request 20...
Finished request 18
Finished request 20
Starting processing request 21...
Starting processing request 4...
Finished request 21
Finished request 4
Here the fourth and fifth requests also finish in a rather delayed fashion.
Starting processing request 23...
Starting processing request 24...
Starting processing request 22...
Finished request 24
Finished request 23
Finished request 22
Starting processing request 26...
Starting processing request 25...
Starting processing request 28...
Finished request 26
Starting processing request 27...
Finished request 28
Finished request 27
Starting processing request 29...
Starting processing request 30...
Finished request 30
Finished request 29
Finished request 17
Finished request 25
Starting processing request 19...
Finished request 0
At this point the first request finally finishes. This may indicate that the initialization time for the first request will always delay it relative to the successive requests. Running the application multiple times can confirm this. It's important that if the order of processing is relevant, that this randomness does not negatively affect one's application.
Starting processing request 33...
Starting processing request 35...
Finished request 33
Finished request 35
Starting processing request 37...
Starting processing request 38...
Finished request 37
Finished request 38
Starting processing request 39...
Starting processing request 40...
Starting processing request 36...
Starting processing request 31...
Finished request 40
Finished request 39
Starting processing request 32...
Starting processing request 41...
Finished request 32
Finished request 41
Starting processing request 42...
Finished request 31
Starting processing request 44...
Finished request 36
Finished request 42
Starting processing request 45...
Finished request 44
Starting processing request 47...
Starting processing request 48...
Finished request 48
Starting processing request 43...
Finished request 47
Finished request 43
Finished request 19
Starting processing request 34...
Finished request 34
Starting processing request 46...
Starting processing request 49...
Finished request 46
Finished request 49
Finished request 45
Request 19 also became fairly delayed, showing once again just how unpredictable a multithreaded application can be. If we were processing a large data set in parallel here, with chunks of data in each request, we might have to pause at some points to account for these delays as otherwise our output cache might grow too large.
As doing so would negatively affect an application's performance, one might have to look at low-level optimizations, as well as the scheduling of threads on specific processor cores in order to prevent this from happening.
Stopped workers.
Joined threads.
Joined threads.
Joined threads.
Joined threads.
Joined threads.
Joined threads.
Joined threads.
Joined threads.
Joined threads.
Joined threads.
Clean-up done.
All ten worker threads which were launched in the beginning terminate here as we call the stop() function of the Dispatcher.
Sharing data
In this article's example we saw how to share information between threads in addition to the synchronizing of threads. This in the form of the requests we passed from the main thread into the dispatcher, from which each request gets passed on to a different thread.
The essential idea behind the sharing of data between threads is that the data to be shared exists somewhere in a way which is accessible to two threads or more. After this we have to ensure that only one thread can modify the data, and that the data does not get modified while it's being read. Generally we would use mutexes or similar to ensure this.
Using R/W-locks
Readers-writer locks are a possible optimization here, because they allow multiple threads to read simultaneously from a single data source. If one has an application in which multiple worker threads read the same information repeatedly, it would be more efficient to use read-write locks than basic mutexes, because the attempts to read the data will not block the other threads.
A read-write lock can thus be used as a more advanced version of a mutex, namely as one which adapts its behavior to the type of access. Internally it builds on mutexes (or semaphores) and condition variables.
Using shared pointers
First available via the Boost library and introduced natively with C++11, shared pointers are an abstraction of memory management using reference counting for heap-allocated instances. They are partially thread-safe, in that creating multiple shared pointer instances can be created, but the referenced object itself is not thread-safe.
Depending on the application this may suffice, however. To make them properly thread-safe one can use atomics.
Summary
In this article we looked at how to pass data between threads in a safe manner as part of a fairly complex scheduler implementation. We also looked at the resulting asynchronous processing of said scheduler and considered some potential alternatives and optimizations for passing data between threads.
At this point one should be able to safely pass data between threads, as well as synchronize the access to other shared resources.
In the next article we will be looking at the native C++ threading and primitives API.
Resources for Article:
Further resources on this subject:

 United States
 Great Britain
 India
India
 Germany
 France
 Canada
 Spain
Spain
 Brazil
 Australia
 South Africa
 Thailand
 Switzerland
 Slovakia
 Luxembourg
 Hungary
 Romania
 Denmark
 Ireland
 Estonia
 Belgium
 Italy
Italy
 Finland
 Cyprus
 Lithuania
 Latvia
 Malta
Malta
 Netherlands
 Portugal
 Slovenia
 Sweden
 Argentina
 Colombia
 Ecuador
 Indonesia
 Mexico
 New Zealand
 Norway
 South Korea
 Taiwan
 Turkey
 Czechia
 Austria
 Greece
 Isle of Man
 Bulgaria
 Japan
Japan
 Philippines
 Poland
 Singapore
 Egypt
Egypt
 Chile
Chile
 Malaysia