In this article, by Paul Sokol, author of the book Infusionsoft Cookbook, we will learn how to create a Contact Us form. Also, we would learn building a lead magnet delivery.
Infusionsoft invented a holistic business strategy and customer experience journey framework named Lifecycle Marketing. There are three phases in Lifecycle Marketing: Attract, Sell, and Wow. This article concerns itself with different tactics to attract and capture leads.
Any business can use these recipes in one way or another. How you use them is up to you. Be creative!
(For more resources related to this topic, see here.)
Creating a Contact Us form
Every website needs to have some method for people to make general inquiries. This is particularly important for service-based businesses that operate locally. If a website is missing a simple Contact Us form that means good leads from our hard-earned traffic are slipping away. Fixing this hole in our online presence creates another lead channel for the business.
Getting ready
We need to edit a new campaign and have some manner of getting a form on our site (either ourselves or via webmaster).
How to do it...
- Drag out a new traffic source, a web form goal, and a sequence.
- Connect them together as shown in the following image and rename all elements for visual clarity:

- Double-click on the web form goal to edit its content.
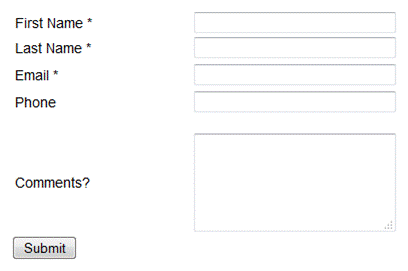
- Add the following four fields to the form:
- First Name
- Last Name
- Email
- Phone (can be left as optional)
The following screenshot shows these four fields:

- Create a custom Text Area field for inquiry comments.
- Add this custom field to the form using the Other snippet and leave as optional:
- Click on the Submit button to change the call to action.
- Change the Button Label button to Please Contact Me and select Center alignment; click on Save.
- Add a Title snippet above all the fields and provide some instruction for the visitor as follows:

- Click on the Thank-you Page tab at the top-left side of the page.
- Remove all elements and replace them with a single Title snippet with a confirmation message for the visitor:

- Click on the Draft button in the upper-right side of the page to change the form to Ready.
- Click on Back to Campaign in the upper-left side of the page and open the connected sequence.
- Drag out a new Task step. Connect and rename it appropriately:

- Double-click on the Task step and configure it accordingly. Don't forget to merge in any appropriate information or instructions for the end user:

- Click on the Draft button in the upper-right corner of the page to change the task to Ready.
- Click on Back to Sequence in the upper-left corner of the page.
- Click on the Draft button in the upper-right corner of the page to change the sequence to Ready.
- Click on Back to Campaign in the upper-left corner of the page and publish the campaign.
- Place the Contact Us form on our website.
How it works...
When a website visitor fills out the form, a task is created for someone to follow up with that visitor.
There's more...
For a better experience, add a request received e-mail in the post-form sequence to establish an inbox relationship. Be sure to respect their e-mail preferences as this kind of form submission isn't providing direct consent to be marketed to.
This recipe out-of-the-box creates a dead end after the form submission. It is recommended to drive traffic from the thank you page somewhere else to capitalize on visitor momentum because they are very engaged after submitting a form. For example, we could point people to follow us on a particular social network, an FAQ page on our site, or our blog.
We can merge any captured information onto the thank you page. Use this to create a personalized experience for your brand voice:

We can add/remove form fields based on our needs. Just remember that a Contact Us form is for general inquiries and should be kept simple to reduce conversion friction; the fewer fields the better.
If we want to segment inquiries based on their type, we can use a radio button to segment inquiry types without sacrificing a custom field because the form's radio buttons can be used within a decision node directly coming out of the form.
See Also
For a template similar to this recipe, download the Automate Contact Requests campaign from the Marketplace.
Building a lead magnet delivery
A lead magnet is exactly what it sounds like: it is something designed to attract new leads like a magnet. Offering some digital resource in exchange for contact information is a common example of a lead magnet.
A lead magnet can take many different forms, such as:
Unlock access to the largest independent learning library in Tech for FREE!
Get unlimited access to 7500+ expert-authored eBooks and video courses covering every tech area you can think of.
Renews at €14.99/month. Cancel anytime
- PDF
- E-book
- Slideshow
- Audio file
This is by no means an exhaustive list either. Automating the delivery and follow-up of a lead magnet is a simple and very powerful way to save time and get organized. This recipe shows how to build a mechanism for capturing interested leads, delivering an online lead magnet via e-mail, and following up with people who download it.
Getting ready
We need to have the lead magnet hosted somewhere publicly that is accessible via a URL and be editing a new campaign.
How to do it...
- Drag out a new traffic source, web form goal, link click goal, and two sequences.
- Connect them as shown in the following image and rename all elements for visual clarity:

- Create a campaign link and set it as the public download URL for the lead magnet.
- Double-click on the web form goal to edit its content.
- Design the form to include:
- A Title snippet with the lead magnet's name and a call to action
- A first name and e-mail field
- A call to action
The form should look as follows:

- Set a confirmation message driving the visitor to their e-mail on the thank you page:

- Mark the form as Ready, go Back to Campaign, and open the first sequence.
- Drag out a new Email step, connect, and rename it appropriately:

- Double-click on the Email step and write a simple delivery message. Make sure the download link(s) in the e-mail are using the campaign link. For best results, thank the person and tease some of the information contained in the lead magnet:

- Mark the e-mail as Ready and go Back to Sequence.
- Mark the Sequence as Ready to go Back to Campaign.
- Double-click on the link click goal.
- Check the download link within the e-mail and go Back to Campaign:

- Open the post-link click goal sequence.
- Drag out a Delay Timer, an Email step, and connect them accordingly.
- Configure the Delay Timer to wait 1 day then run in the morning and rename the Email step:

- Double-click on the Email step and write a simple download follow-up. Make sure it furthers the sales conversation, feels personal, and gives a clear next step:

- Mark the e-mail as Ready and go Back to Sequence.
- Mark the sequence as Ready and go Back to Campaign; publish the campaign.
- Place the lead magnet request form on our website.
- Promote this new offering across social media to drive some initial traffic.
How it works...
When a visitor fills out the lead magnet request form, Infusionsoft immediately sends them an e-mail with a download link for the lead magnet. Then, it waits until that person clicks on the download link. When this happens, Infusionsoft waits 1 day then sends a follow-up e-mail addressing the download behavior.
There's more...
If the lead magnet is less than 10 MB, we can upload it to Infusionsoft's file box and grab a hosted URL from there. If the lead magnet is more than 10 MB, use a cloud-based file-sharing service that offers public URLs such as Dropbox, Google Drive, or Box.
Leveraging a campaign link ensures updating the resource is easy; especially if the link is used in multiple places. We can also use a campaign merge field for the lead magnet title to ensure scalability and easy duplication of this campaign.
It is important the word Email is present in the form's Submit button. This primes them for inbox engagement and creates clear expectations for what will occur after they request the lead magnet.
The download follow-up should get a conversation going and feel really personal. This tactic can bubble up hot clients; people appreciate it when others pay attention to them. For a more personal experience, the lead magnet delivery e-mail(s) can come from the company and the follow-up can come directly from an individual.
Not everyone is going to download the lead magnet right away. Add extra reminder e-mails into the mix, one at three days and then one at a week, to ensure those who are genuinely interested don't slip through the cracks.
Add a second form on the backend that collects addresses to ship a physical copy if appropriate. This would work well for a physical print of an e-book, a burned CD of an audio file, or a DVD of video content. This builds your direct mail database and helps further segment those who are most engaged and trusting. We can also leverage a second form to collect other information like a phone number or e-mail subscription preferences.
Adding an image of the lead magnet to the page containing the request web form can boost conversions. Even if there is never a physical version, there are lots of tools out there to create a digital image of an e-book, CD, report, and more.
This recipe is using a web form. We can also leverage a formal landing page at the beginning if desired.
Although we can tag those who request the lead magnet, we don't have to because a Campaign Goal Completion report can show us all the people who have submitted the form. We would only need to tag them in instances where the goal completion needs to be universally searchable (for instance, doing an order search via a goal completion tag).
Summary
In this article, we learned how to make a Contact Us form. We also discussed one of the phases of Lifecycle Marketing (Attract) and learned how to build a lead magnet delivery.
Resources for Article:
Further resources on this subject:

 United States
 Great Britain
 India
India
 Germany
 France
 Canada
 Russia
 Spain
Spain
 Brazil
 Australia
 South Africa
 Thailand
 Ukraine
 Switzerland
 Slovakia
 Luxembourg
 Hungary
 Romania
 Denmark
 Ireland
 Estonia
 Belgium
 Italy
Italy
 Finland
 Cyprus
 Lithuania
 Latvia
 Malta
Malta
 Netherlands
 Portugal
 Slovenia
 Sweden
 Argentina
 Colombia
 Ecuador
 Indonesia
 Mexico
 New Zealand
 Norway
 South Korea
 Taiwan
 Turkey
 Czechia
 Austria
 Greece
 Isle of Man
 Bulgaria
 Japan
Japan
 Philippines
 Poland
 Singapore
 Egypt
Egypt
 Chile
Chile
 Malaysia


